tennantlim
Well-Known Member
Greetings fellow builders! I hope everyone is doing well amidst the COVID-19 conditions in your respective regions. Personally, I'm grateful to be residing in my home country Singapore where the situation is efficiently contained. Aside from abiding to regulations that require us to wear masks, follow contact tracing procedures and being subjected to travel restrictions, life has been slowly resuming to varying levels of normalcy albeit with reasonable adjustments.
Anyway, back to the subject at hand. Having built two PKD blasters in my custom Stealth Edition style, I feel like I've gathered sufficient knowledge and confidence to embark on a build of the prop in its canonical aesthetics. Ambitious. I know! In addition to inhaling the magnificent World Con photos by Karl T for references and inspiration, the various videos by asavage 's Tested that cover the PKD blaster in tremendous detail have been on regular replay. There is so much information about this prop to stitch together and I'm just grateful for those who readily share them for the collective good.
My build will be based on the 'as-issued' prop before it rusted to hell. Since it's impossible to lawfully acquire a Tomenosuke nor any metal kit here, I will once again look to Anders' 3D model that, in my humble opinion, is the best model out there. It is a fantastic base kit upon which one could add details and modifications to bring it ever so closer to accuracy. Coupled with the super clean resin prints produced by The Imperial Factory (they use industrial grade printers that are capable of producing large prints), I would wager I'm off to a decent start.
And so it begins...again...
I spent a considerable amount of time identifying areas on the Charter Arms Bulldog components that could be improved upon and that are absent in Anders' design.
HAMMER
A friend whipped up a 3D model of the hammer based on good profile images I found online. It wasn't too hard to figure out the dimensions and I think he absolutely nailed it. It's a shame most of the hammer will be obscured when it's installed.


I estimated the pivot point, drilled a hole and cut a steel rod for the pin.

The hammer was then cut to clear the Steyr receiver as was done on the real prop.

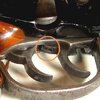
MAIN SPRING ASSEMBLY
The team that prints my resin kits was able to modify the grip frame to fit the mainspring seat.

I acquired a set of genuine Charter Arms Bulldog main spring, rod and seat that fit perfectly within the space.

Here's the complete assembly attached to the hammer in a preliminary test fit. Disclaimer: these are purely for aesthetics and will not actually function in tandem with the trigger and cylinder.

CYLINDER STUD HOLE
I noticed a hole immediately behind the main trigger pin in reference photos and learned that it was to house a cylinder stud.


This was easily replicated on the resin print.

CONNECTING TUBE
I found a steel tube that fits over the 3D printed part perfectly and the larger diameter actually looked even closer to the dimensions in the reference photos. I assure you it'll make sense when it's installed later.


The final piece of upgrade on the Bulldog is currently en route to me so more on that when it arrives.
Anyway, back to the subject at hand. Having built two PKD blasters in my custom Stealth Edition style, I feel like I've gathered sufficient knowledge and confidence to embark on a build of the prop in its canonical aesthetics. Ambitious. I know! In addition to inhaling the magnificent World Con photos by Karl T for references and inspiration, the various videos by asavage 's Tested that cover the PKD blaster in tremendous detail have been on regular replay. There is so much information about this prop to stitch together and I'm just grateful for those who readily share them for the collective good.
My build will be based on the 'as-issued' prop before it rusted to hell. Since it's impossible to lawfully acquire a Tomenosuke nor any metal kit here, I will once again look to Anders' 3D model that, in my humble opinion, is the best model out there. It is a fantastic base kit upon which one could add details and modifications to bring it ever so closer to accuracy. Coupled with the super clean resin prints produced by The Imperial Factory (they use industrial grade printers that are capable of producing large prints), I would wager I'm off to a decent start.
And so it begins...again...
I spent a considerable amount of time identifying areas on the Charter Arms Bulldog components that could be improved upon and that are absent in Anders' design.
HAMMER
A friend whipped up a 3D model of the hammer based on good profile images I found online. It wasn't too hard to figure out the dimensions and I think he absolutely nailed it. It's a shame most of the hammer will be obscured when it's installed.
I estimated the pivot point, drilled a hole and cut a steel rod for the pin.
The hammer was then cut to clear the Steyr receiver as was done on the real prop.
MAIN SPRING ASSEMBLY
The team that prints my resin kits was able to modify the grip frame to fit the mainspring seat.
I acquired a set of genuine Charter Arms Bulldog main spring, rod and seat that fit perfectly within the space.
Here's the complete assembly attached to the hammer in a preliminary test fit. Disclaimer: these are purely for aesthetics and will not actually function in tandem with the trigger and cylinder.
CYLINDER STUD HOLE
I noticed a hole immediately behind the main trigger pin in reference photos and learned that it was to house a cylinder stud.
This was easily replicated on the resin print.
CONNECTING TUBE
I found a steel tube that fits over the 3D printed part perfectly and the larger diameter actually looked even closer to the dimensions in the reference photos. I assure you it'll make sense when it's installed later.
The final piece of upgrade on the Bulldog is currently en route to me so more on that when it arrives.
Last edited:
")