Y-wing... Why Not... SS Y-wing Build by mjhenks.

Working on some piping last night.

I reminded myself last night that this is my first SS build and to give myself slack. this not going to be totally accurate and i need to find peace with that.


View attachment 1524143

View attachment 1524144
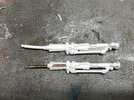
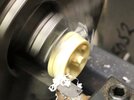
You have to remember that the rebel fighters were cobbled together from different parts. Whatever they could find. The same way ILM built the models. So unless you were trying to duplicate a particular Y-wing, I wouldn't sweat it. Yours is just one of the Y-wings that we didn't see on screen, ; )
 
Cobbled together. That is my focus for sure. Thank you for the encouragemeeou're

Cobbled together. That is my focus for sure. Thank you for the encouragement.
You're welcome. If any model is open to interpretation, it's this one. There is so much going on with all the greeblies/nurneys that you can kinda go crazy. I want a 2 times studio scale version myself, but have too many irons in the fire. Got a full size Lambo Diablo and Hummer replica to build, LoL. Not to mention all the studio scale stuff. Too many projects, not enough money, LOL.
 
Did some gun pod work last night. Replaced the resin gun barrels with .031" brass ones. (Man i would love to see how those barrels are made. ) Also turned down the gun pod to nest into another cylinder and made the gun saddle plate. (No pictures yet)
 

Attachments

  • Gun's 01.jpg
    Gun's 01.jpg
    2.3 MB · Views: 106
  • Gun's 02.jpg
    Gun's 02.jpg
    2.3 MB · Views: 121
  • Gun's 03.jpg
    Gun's 03.jpg
    1.2 MB · Views: 108
Bad news last night. My internal wiring is damaged. Bummer. Both the 3mm connector broke AND inside I lost continuity. Pretty sure I have to open the back of the ship back up.

What is used typically as a electrical disconnect on the model support shaft?

EB37351C-DAE2-4170-81B8-476A92806EE2.jpeg
 
Short update.

Got my last batch of greeblies which means paint is around the corner.

I am making a reproduction of one of the sealab parts in aluminum so that means some fun on the lathe. Will cut it in half and glue some rods under it.

Also found a magnetic 360 degree connector I hope will work for my power input. From a tattoo machine of all things. Coming from China so a few weeks away.

A032C3C0-6D6D-40EE-BEFC-21765742881E.jpeg
 
Milestone reached. Greeblies are done. Not 100% accurate by any means but I am satisfied.

Some images.

Final Sealab part I made.

0946A22D-1531-415F-A894-DC02C2255E56.jpeg


A few areas I scraped clean and started over like the top e rear. Things were off.

6F73F7BE-3CDD-421F-84E0-BF889B6F711D.jpeg


C6D62F89-B116-4CD2-8436-52B1AAC4C437.jpeg


Here are some done shots.

57AF67AE-AB8E-4B16-B20C-D5C082E87D99.jpeg


2CDBF757-971D-41EF-ABD6-669EA39CF2E0.jpeg


6A3A624B-FBCC-4D64-A8EB-2FFC07BBFCEF.jpeg


31E80B53-27AF-47E1-83FF-2CBFA9511FEF.jpeg
 
What techniques do you all use for chipping? Are you using paint to fake it or actually chipping the paint layers?

I think my next steps are to:
- Paint the yellow and blue.
- Painting varous parts that are not white.
- Strip the paint from the piping.
- Decals
- Damage application.

Appreciate any guidance on these as this is all new for me. I normally make my paint jobs "new" and this is where i think i will screw things up. I do not want to pay for a paint job though so i am in this to the end...
 
I use chipping fluid to mask my chips, paint base coat, then remove the chipping fluid. For super fine scratches I'll paint them topically.
 
I can't advise about the best colour choice as I have not researched the Y-Wing in much detail, however have you thought to spray a test panel first to see if you like how the paint goes down.

Really, I just wanted to say, Sensational build, and thank you for sharing your progress!
And best of luck with the painting.

Bjorn
 
The original colour was (surprise surprise) Reefer Yellow.

It's a fairly basic, pale neutral yellow. I'm just in the process of applying that colour to my own Ywings. It's a little paler than Insignia Yellow. If you're mixing your own, I'd say Insignia Yellow plus 10% white will get you close.

Alternatively, my comparison between Reefer Yellow and the decals of the Bandai kit show that the yellow markings provided are very close and if you try to match that, you'll be there. (Assuming you also have a Bandai kit)
 
Last edited:
Refer Yellow is what i have so looks like i am good. I will spray a test piece but my comparison is a computer screen and color print of someones picture. Neither of which are accurate i am sure.

Thank you.
 

Your message may be considered spam for the following reasons:

If you wish to reply despite these issues, check the box below before replying.
Be aware that malicious compliance may result in more severe penalties.
Back
Top