WIP - Arkham Knight model for Pepakura

Hi everyone, I'm Giulio from Italy. First of all my compliments to Bandiet for putting up this thread and all the awesome files, and thanks to the other people who are working so hard on this. Since it's my first post, let me introduce myself, sorry, I'll try to make it quick.
I started using Pepakura two years ago when I built a Deapoolized Iron Man; I built it with EVA foam sheets, it was quite fun.
Now I want to build the Arkham Knight, so I started working with the foam version of your files. I started with the chest plate, but due to its shape, lots of angles and so on, I decided to try a build with fiberglass. Ok, it's my first attempt with this technique, maybe it's not the best beginner's choice, but I love challenges. Here's the first questions: the links I find in the first post of this thread are related to the updated files?
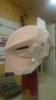
And now the rest. I am still learning how to handle (I mean it, literally) this kind of Pepakura file, so my cuts and bends are not perfect as the ones I see in your pics; well, it takes time, patience and practice. There are many small round pieces with tiny tiny tiny edges to bend, but I will replace them with actual metal screws, so I am leaving them out. RIght now I am working on the right gauntles, I am resizing all the pieces according to my actual size, and that's a luck because the gauntlet has so may small details and I am getting crazy on it. Maybe I will try to reduce the detail level in Pepakura; do you think it's a good idea? The small long stripes needed to create thickness to the piece are quite tricky sometimes.
I have been working on the shoulder pice and I had the same "convex-concave" problem; so basically I should just invert the folding lines, right? In the worst case I will make a mix of fiberglass for some pieces, and foam for other; eventually the painting will make everything plain.
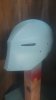
One last question (promise); is the helmet wearable "as is", or do I need to remove and attach a piece in order to put it on?
Well, thanks for reading and for the assistance. I am a bit ashamed to show you the pieces I have built until now, but well... that's it.

IMG_3488.JPGIMG_3489.JPGIMG_3496.JPG
 
Hello giulio and welcome, your progress pics look pretty good, from what you say your heading in the right direction there is a progress thread for my build in my siggniature below, I gave up on the gauntlet because of the amount of small peices and am having it 3d printed. Make sure you check the sizing for everything before you print, ive had to adjust almost everything to make it larger. I dont know about the helmet as I have ordered one from uratz studios (he can be found I the junkyard on here, the link is somewhere Iin my progress thread)
The small holes can easily be drilled in after you have hardened and glassed the piece.
No need to be ashamed of your work, we all start at the beginning and mnor mistakes during the pep stage can usually be fixed in the hardening and bondo stages
 
Oh and the best advice I can give is to takes breaks, not just every hour or so but it doesnt hurt to put it all to one side cor a day or so. Im currently taking a step back from it because ive spent every day for the last month doing various bits and now im burnt out and losing interest.
 
Hi Stigmorgan, thanks for your reply. I am following your thread, it looks interesting. I will probably recycle part of my airsoft gear for the suit, combat boots and other props. Actually the gauntlets are a pain in the ass, but I want to finish it before I decide what to do. I havent checked the foam version, who knows, maybe it's easier. I do have a friend who could print with a 3D printer some pieces for me (well, he 3D printed himself the extruder and most of the components of a 3D printer he designed), but I do not know what kind of file the printing software will accept. Did you print right from the .pdo?
At this first stage I am just practicing the cut, fold & paste part of the process and I'm adjusting the size of everything, so I will probably have to re-build some piece after the first fit-test. Well, I think even a Buddhist monk who draws sand Mandalas would lose his temper with some of these pieces :)

Hello giulio and welcome, your progress pics look pretty good, from what you say your heading in the right direction there is a progress thread for my build in my siggniature below, I gave up on the gauntlet because of the amount of small peices and am having it 3d printed. Make sure you check the sizing for everything before you print, ive had to adjust almost everything to make it larger. I dont know about the helmet as I have ordered one from uratz studios (he can be found I the junkyard on here, the link is somewhere Iin my progress thread)
The small holes can easily be drilled in after you have hardened and glassed the piece.
No need to be ashamed of your work, we all start at the beginning and mnor mistakes during the pep stage can usually be fixed in the hardening and bondo stages
 
Hi Stigmorgan, thanks for your reply. I am following your thread, it looks interesting. I will probably recycle part of my airsoft gear for the suit, combat boots and other props. Actually the gauntlets are a pain in the ass, but I want to finish it before I decide what to do. I havent checked the foam version, who knows, maybe it's easier. I do have a friend who could print with a 3D printer some pieces for me (well, he 3D printed himself the extruder and most of the components of a 3D printer he designed), but I do not know what kind of file the printing software will accept. Did you print right from the .pdo?
At this first stage I am just practicing the cut, fold & paste part of the process and I'm adjusting the size of everything, so I will probably have to re-build some piece after the first fit-test. Well, I think even a Buddhist monk who draws sand Mandalas would lose his temper with some of these pieces :)

foam versions are usually easier due to having less detail, the details are usually added with a soldering iron/burner afterwards.
the shin piece is a little awkward but not too bad, the shoulder bicep and hand plates are easy. i need to reprint my biceps and shins to make them bigger.
 
Hey there mr. Bandiets

Can i have a link please :))

P.s how do i attach the ears and the one below it (im an amateur :( )

Thanks and good job :)))
 
Hello Giulio...as Stigmorgan said and from your pictures it looks you are doing pretty good. And yes for God sakes listen to Stigmorgan take breaks don't be like me that spend 176 hours to be precise that was 16 hours a day for 11 days none stop save only to sleep until I finish all the parts. What can I say once I star something I won't stop until I finish, plus I was on a mini vacation from work and got a stash of redbull and newports. Lol!!

I personally gave up un the gaunlets they were a pain.. but the shin pieces where a complete nightmare they did not make any sense to me. They where pieces that I never figure it out how the work so i gave up on them....anyways Im doing kind of my own costume build with some other mix parts.

The helmet can be wear. But you don't have good vision using the stock openings for the eyes. As far as the size most likely you'll have to decrease the size unless you are large or bigger in size and make it smaller. It took me making the helmet 3 times to finally have it the size that I want it to be. Its a tricky helmet.

But keep it up the work. As you said is a learning process. For me this has been a true test of my Fu#& patience. Lol!!

During this week I will star the hardening process. I decide to go with Fiberglass resin on the outside follow by bondo and lots of sanding and use the Rondo Mix in the inside.
 
Last edited:
Hello Giulio...as Stigmorgan said and from your pictures it looks you are doing pretty good. And yes for God sakes listen to Stigmorgan take breaks don't be like me that spend 176 hours to be precise that was 16 hours a day for 11 days none stop save only to sleep until I finish all the parts. What can I say once I star something I won't stop until I finish, plus I was on a mini vacation from work and got a stash of redbull and newports. Lol!!

I personally gave up un the gaunlets they were a pain.. but the shin pieces where a complete nightmare they did not make any sense to me. They where pieces that I never figure it out how the work so i gave up on them....anyways Im doing kind of my own costume build with some other mix parts.

The helmet can be wear. But you don't have good vision using the stock openings for the eyes. As far as the size most likely you'll have to decrease the size unless you are large or bigger in size and make it smaller. It took me making the helmet 3 times to finally have it the size that I want it to be. Its a tricky helmet.

But keep it up the work. As you said is a learning process. For me this has been a true test of my Fu#& patience. Lol!!

This is my progress. During this week I will star the hardening process. I decide to go with Fiberflass resin on the outside follow by bondo and lots of sanding and use the Rondo Mix in the inside.
I would recommend at leasr 1 layer of fibreglass on the inside to give some strength to stop parts from snapping off. I tried to get away with not using the fibreglass before and dropped the peice, it broke on the hard floor :-(
 
Ohh crap sorry to hear that. I have never work with fiberglass all do I know the principle of it. I was gonna go the rondo way. Cause I help a friend make a stormtrooper helmet and we use same method of rondo...we migh went a little to far...that my friend that weights 175lbs step on top of the helmet and nothing happend.

Im also planning to do carbon fiber skinning at least to he helmet.

But now you got me thinking. What method you use for hardening the pieces?

Resin inside, resin outside, fibreglass inside then I gou over it and drill out any air bubbles and fil in with resin, then I sand the outside, I tend not to bother with the filler stage unless I really have to and just sand down the resin on the ouside.
 
Resin on its own is not strong enough even with a layer of fiberglass.

Try Rondo mix in the inside. You just prepare enough fiberglass resin m for the inside. Then do the same and prepare bondo with less hardener so it doesn't dry out quickly before mixing. You mix them both together. You wanna have a consistency like pancakes syrup and throw it in the inside and move it around so it spread evenly let it dry. You wanna do that 3 to 5 times or until you build the desire thickness. Use some tape around the opening of the helmet so you can give it more thickness on the bottom of the helmet and place it on top of wax paper so it doesn't glue to the table or floor etc...I did not have to deal with bubbles with Rondo.

Once it dry it will be strong as hell. Depending on how many times you did it...you can even step on it and it will hold up your complete weight that's how strong it becomes.
will bear that in mind for if i need to make something stronger thanks
 
Hi Bandiets
I got into props and pepakura a short while ago after seeing the first designs for the Arkham Knight. After a lot of research I found your designs in the facebook group Pepakura Library and it's the first paper model I've constructed. Can't wait for your revised 2.0 I think that will be my first fibreglassing.
I've been planning on making a full carbon fibre costume using a motocross under armour for support. I even looked into using sheet metal to make movable parts in the helmet and your designs just make it all possible.
Just wanted to say your time and effort is much appreciated. Hope I can do your designs justice and make some awesome props!
Thanks bud... I really appreciate the positive feedback. I honestly hope to have the version 2 helmet out soon... I just need to get some time to sit a finish it. Good luck with the build, please post some pics as yoi go along, would love to see them.
 
Bandiets, I stumbled across your Arkham knight helmet totally by accident looking for something else. It is one hell of a nice design you have put together and i can't thank you enough for putting it up. I ended up leaving off the jaw and ear detail from the pep and cut and shaped those out of acrylic. As you can see i really didn't get the accuracy spot on due to only going off reference pics for the finer details. The colours are also not accurate but i went with what i liked the look of.
Once again, thanks heaps Bandiets for your fantastic file!
DSC_0387.JPGDSC_0406.JPGDSC_0392.JPGDSC_0407.JPGIMG_0561.JPGIMG_0567.JPG
 

Attachments

  • DSC_0406.JPG
    DSC_0406.JPG
    1.4 MB · Views: 146
  • DSC_0394.JPG
    DSC_0394.JPG
    1.2 MB · Views: 157
Bandiets, I stumbled across your Arkham knight helmet totally by accident looking for something else. It is one hell of a nice design you have put together and i can't thank you enough for putting it up. I ended up leaving off the jaw and ear detail from the pep and cut and shaped those out of acrylic. As you can see i really didn't get the accuracy spot on due to only going off reference pics for the finer details. The colours are also not accurate but i went with what i liked the look of.
Once again, thanks heaps Bandiets for your fantastic file!
View attachment 490983View attachment 490990View attachment 490989View attachment 490986View attachment 490987View attachment 490988
Dude, accurate or not that is one seriously fine lookin lid.
 
Bandiets, I stumbled across your Arkham knight helmet totally by accident looking for something else. It is one hell of a nice design you have put together and i can't thank you enough for putting it up. I ended up leaving off the jaw and ear detail from the pep and cut and shaped those out of acrylic. As you can see i really didn't get the accuracy spot on due to only going off reference pics for the finer details. The colours are also not accurate but i went with what i liked the look of.
Once again, thanks heaps Bandiets for your fantastic file!
View attachment 490983View attachment 490990View attachment 490989View attachment 490986View attachment 490987View attachment 490988

That looks amazing! Hope I can get something near as good as that.
 
Bandiets, I stumbled across your Arkham knight helmet totally by accident looking for something else. It is one hell of a nice design you have put together and i can't thank you enough for putting it up. I ended up leaving off the jaw and ear detail from the pep and cut and shaped those out of acrylic. As you can see i really didn't get the accuracy spot on due to only going off reference pics for the finer details. The colours are also not accurate but i went with what i liked the look of.
Once again, thanks heaps Bandiets for your fantastic file!
View attachment 490983View attachment 490990View attachment 490989View attachment 490986View attachment 490987View attachment 490988
Hey bud... I've been following your work on the Pepakura facebook page, this is really one of the most awesome lids out there, well done.

Thanks for the compliment, I hope to see more of your work in future
 
Bandiets, I stumbled across your Arkham knight helmet totally by accident looking for something else. It is one hell of a nice design you have put together and i can't thank you enough for putting it up. I ended up leaving off the jaw and ear detail from the pep and cut and shaped those out of acrylic. As you can see i really didn't get the accuracy spot on due to only going off reference pics for the finer details. The colours are also not accurate but i went with what i liked the look of.
Once again, thanks heaps Bandiets for your fantastic file!
View attachment 490983View attachment 490990View attachment 490989View attachment 490986View attachment 490987View attachment 490988


This looks fantastic
 
This thread is more than 7 years old.

Your message may be considered spam for the following reasons:

  1. This thread hasn't been active in some time. A new post in this thread might not contribute constructively to this discussion after so long.
If you wish to reply despite these issues, check the box below before replying.
Be aware that malicious compliance may result in more severe penalties.
Back
Top