Vintage Praco VD Yoda Build

JGattonII

Member
RPF PREMIUM MEMBER
Although I recently/originally 'began' this build as a Mixed Media Replica, I am very blessed to have met up w/ individuals here on the RPF that have allowed me to pursue my goal of building a VD Yoda Lightsaber - but now with authentic/vintage parts!! There is absolutely no way I could have even gotten this far without their assistance, so without further ado a special THANK YOU! goes out to:
The Ninja (Praco C Flash)
sjanish (Cast Oil Pan & Grips)
victory201 (Lambo Wheel & Various Greeblies)

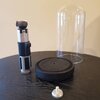
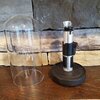
I will post more as the build progresses but wanted to get this started off with a couple of "before" pictures.
Praco.jpg


20210106_150155.jpg


And I'll also take a moment to recognize "the donor:"


Bolsey.jpg


Disclaimer: Some donors may be harmed during the making of this replica...
 
Nice to see everything coming together, enjoy the build the vintage Yoda VD saber is sweet little prop :D
 
Thanks everyone! I've made some progress which I thought I'd share. First up was cleaning my Praco & Bolsey endcaps. I followed the method Halliwax outlined in the Yoda VD lightsaber discussion thread and they turned out great! All black was removed w/ no observed damage to the metal underneath.

20210105_231049.jpg


Next, I proceeded with extracting the reflector stud from the Bolsey so that I could transfer it to the Praco. After filing the inside rivet w/ a halfmoon file for a couple of minutes (also a trick picked up from one of the build threads on here) the stud popped loose with ease. I was able to use the measurements from the Bolsey - along with reference images from ed-209's original masterpiece (via page 5 of the VD lightsaber discussion thread as well as the the Visual Dictionary drawing - to layout/drill various holes in the Praco (for the reflector stud, PEM nut stud, etc.). I meant to take lots of pictures of this part but I guess I was so focused on not messing anything up that I forgot to take any others than this one below!

20210105_214108.jpg


Once my nerves had a day or so to settle down, it was time to mount the PEM nut- & reflector studs. The PEM stud was a little tricky. Mounting it in the factory hole would've positioned the nut a good bit higher than reference images so I had to drill/tap a hole *just below* the factory one. I then cut off a few threads from a 4-40 brass screw I'd picked up from a local hardware store to create my PEM stud. I affixed the stud into the new hole, added a small drop of J-B Weld epoxy to keep it secured and attached my PEM nut to it. I then mounted my reflector stud into the hole I'd drilled previously. Another little dab of epoxy made this part a breeze.

20210106_111654.jpg


20210111_224952.jpg


Then, my focus shifted to transforming the flashgun's collar into the lightsaber's center band. I began by puttying-up the extra holes found on the "C" model and then laying out my cut lines. I used a combination of a Dremel cutoff wheel and pin files to get the fit I wanted...

20210108_100525.jpg

20210108_161721.jpg20210108_161324.jpg20210108_161956.jpg

...Which then allowed me to position & mount the oil pan/control box!
20210110_204904.jpg


As of this moment, the center band is still in primer but we're steadily-and-surely getting there...

20210111_193216.jpg
 
JGattonII, Nice progress photos! I think it will come out great!!!!
Go slowly...the Force is with you. --Ed
Wow! Thank you so very much, ed-209 . It's an honor to have your blessings upon this endeavor. With that said, here is the finished product!!

20210121_152941.jpg

20210121_152951.jpg

20210121_153000.jpg

20210121_153006.jpg

20210121_154158.jpg

20210121_154147.jpg


The Ninja - Seriously, thank you so very much for the opportunity to re-create this amazing piece using an authentic Praco base. I can only hope that my craftsmanship is found sufficient in the transformation of this little vintage camera flash into its full potential of an authentic VD Yoda Lightsaber!!!
 

Attachments

  • 20210121_153843.jpg
    20210121_153843.jpg
    31.2 KB · Views: 94
  • 20210121_153843.jpg
    20210121_153843.jpg
    31.2 KB · Views: 145
  • 20210121_154158.jpg
    20210121_154158.jpg
    84 KB · Views: 140
Wow! Thank you so very much, ed-209 . It's an honor to have your blessings upon this endeavor. With that said, here is the finished product!!

View attachment 1415074
View attachment 1415075
View attachment 1415076
View attachment 1415078
View attachment 1415081
View attachment 1415083

The Ninja - Seriously, thank you so very much for the opportunity to re-create this amazing piece using an authentic Praco base. I can only hope that my craftsmanship is found sufficient in the transformation of this little vintage camera flash into its full potential of an authentic VD Yoda Lightsaber!!!

Welcome buddy the build looks awesome you did an amazing job bring all the parts together, congrats (y)
 
Nicely done! The Force was strong with you!
I often look at replicas, like yours, and marvel how much it resembles the real one.
Good job, guys! I respect all your builds and I'm the one that's honored by your wanting to duplicate it.
Ed
 
Wicked job!! Came out great! Love the display case
Thank you very much, Halliwax! It was a really fun project for sure!

As for the display case, the glsss top was acquired from Hobby Lobby. I originally purchased a base from there too but I ended up opting for my own version using a 1" thick oak board from my shop. After drilling, routing and a quick sanding, I used a handheld torch to burn/char the wood, aka "Shou Sugi Ban" I believe. Although not technically required, I then applied a couple of coats of tung oil to seal the ash. The threaded knob piece that I used to secure the lightsaber to the base was originally from a Kalart flash. Perhaps one day I'll convert it to a rotating base, but it'll do for now. =)
 
This is awesome! I recently made a left handed one out of a bolsey (i approximated the oil pan but it looks like I'm not too far off!) and made my own lambo wheel from drawings I found around, and was working on making a praco version using aluminum tube.
I have a question though.. There's mention of a "reflector nut" What is this? where is it on the Bolsey?
Unfortunately, it is not included on the Bolsey. It is a slotted brass nut that was provided from factory on the Praco, but must be acquired from another source (either from a different flash of the same era or can be made). You can see it in pictures above just where the reflector attaches to the flash body.
 

Your message may be considered spam for the following reasons:

If you wish to reply despite these issues, check the box below before replying.
Be aware that malicious compliance may result in more severe penalties.
Back
Top