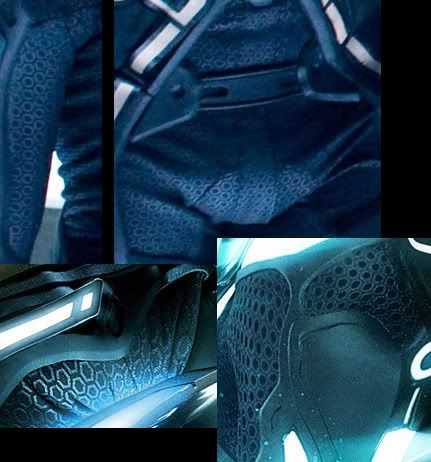
Tron Legacy Costume

They make a splitter cable that has 2, 3-pin connectors so it is possible to daisy-chain off of this one, 12V inverter (pic 3):

Designed for use with the iSS3.1. Can be used for wiring small sheets and tapes in series.

Finally a 3-pin to alligator clip connector allows me to connect directly to the EL sheet (pic 4):

This cable is designed to connect the iSS3.1 and iSS4.5 inverters with 3 pin output connectors with Custom Pattern sheets and cut lengths of EL tape. The gator clips can be used to make the connections quickly and easily.

They have copper tape as well. What I'm worried about is when I move around, will the alligator clips grind away at the metallic contact on the EL sheet? So if I wanted something less abrasive, I can go this route to connect the EL sheets (Pic 5):

Use this adhesive backed copper tape to easily make connections to the tabs on your Cut & Shape EL sheet. This .25 inch wide tape has a strong adhesive and can be quickly applied to the tabs on the back of a Cut & Shape sheet. Be careful not to overlap with an adjacent tab. And be sure when peeling off the tape backing to only expose just the amount you need to make a connection.

Thoughts, ideas? You expertise with the electrical component is greater than mine as is your scuba (you're talking to an open water diver).


so, you're wiring yours in series? if you refer to page 13 of this thread (i know, it's a looong thread), actordiver posted a link to this pdf:
http://www.lighttape.com/library/DesignGuide/Connecting_Multiple_Segments.pdf

basically for that brand/manufacturer they recommend wiring it in parallel otherwise it would add more resistance to the wiring going down the line. plus if one sheet goes out, it takes the whole thing with it. parallel basically means you wire each piece so they all have a direct connection to the battery. it won't take down the entire circuit path with one bad piece of wiring or e.l.

soulintertia:
good job with the progress :) i see that you have a leg pattern in progress for sam's outfit with el tape. have you figured out how to shape the other patterns -eg. angles on the leg and such that aren't manageable in a straight line tape? i imagine if you cut the angles and add more sheets each piece would need a parallel line to the battery?

the hex fabric looks good too. not a complaint/ criticism but just an observation that maybe the hex pattern could be adjusted to be a bit smaller?

i'm pretty much researching tools & possible materials at the moment -not planning to make an exact of any suit, just something of the tron legacy world.

a tron legacy pic for ideas:
yfrog Fullsize - qqj.jpg
 
Oh yeah, it can be cut pretty much any which way you like. You can even punch holes in it!

I'm using a commercial grade product which I bought second hand. Not sure which manufacturer. It was some pricey stuff but super strong and quality made! I have enough of it to possibly offer a couple kits. Check my thread for updates on that later. I'll post in the junkyard if I do decide to go that route.
Yeah, I've closely read your progress thread (which is amazing, btw). I'm considering the EL tape from Light Tape. I sent a few emails to them and they said it would be about $400 for a full costume and they offered custom cutting services (which I'm sure will cost an arm, leg, and kidney). A sample of 2" x 1' tape in white with a 9V DC power supply costs $40. I may get one to play with and see what I can do with it before investing in a full costume order.

Yeesh. This is by far the most complex costume I've ever considered... and I'm starting to seriously question my sanity. Haha!
 
have you figured out how to shape the other patterns -eg. angles on the leg and such that aren't manageable in a straight line tape?

This is where I am right now. I'm experimenting with cutting and reattaching the light tape. I've also had success with cutting angles and bending it to shape. I'll try to post some results this weekend!

not a complaint/ criticism but just an observation that maybe the hex pattern could be adjusted to be a bit smaller?

I've measured out the hex pattern using the reference shots below as well as some of the larger higher res billboard shots. I count about 20 hexagons from just below the shoulder to just inside the elbow joint. I took this measurement and scaled it with my own arm fitting about 20 hexagons per every 8 inches of length. I'm 5'9", so I feel this is pretty accurate when scaled with my own body size. Garrett Hedlund is 6'1", so if anything the hexagons could probably go even a little bit larger. Regardless. I'm happy with the scale as is.

undersuit.jpg
 
I'll give you the gist of what I started out with, and what I'm leaning towards. Firstly, inverter I was using is as follows (Pic 1):

Inverter for small/medium size sheet or tape with alligator clips for easy connections.
Takes 4 x AAA batteries or external DC(12VDC) input.

Can be used with a short tape (up to 6 feet, for best results not more than 3 feet) or a small custom pattern sheet (up to A5 size, for best results not more than 24 square inches).

The 24 square inches is what I've been keeping the individual designs down to. The issue of course is I have 24-26 individual patterns. So the work-around is to use one of the 12V inverters (Pic 2):

This 12VDC inverter is designed for battery power.
Compact size (approximately 2.1" x 3.1" x 1.1") and a 2pin connector makes this inverter ideal for tight spaces and difficult connections.
Use a 2pin>gator cable for easy connections to Custom Pattern sheet cutouts with areas A5 size or less or tapes up to 9 feet long.


They make a splitter cable that has 2, 3-pin connectors so it is possible to daisy-chain off of this one, 12V inverter (pic 3):

Designed for use with the iSS3.1. Can be used for wiring small sheets and tapes in series.

Finally a 3-pin to alligator clip connector allows me to connect directly to the EL sheet (pic 4):

This cable is designed to connect the iSS3.1 and iSS4.5 inverters with 3 pin output connectors with Custom Pattern sheets and cut lengths of EL tape. The gator clips can be used to make the connections quickly and easily.

They have copper tape as well. What I'm worried about is when I move around, will the alligator clips grind away at the metallic contact on the EL sheet? So if I wanted something less abrasive, I can go this route to connect the EL sheets (Pic 5):

Use this adhesive backed copper tape to easily make connections to the tabs on your Cut & Shape EL sheet. This .25 inch wide tape has a strong adhesive and can be quickly applied to the tabs on the back of a Cut & Shape sheet. Be careful not to overlap with an adjacent tab. And be sure when peeling off the tape backing to only expose just the amount you need to make a connection.

Thoughts, ideas? You expertise with the electrical component is greater than mine as is your scuba (you're talking to an open water diver).


Ok, this is what I would do. Add up the total square inches of the panels that you have purchased. 8x10 sheet 80 inches. dont bother subtracting the pieces you dont use (unless you take a big chunk out) cause that way you get an inverter that's a bit more than you need (so in case you add a little more tape or wire you can use the same inverter) It seems like the inverter might be a bit too weak. However if your 12v (bigger one) can handle say 250 square inches then use it.

as for the alligator clips, I agree that they will wear and tear, so the copper tape would be good to reinforce, BUT.... I think a better way to do it is solder directly to the panels in the spots you think the least amount of friction would occur. If the panels take a regular solder then score!! (if they do not, I can suggest a cold solder solution) its a little tricky so let me know if you can solder directly to the panels without melting the connection.

Once you have a nice little lead wire connected to the panels then run a main wire (heavier gage wire) to the inverter. All your cut out panels will run to the main wire and then be powered by the inverter and 1 battery pack. Not 96 batteries and 26 small inverters. If you look at the back of some of the production stills you can see a black "brick" rectangle pack. My guess is those are the inverters and batteries running the suits in the movie. See pics.
 
Annisse,
I've been lurking on here a while, and following with interest your costume's development and your upcoming experiment with the glow-in-the-dark paint/reflective tape. I'm itching to put this costume together before an early halloween party on the 22nd, so I was hoping you'd be getting in your paint shipment soon. Any idea when you'll be able to test that out?
Ross

Still waiting on my Glow paint. Will let you know. For those of you that have actually lite up your costumes, KUDOS looking good! I wish I had the money and guts to go thru all that but I want to slit my wrists thinking of all that work I would put into lighting up my costume then the entire thing breaking.

~A
 
Thank you so much!!! You've been a huge help! :D Do you mean heavy duty hooks as in.... I should venture to a hardware store? Or do they sell larger hook/eye kits at craft stores? I hardly ever use snaps, hooks, eyes, grommets...all that metal stuff... anything like that so I'm not to sure where the best place is to get what.

Thanks!!!

Yes just regular hook n eyes but the large metal ones from any craft sewing store like JoAnn's. Make sure not to make your Quorra chest armour not TOO tight fitting though if you are using craft foam for the build. After wearing mine 3 times already I am on my 4th run of having to make repairs to the side seams. I had to add extensions to wear the hooks are cuz it kept busting off me. HAHA I like it tight fitting but like I said, craft foam is not strong or durable to hold up thru all that stress of wearing it on your body and moving around alot.
 
I have not yet, but closed cell foam like this is what Yoga mats are made of.

EVA FOAM - is what Yoga mats are made out of and what I was thinking of using to completely re-do my Quorra armour but it would have a to be a thin gauge not too thick. Some ppl on this forum I see have used Eva Foam to make their Mass Effect armour, and looks really awesome. I am good actually right now with the felt I used for lining inside in my Quorra armour now actually. I am thinking foam will just be too thick for lining it. The trick is, finding the right glue and right now the only thing that is working is either Epoxy or Super Glue gel. Something that dries fast but not too fast so you can work with it. Me and the 99 cent store are best buds right now ;)

Yeah! I think the cat's out of the bag. We all know how expensive this EL tape is. By the way what kind of white paint Annisse will you be using?

I am using the Bright White Glow in the dark paint, it is the only white they had as I do not want to go with Aqua blue for Quorra.
 
Foam Mart near Burbank is a great place to start! tell them what you want - those guys know everything.

I will make some inquiries for you on the fabric printing, not really sure. It was likely fairly expensive to produce but you never know unless you ask.

Laser Cut Stencils can be ordered online - you need to provide the art usually. Custom Stencils, Stencils these guys offer custom laser cut graphic stencils starting at $35 but you would want a quote.

Thanks FXFAN about the Foam Mart tip, maybe I can find some EVA FOAM there, and the Laser Cut Stencils. If I can get the stencil made for the HEX print I will be a happy camper :p
 
I already have my deluxe identity disk, but has anyone found one other than blue? Like perhaps the clear (as it was pictured from entertainment earth)

or is everyone getting the blue one?
 
Soulinertia, looks like you are going all out. I can't wait to see how it turns out. I noticed in several of your pics you have a template-like print out. That is very cool. did you just take ref photo and photoshop or did you make it by hand? I'm at the point where all my materials are coming in the mail and I'm at that "woah, I'm actually attempting this, maybe I should have a plan" stage.
 
Thanks FXFAN about the Foam Mart tip, maybe I can find some EVA FOAM there, and the Laser Cut Stencils. If I can get the stencil made for the HEX print I will be a happy camper :p

Yep, I can vouch for foam mart..got a few stuff there for various projects. I will be going tommorow as a matte of fact.

Bought another ID disc and when my rare magnets come in I'm going to test it out on how well it sticks. There pretty strong, but, I may have to make one of those Disc rests on the back.
 
EVA FOAM - is what Yoga mats are made out of and what I was thinking of using to completely re-do my Quorra armour but it would have a to be a thin gauge not too thick. Some ppl on this forum I see have used Eva Foam to make their Mass Effect armour, and looks really awesome. I am good actually right now with the felt I used for lining inside in my Quorra armour now actually. I am thinking foam will just be too thick for lining it. The trick is, finding the right glue and right now the only thing that is working is either Epoxy or Super Glue gel. Something that dries fast but not too fast so you can work with it. Me and the 99 cent store are best buds right now ;)


I am using the Bright White Glow in the dark paint, it is the only white they had as I do not want to go with Aqua blue for Quorra.
Thanks Annisse to the reply. I finally got my paint. It's pretty awesome.
I had to order the oil based since the water based was out of stock. (RED COLOR ONLY) The paint itself in the bottle even glows after its exposed to light. I was very impressed. I'm going to test it tommorrow I'm out of time today. This paint looks so cool. The color you picked out should also be impressive. You'll also receive a free UV marker & a tiny UV flashlight for a key chain. There are no instructions. So you'll have to use the web site from www.riskreactor.com. Good Luck!:rolleyes
 
If you look at the back of some of the production stills you can see a black "brick" rectangle pack. My guess is those are the inverters and batteries running the suits in the movie. See pics.

I am fortunate that the BMX body armor has about 8 locations where I can hide power packs.

I am going with the 9V inverters because inch for inch they pack the power I would need.

My main issue would be creating a parallel circuit from the power backs to the EL designs. I know the principle/concept of parallel. Is it as simple as taking the two lead wires from the power pack, extending those wires with similar electrical wire, and splitting off wires from those two mains towards the individual designs, linking them up with the copper tape at the individual contacts (or soddering them)? What type of wire would you recommend?
 
Is it as simple as taking the two lead wires from the power pack, extending those wires with similar electrical wire, and splitting off wires from those two mains towards the individual designs, linking them up with the copper tape at the individual contacts (or soddering them)? What type of wire would you recommend?

Yes it is. Solder the wires together and you can use the same gauge or a little more. What I did with the shin guards was use a heavier 16 gauge speaker wire and separated the tip into 3 twisted parts and then soldered the bottom,middle and top sections to it. Used heat shrink tubing (cover each pos/neg connection, as well as the overall connection) to keep it secure and insulated and then glued it to the shin guard.
 
Thanks Annisse to the reply. I finally got my paint. It's pretty awesome.
I had to order the oil based since the water based was out of stock. (RED COLOR ONLY) The paint itself in the bottle even glows after its exposed to light. I was very impressed. I'm going to test it tommorrow I'm out of time today. This paint looks so cool. The color you picked out should also be impressive. You'll also receive a free UV marker & a tiny UV flashlight for a key chain. There are no instructions. So you'll have to use the web site from www.riskreactor.com. Good Luck!:rolleyes

Great! that is awesome to here you are impressed with your paint. I can't wait to get mine now to try it.

Good Luck with testing your glow paint and please let us know your results. I will have to wait until the following week to test mine, very busy next week but I will definately post here to let everyone know of my results.

~A
 
Yes it is. Solder the wires together and you can use the same gauge or a little more. What I did with the shin guards was use a heavier 16 gauge speaker wire and separated the tip into 3 twisted parts and then soldered the bottom,middle and top sections to it. Used heat shrink tubing (cover each pos/neg connection, as well as the overall connection) to keep it secure and insulated and then glued it to the shin guard.

I have some scrap EL sheet so I'll be testing the theory tonight. If this works like I hope it will, the two of you will have solved the power issue for me.

The costume looks cool enough without the lights so with every design that gets fused on it looks even better.
 
on several attempts I tried to order WHITE GLOW PAINT, which is pretty hard to find.
I had to cancel my order from 3 places because they were simply out of stock. Another place that I ordered from said WHITE GLOW PAINT and when I got it .. well it was simply regular greenish glow paint that looks white when it's not glowing.


I finally found a place that had some... it should be arriving today (USPS says "out for delivery")

I am impatiently waiting and I will post results AS SOON AS I GET TO OPEN THE PACKAGE.

I am really excited... and I hope I will not be disappointed. :confused :confused :confused what will happen?? stay tuned.
 
IS ANYONE GOING TO THE NEW YORK CITY HALLOWEEN PARADE IN TRON COSTUME??


it would be awesome if we can get the whole cast from the movie for a photo shot!!


reply if interested

(i will be quorra)
 
ok everyone i got my WHITE GLOW PAINT

which really glows green.. but in pictures comes up as white.

the glow factor is LOW (though i have not exposed it to a strong light yet.. I only had a dim lamp available atm]

here is a picture:
1071705.jpg


hope everyone can see it.. otherwise go to this link:
Imageshack - 1071705.jpg

PLEASE GIVE ME FEEDBACK

thank you!
 
Back
Top