Tron Legacy Costume

I just got my lamps from Cool neon!!! :D

I have a few questions: They say you can contour them, but I'm not sure how to do it... at all... XD Can anyone give me some simple instructions (like... for people who aren't familiar with EL tape)?
Also, if I cut them in half, can I light both halves? Or will I lose half the strip?

Thanks! :)


Hi glorwen

I'm not sure which panels you are referring to. There are two main types of EL panel:

TABBED/Cutable:thumbsup
ff5cdb5f.jpg

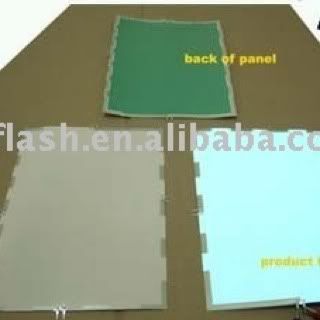
This type has tabs along the edge and as long as there are one of each tab (positive and minus) left for your connections you can cut any shape you want.

cf72d93d.jpg

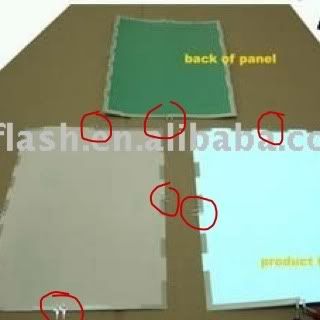
I've circled the contacts for better reference


BACKLIGHT:thumbsdown
0468b165.jpg

This type of panel has usually got it's connectors in place already and needs special sealing to keep moisture out. The main contact usually takes up most of the centre of the piece. The other one is the tiny line following the edge of the centre contact. Cutting through the little line can badly reduces the brightness of the panel but does work, just don't cut too much of the little contact line around the edge.

You can PM me if you want any mor help, tips or info as I love working with EL. I've recently started sourcing meterials to start on my Abraxas costume from Tron Evolution and intend to go all out with it. How much EL are you intending to use?
 
Given the curvature of the lines along the flap and that small box in the center it makes me think more of The Motion Picture's Admiral uniform:
admiralie4.jpg

Oh, I got the curve and trapezoid from C.L.U.'s costume.

And I'll be using the more stylized left chest light-strip anyway... And this will be a black leather jacket, with a velcro front opening instead of zipper... it will look like one piece though because the light strip will be over the velcro seam bit. Though there will be some fabric parts like the underarms and sides, and the back shoulders and such, so I can move freely, but to also make it more unique.

n6cr2v.jpg


I haven't been able to work on my helmet though for a bit now... But I'm still confident I can get it and this jacket done by halloween.
 
Y'know there is a way you could do that armour quite effectively.

If you can get thin (say, quarter inch) upholstery foam and layer it together, you can glue spandex down over the top and it'll form a very neat and tidy sort of quiltin effect which you can control very accurately in how you cut the foam.

I don't have an example of it to hand but I can probably knock one up.

HF
 
I just got my lamps from Cool neon!!! :D

I have a few questions: They say you can contour them, but I'm not sure how to do it... at all... XD Can anyone give me some simple instructions (like... for people who aren't familiar with EL tape)?
Also, if I cut them in half, can I light both halves? Or will I lose half the strip?

Thanks! :)

Woot! I also got mine from CN. they are awesome to work with. ;)
Did you asked them to solder both ends of the light tape for you? if not, then you have to put the connector on yourself. ;(

looking at the back side of the tape, you can cut the following the red line like this.
7773-cutting-light-ribbons-copy.jpg


this is the BACK of the tape. the electrical current is being carried on the left side of the connector, so if you have a connector on both ends, you will get two full stripes of EL tape ;)
 
Last edited:
Hi glorwen

I'm not sure which panels you are referring to.

I actually got tape.... but thatnk you so much for giving so much info on panels!!! :)

Woot! I also got mine from CN. they are awesome to work with. ;)
Did you asked them to solder both ends of the light tape for you? if not, then you have to put the connector on yourself. ;(

looking at the back side of the tape, you can cut the following the red line like this.
7773-cutting-light-ribbons-copy.jpg


this is the BACK of the tape. the electrical current is being carried on the left side of the connector, so if you have a connector on both ends, you will get two full stripes of EL tape ;)

They actually did it without me asking!! XD
Which is the left??? Aaaaaaaagggghhhhhh!!! Also, how many inverters/strips did you have? I originally bought 6 strips and one inverter (yeah, yeah, I already ordered another one...). One more thing: how did you connect all the strips together? I'm confused as to how I will get all the strips lit...

Thanks!!
glorwen

p.s.: I think there will be Quorra's en masse this year for halloween... I'm kinda excited. Nerd revolution is a go!!!
 
First off. Epic Annisse, the first and still very revolutionary. I'm tripped out over the end of line concept maiden.

Second
314826_257652754267426_100000681109325_881489_1901935376_n.jpg

(cane not part of cosplay)

Aside from the hands all the pieces are twice maybe three time the size of actual tron. And in truth this is actually a really cheap cosplay, because surface area for lights is not that much. The most expensive piece was the guess sleaveless hoodie (too expensive, but it was just so perfect for this cosplay). Aside from that, less than 80-100, not considering time.

I'm still waiting for more pics from my friends amazing camera (its just an actual camera over the crap ones my phone takes). And I got a pm from someone about my gloves, which I will show how. Plus I'm thinking of selling the gloves, because I need the money.

Still looking for anyone else who did the gloves, and I think I'm the only one thats powered. One other used glow stiks and tape, another used reflective.

my cane made it on the RPF XD
 
ok i need some help,
anyone have any good tips for making a disk mount or know where to get a good one for a relatively good price
and untill i can get Souls upgrade i need to know it there is a inexpensive way to light just he C-ring of a disk.
 
glorwen;1898697 said:
Which is the left??? Aaaaaaaagggghhhhhh!!!
- with the connector facing you, the LEFT edge is the side where the current is carried. If you followed my picture, you can see both left side (in relationship to either connector) travels the full length of the half-ribbons.
Also, how many inverters/strips did you have? I originally bought 6 strips and one inverter (yeah, yeah, I already ordered another one...).
– I originally got 6 stripes, and 3 big boy converters. Depends on what converters you get, you can adjust accordingly. Their driver power is measured in wire length (which sucks) but CN also listed that each inch of the 1” width ribbon = 1ft of wire. So my big boy driver would only support 2 full sized (1”W x 40”L) ribbon, or 4 (1/2”W X 40”L) Ribbon. I ended up using only 4 full size ribbons totally, some of them are cut in half as my picture. That means also 2-big boy drivers, 2-12v battery packs and used phat light wire w/ plug & play driver to make the circles. ONE TIP, DO NOT FOLD THE RIBBON, you will crack the strip that is carrying the current and damage the ribbon!!! So if you want to do the sleeve & leg’s angled lines, you will have to configured that in (each time you turn corner, you will need another stripe, another connector to the power supply).


One more thing: how did you connect all the strips together? I'm confused as to how I will get all the strips lit...
– there should be “ribbon side connectors”, they are the ones with the 4 pins. You insert that into the ribbon connector. And then you insert the little female end of the “ribbon side connector” into the Driver’s Male connector. Get your power connected to the driver and flip the On Switch! ☺


I purchased a few 4-way splitters (which allows 4-half ribbons to connect to the driver); 6” and 18” extenders (which helps add length to connectors on various parts of your body). When I get home tonight, I can look at my shopping list. I wanted to keep the cost down as much as possible, so I did extensive planning on the length and how much stuff I need + extras. I think I have extra extenders if you need some. I also ordered their Beginner’s kit, which comes with a soldering iron, samples of light wires, and all the heat sink tubes + a few hand held plug and play drivers (battery + drivers in a compact small case). It turned out to be an awesome idea, because I used those plug and plays to power my sword and small circles.
 
Last edited by a moderator:
ok i need some help,
anyone have any good tips for making a disk mount or know where to get a good one for a relatively good price
and untill i can get Souls upgrade i need to know it there is a inexpensive way to light just he C-ring of a disk.

Since I just recently finished reading through this monster thread I saw quite a few options. A lot of people have used Tupperware or other plastic bowls to make their mounts, I personally plan on using one of those disposable black plastic bowls with a few magnets since I happened to have a couple that fit the disk perfectly. I also saw a couple people using flanges from the plumbing department of Home Depot with good results.

The easiest one would probably be from here... Disc Holder Mount The base price is decent but gets a bit spendy if you add all of the options.

For lighting the C ring on a budget, you could just get a few pre wired LED's from eBay, I have used this seller with great results... Red, White items in Empat Manufacturing II store on eBay!

My first post on this amazing thread of information so hello everyone! Props to everyone who has been working on this stuff with great results!

Oh and I am not affiliated with any of the links I posted above or Home Depot. Just offering up some information that I have saved in my notes from reading through all of this!

-Dovi
 
For those of you going the el-tape route. I just learned the hard way, E-luminates el tape suuuuucks. Ordered a pile of el tape from them, got it today, and I can describe the tape in one word, DIM, the opposite of BRIGHT, even cheapie glowhut el tape on the same inverter, same power source is way brighter! Put them side by side, the glowhut tape was brilliant in comparison, unfortunately glowhut doesn't supply the lengths and widths I need. Returned the entire order. Going to do what I should of to begin with, going with luminous film for the el tape.
 
- with the connector facing you, the LEFT edge is the side where the current is carried. If you followed my picture, you can see both left side (in relationship to either connector) travels the full length of the half-ribbons.

– I originally got 6 stripes, and 3 big boy converters. Depends on what converters you get, you can adjust accordingly. Their driver power is measured in wire length (which sucks) but CN also listed that each inch of the 1” width ribbon = 1ft of wire. So my big boy driver would only support 2 full sized (1”W x 40”L) ribbon, or 4 (1/2”W X 40”L) Ribbon. I ended up using only 4 full size ribbons totally, some of them are cut in half as my picture. That means also 2-big boy drivers, 2-12v battery packs and used phat light wire w/ plug & play driver to make the circles. ONE TIP, DO NOT FOLD THE RIBBON, you will crack the strip that is carrying the current and damage the ribbon!!! So if you want to do the sleeve & leg’s angled lines, you will have to configured that in (each time you turn corner, you will need another stripe, another connector to the power supply).

– there should be “ribbon side connectors”, they are the ones with the 4 pins. You insert that into the ribbon connector. And then you insert the little female end of the “ribbon side connector” into the Driver’s Male connector. Get your power connected to the driver and flip the On Switch! ☺

I purchased a few 4-way splitters (which allows 4-half ribbons to connect to the driver); 6” and 18” extenders (which helps add length to connectors on various parts of your body). When I get home tonight, I can look at my shopping list. I wanted to keep the cost down as much as possible, so I did extensive planning on the length and how much stuff I need + extras. I think I have extra extenders if you need some. I also ordered their Beginner’s kit, which comes with a soldering iron, samples of light wires, and all the heat sink tubes + a few hand held plug and play drivers (battery + drivers in a compact small case). It turned out to be an awesome idea, because I used those plug and plays to power my sword and small circles.


So much info!!! :D

Do I cut through the little metal strip on the connector or should I try to cut around it?

I have a few wire-side connectors. Can I use those if I run out of the ones that come with the strips? I'm not really well-versed in anything involving EL... sorry!!
 
Last edited by a moderator:
OK! It's been a LONG while since I posted, but I've been working on my Quorra costume 5 minutes at a time and working full-time, and working some more on top of that! Just wondering if anyone has any experience with the cuttable EL panel as seen on GlowHut? http://glowhut.com/cuttable-a6-size-el-panel--back-ligh6.html

I have connected and soldered it, but it does not light up, and I don't know if it is 1) because it was raining the day it was delivered and the box may have gotten wet OR 2) if I cut it wrong, even though I thought I did it right. There were no instructions and I had to do the soldering myself, but I don't think I'm doing it right and coudn't test the panel out until it was connected! ha. The only thing I have left on my quorra costume is making the circles and the "|" on the chest/back area. I fear I may have ruined $44 dollars worth of EL panel trying to cut these out. Before I order more, I want to seek advice....thanks in advance!!

Also, someone mentioned phat light?? Where do I get that? I may try another method for the circles if I can't get my a6 lit up from GlowHut.

P.S. I LOVE the GlowHut products I've ordered so far - I've been very pleased with the brightness and durability, plus they have super-fast response time. I have been on a budget and I know there is nicer stuff out there, but if someone has limited funds like me, I highly recommend it. (Just trying to get this cuttable a6 sheet wiring figured out!
 
So much info!!! :D

Do I cut through the little metal strip on the connector or should I try to cut around it?

I have a few wire-side connectors. Can I use those if I run out of the ones that come with the strips? I'm not really well-versed in anything involving EL... sorry!!

I don't think any of us are well-versed going into this. Heck i am still finding out ways to do things better. here are some pictures you can see how i matched up the light tapes. This base image is used with permission and I've made alterations to it to fit my needs.
 
Last edited:
So much info!!! :D

Do I cut through the little metal strip on the connector or should I try to cut around it?

I have a few wire-side connectors. Can I use those if I run out of the ones that come with the strips? I'm not really well-versed in anything involving EL... sorry!!

NOOOOOO DO NOT cut through the metal strip on the connector !! just follow the red lines on my drawing. ;)

wire side connectors can't plug into the connecter that's located on the light tape ends. you should have enough with the 4 pins.
 
Last edited:
ok i need some help,
anyone have any good tips for making a disk mount or know where to get a good one for a relatively good price
and untill i can get Souls upgrade i need to know it there is a inexpensive way to light just he C-ring of a disk.

I used a Chinese take out quart sized container. ;) and wrapped it with black fabric. it works pretty well, and fits the disc perfectly. - cost $0!

I also cut slits into it, thread ribbons through to make it into a harness. see below. of course, I used black ribbons for the final ensemble.

7473-p8270573.jpg
 
Last edited:
Thanks for all the great and most helpful info! I feel like I'm finally on the homestretch, just a few more things to figure out!
 
super amazing! I have to get going on my tron based jacket! COol thing is the distributor for the EL in the films is actually here in addison where i Live! =D
 
Back
Top