You are using an out of date browser. It may not display this or other websites correctly.
You should upgrade or use an alternative browser.
You should upgrade or use an alternative browser.
Tom's Real Parts Obi Wan Saber
- Thread starter thd9791
- Start date
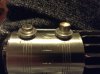
Actually that's a flash hider ring. The flash hider is what's stopping them from going all the way in@thd9791 ... looks really great ... so perhaps you could file that piece of pipe a bit so on 1 side you can screw your transistor and on the other side it's non-apparent?
Chaim
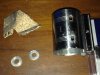
Solved it! I JB welded the washers to the clamp. Then I fed long legged op amps through and pinched them in the clamp. Surprisingly it worked like a charm! My idea was that the original washers on the prop were able to come off, but the transistors stayed....because they were physically attached. Romans washers go under but the real ones didn't we assume. I have another stock of op amps coming to me ")
- - - Updated - - -
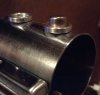
Here is a comparison with a regular transistor.
- - - Updated - - -
Here is a comparison with a regular transistor.
Attachments
Last edited:
I have an update:
The pictures speak for themselves- but I refinished a new addition to my collection. I’ve already used vinegar, WD 40 and sanding sponges to get the rust and free paint off...

First came cleaning and drying

Then a coat of Perma Blue for steel

Then water and drying


Then repeat


A 3rd round gets it to where I like it.
And then a wipe down of barricade oil! (Did it for all my steel parts while I had it out)

Then under my kitchen lighting, this is where I’m at - not bad at all I did try the super blue on the neck lower, just to give it some weathering!


The pictures speak for themselves- but I refinished a new addition to my collection. I’ve already used vinegar, WD 40 and sanding sponges to get the rust and free paint off...
First came cleaning and drying
Then a coat of Perma Blue for steel
Then water and drying
Then repeat
A 3rd round gets it to where I like it.
And then a wipe down of barricade oil! (Did it for all my steel parts while I had it out)
Then under my kitchen lighting, this is where I’m at - not bad at all
I did try the super blue on the neck lower, just to give it some weathering!russellsch
Master Member
Man that's beautiful!
Out freaking standing Tom!! Love how the finish came out!
I recently have been fooling around with resistors
Though I believe your route is how they were attached in the film. I drilled out the resistor and sanded down a 6-32 brass screw, then epoxied the screw inside the resistor..

It wasn’t very fun at all...
I recently have been fooling around with resistors
Though I believe your route is how they were attached in the film. I drilled out the resistor and sanded down a 6-32 brass screw, then epoxied the screw inside the resistor..
It wasn’t very fun at all...
Nice!!! I did this with a solid Roman's spacer (the ones with tapped holes for his transistors) its CERAMIC in there, I set multiple things on fire and dulled a few drill bits in the process. I also ended up glueing it in crooked, Yours looks very professional.
Nice!!! I did this with a solid Roman's spacer (the ones with tapped holes for his transistors) its CERAMIC in there, I set multiple things on fire and dulled a few drill bits in the process. I also ended up glueing it in crooked, Yours looks very professional.
The ceramic was very hard to drill, I ended up using a tile cutting bit..
Fun fun fun lol
Halliwax IS a professional, although he doesn't know the difference between a resistor and a transistorNice!!! I did this with a solid Roman's spacer (the ones with tapped holes for his transistors) its CERAMIC in there, I set multiple things on fire and dulled a few drill bits in the process. I also ended up glueing it in crooked, Yours looks very professional.
sorry mate, couldn't resist
Halliwax IS a professional, although he doesn't know the difference between a resistor and a transistor
sorry mate, couldn't resist
I’m far from a professional, before I drilled these I threw on my safety glasses, mask and rubber gloves
There is a factory across the harbor who use to build “transistors” and they dumped PCBs into the harbor/river for years. The last 8 years we have been cleaning the PCBs up
So I learned “transistors have PCBs in them”
Drilling these vintage resistors/transistors/capacitors what ever they are, I was afraid of PCB goop coming out
Luckily there was nothing but ceramic inside
actually
those are operational amplifiers. i dont know what that really means, but they have the short can and like 8 leads
Learned something new today!
I took a picture the other day of my saber with its guts exposed!
View attachment 1053018
Wicked man!
matty matt
Sr Member
That is killer.
russellsch
Master Member
I feel a little naughty looking at it with it's pants off
Similar threads
- Replies
- 94
- Views
- 11,131
- Replies
- 2
- Views
- 1,647
- Replies
- 13
- Views
- 532
- Replies
- 63
- Views
- 5,557