Tomorrowland

Hey Erick yes I did,
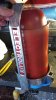
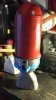
I first had them milled down so they were thinner, and then used self tapping screws to mount them to the bottom, let me know if you need a picture of the bottom, here is a picture of the milled down Extinguisher tops, I also got a good hole saw drill bit and drilled out the center, or you could just screw the Nozzles to the flat part of the extinguisher top if it is flat enough.
15 copy.jpg
I bought PVC pipe today and started the Pieces on the top, I heated and bent some 1" PVC and then filled it. I'll sand it tomorrow and if it looks good I'll do the other side.
Pack top 1.JPG
 
Made some progress on my pack today! Pretty happy with how the extingushers turned out considering they're pac, a bowl, and some aluminum stripping.

jetpack.jpg

So it's coming along... more to do tomorrow! I purchased a cookie sheet to mount everything to, seems that seems like something Frank would have used.

- - - Updated - - -

I showed this to a guy at Home Depot today... he said Lawn Mower Mufflers!

Lets try it a again,

It is the 2 cylinders that come out of each electrolux top

View attachment 488714
 

Attachments

  • 20150613_161403.jpg
    20150613_161403.jpg
    1 MB · Views: 74
  • 20150613_195150.jpg
    20150613_195150.jpg
    1.3 MB · Views: 73
Frankwalker, do you have any info on the bowls you used.

those look pretty good.


Made some progress on my pack today! Pretty happy with how the extingushers turned out considering they're pac, a bowl, and some aluminum stripping.

View attachment 489190

So it's coming along... more to do tomorrow! I purchased a cookie sheet to mount everything to, seems that seems like something Frank would have used.

- - - Updated - - -

I showed this to a guy at Home Depot today... he said Lawn Mower Mufflers!
 
Frank: Looks great, glad the bowl idea worked out! Have to look at some old briggs and stratton lawn mower mufflers then, might be a lead.

Blastmaster: Thanks for the inf on mounting them. Wasn't sure how tough the metal is on the those handles so I didn't want to try anything yet. If you have a pic of how they are mounted to the vacuum I'd appreciate it.
Did you cut the top screw threads off the top of the extinguishers? Left mine on for now but it seems a bit high when I test mounted the vacuum top to it.

I'll get some photos of my progress and post later or tomorrow.

Thanks!
Erick
 
The bowls came from Target. They're in the kitchen section, obviously, and we're on an end cap. They're a set of three nesting plastic bowls. They were on clearance for 2 dollars a set, and then I used the middle bowl.
 
Frank: Looks great, glad the bowl idea worked out! Have to look at some old briggs and stratton lawn mower mufflers then, might be a lead.

Blastmaster: Thanks for the inf on mounting them. Wasn't sure how tough the metal is on the those handles so I didn't want to try anything yet. If you have a pic of how they are mounted to the vacuum I'd appreciate it.
Did you cut the top screw threads off the top of the extinguishers? Left mine on for now but it seems a bit high when I test mounted the vacuum top to it.

I'll get some photos of my progress and post later or tomorrow.

Thanks!
Erick
Oh yea for sure cut the top threads off the extinguishers!!
3.JPG
 
Yep, plastic bowls look great. I've combined PVC pipe and fittings with other random plastic "stuff" in several builds. It's easy to glue together, fills, and sands so that it looks like one piece. Good job with your extinguishers.
image.jpg


This is shot of my Fallout AER-9. The "microfusion cell" and the mounts on either side are (left to right):
PVC ring from a sink P-trap, the yellow cell is a PVC pipe cap glued to a short piece of 2" PVC pipe, the threaded piece is the female end of a swimming pool hose. And the tapered mount that it "plugs" into is a plastic shower head that was smoothed to fit with filler. I'm like a kid in a candy store in the plumbing section of Home Depot.
 
Handles are coming together, I got the correct pressure gauge as well. I found vintage Schwinn stingray brakes and an old set of stingray handlebars. I new the grips for from the stingray, so I like the idea of young Frank cutting up his bike for parts.

I will dirty them up and attach the cables, gauge, tape, swivels and 2nd hinged pipe.

IMG_2946.jpg
 
Last edited:
Are there any photos out there of of the other side of the pack showing the bracket to mount everything on and the harness?

Erick

Hi Eric,
Here are pics of the underside,
IMG_2953.JPGIMG_2954.JPG

- - - Updated - - -

I started with the those crazy curved pipes and the Solenoids (well I call them solenoids) coming off the top, Here is the left one I made before painting!! Still a few detail pieces to go on but the body of it is close to finished!!
IMG_2956.JPGIMG_2957.JPG
 
you guys are doing great, based on the caps with the kid building the jetpack, you can build a vector line outline of the carb gasket used behind the horn ring center and find out what carb it is by the gasket. the you will know what the item is that they are referencing back there.
 
Blastmaster, thank for the pic of the handle attachment. That's pretty much how I was going to mount mine as well.

Here's my collection of parts so far and some progress.

Jetpack1.jpg

The jet nozzles are also now painted and I have the electrolux name plates mocked up and about ready for mounting. Just have to finish drilling the holes in the extinguisher handles and mount that. Then everything should start to come together and look like some progress!

Erick
 
Blastmaster, thank for the pic of the handle attachment. That's pretty much how I was going to mount mine as well.

Here's my collection of parts so far and some progress.

View attachment 489610

The jet nozzles are also now painted and I have the electrolux name plates mocked up and about ready for mounting. Just have to finish drilling the holes in the extinguisher handles and mount that. Then everything should start to come together and look like some progress!

Erick
Awesome Eric!!!!
 
you guys are doing great, based on the caps with the kid building the jetpack, you can build a vector line outline of the carb gasket used behind the horn ring center and find out what carb it is by the gasket. the you will know what the item is that they are referencing back there.

Thanks for that Idea, I am having it 3D printed then I'll mold it and offer it for every one, the 3D printers have my Horn button for size reference!
They are going to round the top edge a bit...
Base copy.jpg
 
Any thoughts on whether or not the back cushion is a custom job? Or based on a military item?

Probably a custom job but I'd say it's based on a seat back or bottom. Would make sense as a "found" part around the house, plus it would be a sturdy frame and cushioned.
Only other idea might be an old parachute pack since it would have the buckles on it already.
Maybe the seat cushion from the pack like this http://www.ebay.com/itm/WW2-A-N-Par...446?pt=LH_DefaultDomain_0&hash=item2a529f4a86


Erick
 
Last edited:

Your message may be considered spam for the following reasons:

If you wish to reply despite these issues, check the box below before replying.
Be aware that malicious compliance may result in more severe penalties.
Back
Top