You are using an out of date browser. It may not display this or other websites correctly.
You should upgrade or use an alternative browser.
You should upgrade or use an alternative browser.
Tomenosuke blaster assembly kit tips and tricks, help the new builders
- Thread starter eethan
- Start date
ahhhh lol!
Honestly just rebuilding it. The multitude of different screws have my right brained mind baffled lol
yngdth
New Member
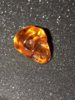
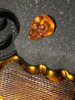
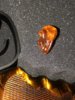
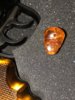
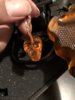
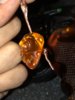
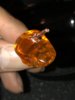
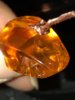
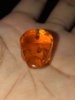
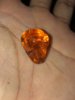
Got me an Amber skull Ojime (bead) from Japan with a mosquito in it. I got it to hang from the Blaster as a an ornament. Although I had to drill through it to make holes, which I wish it was made with because I am no professional with tools, but thank God I got a steady hand. I’m currently destroying my fingers twisting up some copper wire for the Ojime to hang from. Will update when finished but here is some before and after drilling, my small but painful progress with the wire (the knot was the worst, I was trying for a diamond knot but I’m sure I failed lol), and close ups of the ‘Squitor.
Edit: last 2 pics gave the Ojime a quick polish with olive oil before tying it all together
Edit: last 2 pics gave the Ojime a quick polish with olive oil before tying it all together
Attachments
-
 2673F8EC-83E1-4CAE-A967-492DCD8900CA.jpeg2.5 MB · Views: 185
 -
 1FBD4794-8081-4427-835A-88142C0457D4.jpeg2.6 MB · Views: 190
 -
 92E5BCD4-800D-40A4-843D-4B34E0A2BC08.jpeg2.6 MB · Views: 198
 -
 33E79FA8-4AB8-4511-B749-4504C83F2001.jpeg1.6 MB · Views: 165
 -
 2D3E4A39-2791-4245-BDDD-039D7DE86199.jpeg2.4 MB · Views: 169
 -
 0AE8C5B1-23BB-456C-A77B-6618AA059D4E.jpeg1.3 MB · Views: 170
 -
 9BA27D85-148C-468F-85F0-1418B8ECAF3F.jpeg913.5 KB · Views: 173
 -
 89E401E4-D3A9-40D3-9E14-4879B3AF1037.jpeg965.5 KB · Views: 170
 -
 B8C6ED51-8D77-4F3D-8367-8506D40616EC.jpeg689.8 KB · Views: 172
 -
 CE3BAF37-EDCE-4E96-9707-89343F3963FA.jpeg811.8 KB · Views: 178
 -
 F6A2CC93-33D4-46C0-96EC-5547FD04FAA6.jpeg906.6 KB · Views: 192
 -
 8E3CA535-E55E-42FA-A378-8C37C02A18F6.jpeg532.7 KB · Views: 169
 -
 7E7C44BB-8438-41B8-B1BA-317FC96BD8FF.jpeg697.8 KB · Views: 164
Last edited:
yngdth
New Member
Honestly just rebuilding it. The multitude of different screws have my right brained mind baffled lol
Dammmet if I was around I’d help bud. I know the instructions aren’t the best for English speakers but the pictures are important, they show more than what’s said if you really pay attention. They are accurate just kinda difficult to understand and you should be able to match the screws up by comparing the pictures in the steps to the contexts.
yngdth
New Member
“Enhance”


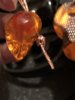
Even works with holster or back brace! I recommend tying it to the same side as your dominant hand so it will holster and hang properly.

Below the skull I tried a diamond knot. Above the skull was an ugly normal knot so I cover it with a strip of leather, normal knot. A hangman’s noose to secure it to the Blaster. And the copper is just from an old wire I stripped, I cut off about a foot and carefully divided the lot of wire in half and twisted the half’s individually and then twisted them together. Most of it turned into to practice and redo material and then I only ended up only using the 2 strands for securing the skull and then I cut off the remainder of 1 strand because it would’ve been too thick and stiff to hang like string.
Even works with holster or back brace! I recommend tying it to the same side as your dominant hand so it will holster and hang properly.
Below the skull I tried a diamond knot. Above the skull was an ugly normal knot so I cover it with a strip of leather, normal knot. A hangman’s noose to secure it to the Blaster. And the copper is just from an old wire I stripped, I cut off about a foot and carefully divided the lot of wire in half and twisted the half’s individually and then twisted them together. Most of it turned into to practice and redo material and then I only ended up only using the 2 strands for securing the skull and then I cut off the remainder of 1 strand because it would’ve been too thick and stiff to hang like string.
Here's a step by step buildup tutorial that I just made:
Helix6187
Well-Known Member
After reading again this whole subject, I can't find an answer to my problem and my google-fu was not strong enough I guess.
My cylinder rotate on a irregular basis, I disassembled the whole trigger group for being sure everything wasfine and it's the case.
Cylinder removed I can see the latch operating as it should.
My cylinder was painted since I removed the security washer, is it possible that there is some friction somewhere like to the steyr cover that might jam the cylinder ?
After reading again this whole subject, I can't find an answer to my problem and my google-fu was not strong enough I guess.
My cylinder rotate on a irregular basis, I disassembled the whole trigger group for being sure everything wasfine and it's the case.
Cylinder removed I can see the latch operating as it should.
My cylinder was painted since I removed the security washer, is it possible that there is some friction somewhere like to the steyr cover that might jam the cylinder ?
When I had mine I found that pulling the trigger needed to be a definite action, a solid pull, to make the cylinder rotate
Helix6187
Well-Known Member
When I had mine I found that pulling the trigger needed to be a definite action, a solid pull, to make the cylinder rotate
Unfortunatly this trick don't work, I think I'm good for a complete disassembly again
 .
.Unfortunatly this trick don't work, I think I'm good for a complete disassembly again
This seems to be a relatively common problem whenever the blaster is modified. Same thing happened to me.
I emailed Tomen and just asked for the relevant replacement parts. Mune was happy to send as long as I paid for the shipping. Problem solved.
I forget the part numbers but I think I posted them somewhere in this thread. In any case it should be obvious which 3 or 4 you need when you look at the diagram.
kareembadr
New Member
It is crazy how well buffing the plastic Bulldog makes it match the other weathered parts. I tried it and it worked like a charm. Now I have to darken the receiver.
Was this using the mothers mag and aluminum polish, or was there another step before that? What did you buff it with? I'm looking to weather the plastic parts on mine to make them look more metallic (after I replace the barrel and blue the receiver)
for the bulldog frame, it was only the mother and mag polish. the plastic is already super smooth.Was this using the mothers mag and aluminum polish, or was there another step before that? What did you buff it with? I'm looking to weather the plastic parts on mine to make them look more metallic (after I replace the barrel and blue the receiver)
However, I did sand all the casting circles that are visible on the frame, something very few people do despite the fact that this is clearly not present on the real blaster. On of the tells of the Tomens.
cheers
kareembadr
New Member
Has anyone had trouble with the replacement steel barrel? I cut and filed down the plastic barrel and metal and there's about a 1-2mm gap between the barrel and the revolver frame. Trying to figure out how to rectify this. Everything else is such a tight fit so it really needs to be snug to work properly.
kareembadr
New Member
Mine is flush, maybe you removed too much material from the frame.
A pics would help us to see the problem.
I think there must have been material left in the cavity that I didn't see. The barrel is a really tight fit (so much so that I'm going to need to hit it with wd-40 to attempt to pry it out.) I'm worried I really messed this up somehow.
Helix6187
Well-Known Member
Maybe there was some kind of deburingg to do on your barrel before installing it.
I manually sanded my barrels to insure everything went smooth.
Maybe plastic is to blame here too, because the edge of the frame is not really clean. You can see some left over shavings.
WD-40 or gun oil could help indeed.
I manually sanded my barrels to insure everything went smooth.
Maybe plastic is to blame here too, because the edge of the frame is not really clean. You can see some left over shavings.
WD-40 or gun oil could help indeed.
kareembadr
New Member
Thanks for the guidance!
I was able to pry the barrel off with some leverage using a screw driver, and cleaned up the edge with a metal file. Can't recommend using one of those highly enough. Seems to have worked pretty well, though it's still a tight fit so I'm going to hit it with wd-40 before fitting the barrel in.
Incidentally, the metal file seems to do a decent job of weathering the plastic, so I may try to mark up the cylinder a bit as a finishing touch.
kareembadr
New Member
Not sure if this will be helpful for anyone, but I noticed that my cylinder was sticking a bit when I pulled the trigger. I realized that I had tightened the screw that keeps the right panel on a little too tightly. The one just to the right of the trigger, left of the receiver arm. When I loosened it, the trigger pulled easily and cylinder turned smoothly again.
Currently waiting on my perma blue and renaissance wax so I can strip the paint of the receiver and blue it and the steel barrel. Has anyone had success with using steel wool? Seems to be more people who have sworn it off than not. Also, perma-blue bath vs swabbing...which is better for a total novice?
Currently waiting on my perma blue and renaissance wax so I can strip the paint of the receiver and blue it and the steel barrel. Has anyone had success with using steel wool? Seems to be more people who have sworn it off than not. Also, perma-blue bath vs swabbing...which is better for a total novice?
Similar threads
- Replies
- 4
- Views
- 751
- Replies
- 4
- Views
- 1,163