You are using an out of date browser. It may not display this or other websites correctly.
You should upgrade or use an alternative browser.
You should upgrade or use an alternative browser.
Thorssoli's Ironman MkIII Build - Finished Suit Pics Page 26!!
- Thread starter thorssoli
- Start date
Nessy
Active Member
Re: Just What This Forum Needs: Another Ironman Build
My day got a lot better after reading that. The molds look great and I am really looking forward to seeing the castings as they come out.
Can anyone make out what the writing in the 'mouth' of the helmet says?
I have been pretty busy, but I'm about to pour a lot more time and resources into this build. Things are about to get much more interesting.
My day got a lot better after reading that. The molds look great and I am really looking forward to seeing the castings as they come out.
Can anyone make out what the writing in the 'mouth' of the helmet says?
MTCOOLJ
Active Member
Re: Just What This Forum Needs: Another Ironman Build
Wow Thorssoli, I read through the entire thread this morning and you're work is amazing!! I envy you and your 3d printer, and I find myself coming back to your thread build to read any updates posted. Keep up the amazing work my friend, I cannot wait to see it completed
Wow Thorssoli, I read through the entire thread this morning and you're work is amazing!! I envy you and your 3d printer, and I find myself coming back to your thread build to read any updates posted. Keep up the amazing work my friend, I cannot wait to see it completed
Re: Just What This Forum Needs: Another Ironman Build
Thank you all for the kind words. Comments and compliments help fuel the motivator and now that it's crunch time I need all the help I can get.
Most of my pictures are clickable. They'll take you to larger versions on Flickr if you click them.
Today I made significant progress on arm parts. Here I am trying on the first pair of forearms:

Here's the first bicep casting:

It's snug:

Here's the first full set of arm parts laid out on the bench:

And the first pair after I'd started prep work:

I blocked up the inner shoulder parts and prepped them for molding:

Then I poured the print coat:

I also laid out all of the spine protector plates and didn't think to take any pics until after I'd poured the rubber:

And trimmed up the abdomen plated and test fit it against the waist prototype:

Lots of work to do today. I'll be blocking up the chest and back pieces and hopefully get a print coat poured on both of them. I'm also hoping to split the waist section and pelvis and get them ready to to mold. Stay tuned...
Thank you all for the kind words. Comments and compliments help fuel the motivator and now that it's crunch time I need all the help I can get.
Can anyone make out what the writing in the 'mouth' of the helmet says?
Most of my pictures are clickable. They'll take you to larger versions on Flickr if you click them.
Today I made significant progress on arm parts. Here I am trying on the first pair of forearms:
Here's the first bicep casting:
It's snug:
Here's the first full set of arm parts laid out on the bench:
And the first pair after I'd started prep work:
I blocked up the inner shoulder parts and prepped them for molding:
Then I poured the print coat:
I also laid out all of the spine protector plates and didn't think to take any pics until after I'd poured the rubber:
And trimmed up the abdomen plated and test fit it against the waist prototype:
Lots of work to do today. I'll be blocking up the chest and back pieces and hopefully get a print coat poured on both of them. I'm also hoping to split the waist section and pelvis and get them ready to to mold. Stay tuned...
Re: Just What This Forum Needs: Another Ironman Build
I pulled the spine protector mold, but haven't cast any parts yet:

Picking up where I left off yesterday, I added some thickness to the inner shoulder molds:

I also blocked up the outer shoulder piece and poured a print coat for it:

Then thickened it up and added a couple of registration keys:

Tomorrow I'll be putting on another coat of silicone to make the surface smoother. I'll also be doing some work on the neck piece. Today all I did was fine-tune the surface texture and prime them:

I've also gone ahead and split the pelvis armor into two sections:

Same goes for the waist:

Moldmaking continues tomorrow. Stay tuned...
I pulled the spine protector mold, but haven't cast any parts yet:
Picking up where I left off yesterday, I added some thickness to the inner shoulder molds:
I also blocked up the outer shoulder piece and poured a print coat for it:
Then thickened it up and added a couple of registration keys:
Tomorrow I'll be putting on another coat of silicone to make the surface smoother. I'll also be doing some work on the neck piece. Today all I did was fine-tune the surface texture and prime them:
I've also gone ahead and split the pelvis armor into two sections:
Same goes for the waist:
Moldmaking continues tomorrow. Stay tuned...
tommiethagun
New Member
Re: Just What This Forum Needs: Another Ironman Build
Nice...
Nice...
ROBOSTEVE 0671
Sr Member
Re: Just What This Forum Needs: Another Ironman Build
Stunning!!!
Stunning!!!
Nessy
Active Member
Re: Just What This Forum Needs: Another Ironman Build
I found the "more sizes" button in Flickr. I must say that your recasting policy is spot-on.
Everything is looking great, I can't wait to see more casting coming out of these molds. Out of curiosity, have you been keeping track of how much silicon you are using on this project?
I found the "more sizes" button in Flickr. I must say that your recasting policy is spot-on.
Everything is looking great, I can't wait to see more casting coming out of these molds. Out of curiosity, have you been keeping track of how much silicon you are using on this project?
MattCorneIM
Active Member
Re: Just What This Forum Needs: Another Ironman Build
This...Is...Awesome!!!!!
This...Is...Awesome!!!!!
Re: Just What This Forum Needs: Another Ironman Build
Last night I had Lopez whittle out a new and improved boot:

Here it is all glued together:

This is the last important part I need to clean up in order to have all of the essential prototypes for a wearable suit. It's getting close.
Finished the molds for the shoulder parts this morning:

About the same time as the mothermold had set up, my friend Trevor (who has the misfortune of being my size and often gets stuck serving as my "stunt double" when I need to see how I'm going to look in a particular costume) showed up and offered to roll out the first castings:

Here's the first set of inner shoulder parts:

And the first outer shoulder plate:

Trevor managed to get the first complete pair of shoulder pieces out of the molds, but we didn't have time to do any trimming:

While Trevor was doing that, I built up the mold walls for the pelvis pieces:

Then poured on the print coat:
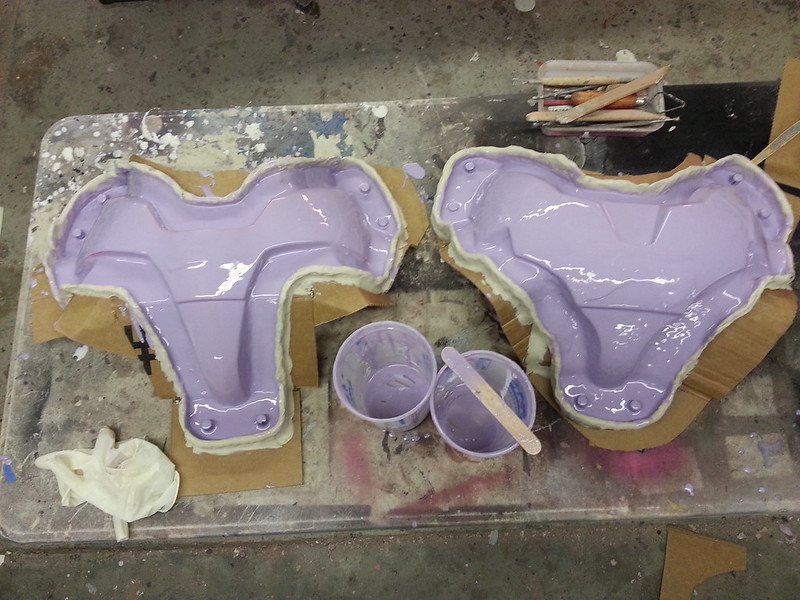
I also did the same thing with the waist parts:


It's coming along nicely:

Except for the part where a kamikaze fly decided to end his tragic little life in the plurple goo:

Molding will continue tomorrow. I'm also starting on prep work for the first few castings. They're starting to stack up:

I'm also going to be experimenting with some better metallic finishes, so I've pulled a few more faceplates and gave them a good glossy basecoat to start with:

At this point it's becoming pretty clear that I won't have a suit done in time for the opening night of the new movie. I guess I should've listened to all the folks who were telling me to get a move on back in January. Oh well.
Last night I had Lopez whittle out a new and improved boot:
Here it is all glued together:
This is the last important part I need to clean up in order to have all of the essential prototypes for a wearable suit. It's getting close.
Finished the molds for the shoulder parts this morning:
About the same time as the mothermold had set up, my friend Trevor (who has the misfortune of being my size and often gets stuck serving as my "stunt double" when I need to see how I'm going to look in a particular costume) showed up and offered to roll out the first castings:
Here's the first set of inner shoulder parts:
And the first outer shoulder plate:
Trevor managed to get the first complete pair of shoulder pieces out of the molds, but we didn't have time to do any trimming:
While Trevor was doing that, I built up the mold walls for the pelvis pieces:
Then poured on the print coat:
I also did the same thing with the waist parts:
It's coming along nicely:
Except for the part where a kamikaze fly decided to end his tragic little life in the plurple goo:
Molding will continue tomorrow. I'm also starting on prep work for the first few castings. They're starting to stack up:
I'm also going to be experimenting with some better metallic finishes, so I've pulled a few more faceplates and gave them a good glossy basecoat to start with:
At this point it's becoming pretty clear that I won't have a suit done in time for the opening night of the new movie. I guess I should've listened to all the folks who were telling me to get a move on back in January. Oh well.
BlobVanDam
Sr Member
Re: Just What This Forum Needs: Another Ironman Build
Will you be offering casts? :lol
Except for the part where a kamikaze fly decided to end his tragic little life in the plurple goo:
Will you be offering casts? :lol
Re: Just What This Forum Needs: Another Ironman Build
Funny you should ask, I've got some "hydrospan" expanding resin on hand. Some of us have been discussing the notion of making giant-sized insects. This wouldn't be a terrible place to start though. I'd rather begin with a more interesting bug.
Funny you should ask, I've got some "hydrospan" expanding resin on hand. Some of us have been discussing the notion of making giant-sized insects. This wouldn't be a terrible place to start though. I'd rather begin with a more interesting bug.
Last edited:
DarkJester
Well-Known Member
Re: Just What This Forum Needs: Another Ironman Build
will this be a full suit only type of thing or will you do individual parts for those of us who may/may not have decided "going airsofting in my suit, to look like a badass is a great idea" and need to make repairs but have no desire to repep pieces?
will this be a full suit only type of thing or will you do individual parts for those of us who may/may not have decided "going airsofting in my suit, to look like a badass is a great idea" and need to make repairs but have no desire to repep pieces?
Re: Just What This Forum Needs: Another Ironman Build
Today was a busy day, but I still won't have a suit in time for the premier. I guess I'll just have to rest assured that I'll have it for Avengers 2.
The first order of business today was thickening the iron pelvis molds:


Same goes for the waist mold:

While those were setting up, I blocked up the back and set up the mold walls:

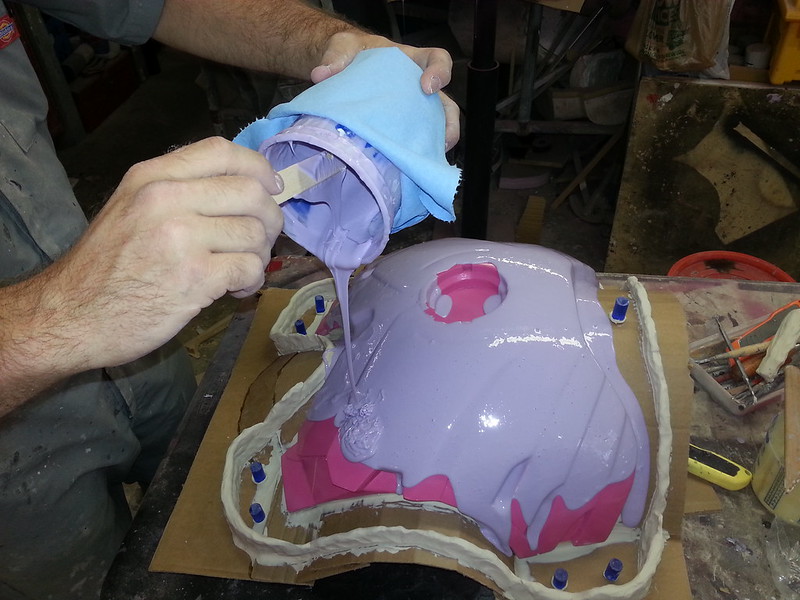
Then I propped it up nearly upright and poured on some silicone:

The reason for propping it up was to get rubber into the undercuts where bubbles would collect if it was sitting flat on the table:

My friend Matt stopped by and I set him to work spreading the silicone over the shoulders:

Meanwhile, I set to work prepping the chest piece for rubber:

And poured on the print coat:

With that done, I was stuck waiting for rubber to cure, so it was time to take a break. After I'd changed out of my coveralls, I found this guy poking around in the workshop:

Together, we gave the project a good looking over:


Then I went to the gym to continue slimming down into my fit-into-the-armor physique. When I got back, the silicone had firmed up enough to lay the back piece flat without having it drool away from where it was supposed to be. So it was time to pour the rest of the print coat:

While that was setting up, I added some thickness to the chest mold:

Then I ran out of silicone about halfway through thickening up the jacket mold for the backplate:

I'm hoping I can pick up some more at a local supplier sometime tomorrow. Then it's just a matter of molding the thighs, finishing the prototypes for the shins and boots, a bit more molding and casting, then painting, plating, and wearing it around.
Piece of cake...
Today was a busy day, but I still won't have a suit in time for the premier. I guess I'll just have to rest assured that I'll have it for Avengers 2.
The first order of business today was thickening the iron pelvis molds:
Same goes for the waist mold:
While those were setting up, I blocked up the back and set up the mold walls:
Then I propped it up nearly upright and poured on some silicone:
The reason for propping it up was to get rubber into the undercuts where bubbles would collect if it was sitting flat on the table:
My friend Matt stopped by and I set him to work spreading the silicone over the shoulders:
Meanwhile, I set to work prepping the chest piece for rubber:
And poured on the print coat:
With that done, I was stuck waiting for rubber to cure, so it was time to take a break. After I'd changed out of my coveralls, I found this guy poking around in the workshop:
Together, we gave the project a good looking over:
Then I went to the gym to continue slimming down into my fit-into-the-armor physique. When I got back, the silicone had firmed up enough to lay the back piece flat without having it drool away from where it was supposed to be. So it was time to pour the rest of the print coat:
While that was setting up, I added some thickness to the chest mold:
Then I ran out of silicone about halfway through thickening up the jacket mold for the backplate:
I'm hoping I can pick up some more at a local supplier sometime tomorrow. Then it's just a matter of molding the thighs, finishing the prototypes for the shins and boots, a bit more molding and casting, then painting, plating, and wearing it around.
Piece of cake...
Re: Just What This Forum Needs: Another Ironman Build
Alright, the local shop didn't have any silicone in stock, so I went ahead and ordered some from another outfit and now I'm waiting for shipping. The bucket should arrive tomorrow, so I'll probably have parts out of the molds in progress by the end of the weekend.
In the meantime, I spent yesterday experimenting with a silver plating kit that my friend Matt picked up:

I figured there's no better way to simulate metallic finishes than actually plating the parts with metal, so I lined up four casts of the faceplate with shiny gloss basecoats, mixed all of the necessary chemicals, and got to work:

The process starts with a thorough washing of the parts, then spraying down with a surfactant wetting agent to break up surface tension, then rinsing with distilled water, then spraying with a tin solution which leaves a sensitizing layer of tin on the surface, then rinsing with distilled water, then using a dual nozzle sprayer to coat it with the activated silver solution which then chemically bonds with the tin on the surface of the work piece.
Here's s shot of one of the faceplates somewhere in the middle of the process:

Here I am screwing around with it:

And here's the first one in sunlight after it had dried:

The streaks of black showing through are caused (as near as I can figure) by silicone residue leftover from the moldmaking process. It turns out when the instructions tell you to wash the parts thoroughly with soapy water, they're not screwing around. So, having learned a few lessons along the way, I made another attempt. Then another. Then another:

I'm pretty happy with the last one:

I've got to do a bit more research before I'm comfortable with the gold plating.
Alright, the local shop didn't have any silicone in stock, so I went ahead and ordered some from another outfit and now I'm waiting for shipping. The bucket should arrive tomorrow, so I'll probably have parts out of the molds in progress by the end of the weekend.
In the meantime, I spent yesterday experimenting with a silver plating kit that my friend Matt picked up:
I figured there's no better way to simulate metallic finishes than actually plating the parts with metal, so I lined up four casts of the faceplate with shiny gloss basecoats, mixed all of the necessary chemicals, and got to work:
The process starts with a thorough washing of the parts, then spraying down with a surfactant wetting agent to break up surface tension, then rinsing with distilled water, then spraying with a tin solution which leaves a sensitizing layer of tin on the surface, then rinsing with distilled water, then using a dual nozzle sprayer to coat it with the activated silver solution which then chemically bonds with the tin on the surface of the work piece.
Here's s shot of one of the faceplates somewhere in the middle of the process:
Here I am screwing around with it:
And here's the first one in sunlight after it had dried:
The streaks of black showing through are caused (as near as I can figure) by silicone residue leftover from the moldmaking process. It turns out when the instructions tell you to wash the parts thoroughly with soapy water, they're not screwing around. So, having learned a few lessons along the way, I made another attempt. Then another. Then another:
I'm pretty happy with the last one:
I've got to do a bit more research before I'm comfortable with the gold plating.
ROBOSTEVE 0671
Sr Member
Re: Just What This Forum Needs: Another Ironman Build
This process isn't ever going to be easy but it looks like you're on your way to nailing it.
Love getting the notifications through to show you've updated more pics, great thread!
This process isn't ever going to be easy but it looks like you're on your way to nailing it.
Love getting the notifications through to show you've updated more pics, great thread!
Re: Just What This Forum Needs: Another Ironman Build
Love that chrome plate!
Love that chrome plate!
Similar threads
- Replies
- 13
- Views
- 289
- Replies
- 2
- Views
- 244