The Rocketeer - My First Real Build (COMPLETED)

ThatGuyKnownAsT

New Member
Hey all. Kind of nervous, but here's my first topic. Long time lurker, and the amount of craftsmanship I see here is always inspiring. For the longest time I've wanted a Rocketeer costume. Well, this year, I finally decided to do one. The original plan was the have it done for Halloween, but at this point, I'll probably end up with a half-finished one for Halloween (which is no sweat off my back, only going to some house parties) and then refine it during the winter months before taking it to PAX South/East/Prime next year.

So, going to include sources for things bought and things referenced because I feel that should be a thing.


First in the jacket:

Ibw0wQy.jpg

Purchased with custom sizings from South Beach Leather. Pretty good fit and look to it. The sleeves are a LITTLE too short, but I can work with it. Also, the buttons are off and I plan to replace them later.

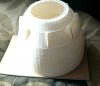
Next is the helmet. The helmet is the one thing I did not trust myself with a limited skill set to do right, and although I could learn from trial and error, I figured I'd do it on my next project (hopefully Iron Man). I bought a pre-fab helmet from this seller on Ebay.
c2tyc4I.jpg

Unlike his description (where you would need to mount the lenses yourself) the seller/creator had already melted them in place. While great, it meant I would need to make sure the lenses were taped properly. Not too difficult a task, but I'd have rather just mounted them myself with my own heat gun. The other tiny issue was that the vents on top were closed and solid. Had to dremel those out.

ISesj2Y.jpg
wqx5bcu.jpg

Unfortunately, I knicked the helmet a couple times with the dremel. Damage fixable though. Nothing a little bondo and primer couldn't fix.

IvB2SDN.jpg
s02SJre.jpg

Now once I started painting it with Design Master Brilliant Gold paint, I noticed the bondo wasn't as smooth as I'd have liked. However, I figure in the long run it's fine because as soon as I start weathering it, it'll blend right in.

YOouHh5.jpg
resmtl2.jpg

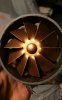
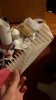
For the last part of this post, I move on to the rocket itself. I'm still kinda of tumbling around on what to do, but part of the original plan was to 3D print certain pieces found on Thingverse. A friend with a 3D printed found this model of the fuselage, and we began to print it.

CKHp9vz.jpg

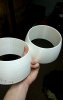
Unforuately, the printer was too small, and we didn't have the time to properly slice it into more manageable pieces. We are harvesting the vents off this, and printing out just the vents for the rocket which I'm making partially out of PVC. Here's one of the fuselages cut offf of the main pipe. Still need to shape the bottom, but I think it looks good.

IFQke5N.jpg
5C46pri.jpg

So the plan for the rest of the rocket is as follows:
  • Shape fuselages, cut out vent holes.
  • Place 3D printed vents into the holes
  • Cone shaped on a "lathe" (large drill) out of foam core
  • Score the cone, drill in holes, add fins from scrap signage metal
  • Mount cone to PVC, score lines down the side
  • Center piece have printed at a makers shop locally (here is the file I found for that)
  • Mount everything together, add rivets (I read googly eyes have been used for rivets but are unsure of what size to get/how many)

At that point I think the pack will be serviceable for at least Halloween for some house parties, before I do some major updates to it.

So tell me what you think. Any suggestions? Again, this is my first build so I'm constant nervous over it. Thanks so much for reading.
 
Last edited:
Re: The Rocketeer - My First Real Build (Sort of)

Looking great so far. I've loved The Rocketeer since i was a kid. Always wanted to build a full costume but i only got as far as pepakuraing (is that a word?) a helmet. Can't wait to see more man! Keep it up!
 
Re: The Rocketeer - My First Real Build (Sort of)

Looks good so far to me! I, also, have wanted to a Rocketeer costume for years. It's that damn jetpack that holds me back. Kit's cost $1,000. Or I have no workspace to sit and try to make one...

Good luck with yours!
 
Re: The Rocketeer - My First Real Build (Sort of)

Yep, looking fine from where I stand (or sit). Keep up the good work!
 
Re: The Rocketeer - My First Real Build (Sort of)

Thanks so much for the kind words so far.

So last night I went to my friend's workshop to do some more special cuts.

We used this image from Google Image search for some measurements (which I scaled down to fit my back).
W77vv29.jpg

Using a hacksaw and a make shift jig made from clamps and old fencing out back, we cut the 45 degree angle cut at the bottom of each fuselage.
kCKxSMy.jpg

We then marked off the area for the holes for the vents to go in, using the salvaged vent piece from the failed 3D print.
s1mn9WU.jpg
RkyyRph.jpg
zgFBoED.jpg

We then used a reciprocating saw to cut out the vent holes on each pipe.
NIGtXg2.jpg
L5EMJDE.jpg
s2v0qVv.jpg

I have a video explaining what happens with the saw better. Basically, it vibrates teeth really fast and can melt the PVC if you aren't careful. There's a little bit of meltage but it can be sanded and hidden. Let me know if you want to see the video explanation. :p

After that, we're now printing up a couple more vents, and the cones. Should be a couple days.
TVwuxqN.jpg
eRdbdnM.jpg

Back at my place, I've made the engines out of two types of plungers. I think they looks pretty good. Not screen accurate, but I can dress them up.
OmXInbN.jpg
 
Re: The Rocketeer - My First Real Build (Sort of)

Hey all,

Week later update. Slight progress this week. Too many other things went on to actually get much accomplished. Won't have the rocket done in time for Halloween, but my friend Pete who is helping me work on this made a 6-layer, 1-inch thick cardboard mockup of the pack. A little paint and embellishment and it should be suitable for a small party.
yxTPIep.jpg

On actual rocket news, I've received the first real substantially usable 3D printed piece in: The center piece!
t59XJgR.jpg

It needs to be sanded and primed to hell, and a two little dimples dremeled out for the exhaust vents, but this thing is a beauty and sturdy as hell. Here it is dry mocked up with the fuselages.
G5tRVjc.jpg

Just makes me excited looking at it. Also, something I noticed with the jacket was that the collar was ****ING gigantic. Like, it needs to be long to cover up the neck, but this length was coming up into the helmet and looked really bad (at least for me and my shorter neck).
501oJqX.jpg

Luckily, my friends at Savage Punk Studio (seriously, go check them out) helped out and were able to shorten the collar to a more manageable length.
ph4gBwX.jpg

That's all for now. Next post will probably be some Halloween photos and then hopefully a real update with the cones and the like.
 
Re: The Rocketeer - My First Real Build (Sort of)

Lack of updates because time is never on my side!

So I guess first I'll start with the helmet! Just needs padding and a strap!

Applied two rubs of Rub N' Buff antique gold to the helmet since last time. Give is a nice metallic look.
IMG_20160323_235720.jpg

After apply a wash of black and brown acrylic, it's finally got the look I was going for.
IMG_20160325_120353.jpgIMG_20160325_120340.jpgIMG_20160325_120318.jpg
 
Re: The Rocketeer - My First Real Build (Sort of)

Now for the 3D printed pieces (apologies for double post browser kept messing up the previous post).

In order via the attachments below:

- The center piece exhaust sanded and after a few coats of prime. This piece has been a pain to get smooth.
- Center exhaust fan (purchased off ebay)
- Center exhaust fan fitted into center exhaust piece.
- Fixing a 3D model for the cones in SketchUp
- Beginning print of cone bottom pieces
- Writing to show time lapse of how long it took/takes to print that piece (took about 8 hours)
- Two bottom cone pieces complete. They had some small gaps in them, which I will bondo over later.
- Beginning print of the fins
- Bottom piece, fins, and failed tip. Ran out of filament when printing the tip. Still waiting for new filament to come in, but the failed piece will be a great testing/scrap tool.
- Case in point. Using the failed tip to test dremeling holes for the fin pieces.
- Bondo drying over the "cracks" in the 3D prints of the bottom cone pieces. I think you can see the cracks.

NOTE: This build won't be 100% screen accurate (see: Center exhaust casing and engines) as I am trying to get this done within a schedule, but I do hope to replace those parts in the future with those closer to the film.

Thanks for your time and let me know what you think!
 

Attachments

  • 12825198_10153872554240638_2071987452_n.jpg
    12825198_10153872554240638_2071987452_n.jpg
    41.3 KB · Views: 144
  • 12527832_10153906613940638_723549093_n.jpg
    12527832_10153906613940638_723549093_n.jpg
    34.7 KB · Views: 143
  • 12674713_10153906614415638_783983590_o.jpg
    12674713_10153906614415638_783983590_o.jpg
    111.7 KB · Views: 146
  • 12571295_10154567251797656_614110267_n.jpg
    12571295_10154567251797656_614110267_n.jpg
    64.9 KB · Views: 136
  • 12422322_10154567865732656_1454589992_o.jpg
    12422322_10154567865732656_1454589992_o.jpg
    159.8 KB · Views: 149
  • 12722213_10154568847607656_1385693642_o.jpg
    12722213_10154568847607656_1385693642_o.jpg
    123.4 KB · Views: 136
  • 12782203_10154572727492656_532104890_n.jpg
    12782203_10154572727492656_532104890_n.jpg
    44.8 KB · Views: 141
  • 12188297_10154575611957656_563156318_n.jpg
    12188297_10154575611957656_563156318_n.jpg
    48.7 KB · Views: 141
  • 12443146_10154578022562656_1505886103_n.jpg
    12443146_10154578022562656_1505886103_n.jpg
    51.2 KB · Views: 144
  • 12527859_10153925401615638_111503179_n.jpg
    12527859_10153925401615638_111503179_n.jpg
    19.3 KB · Views: 137
  • IMG_20160325_120456.jpg
    IMG_20160325_120456.jpg
    2.5 MB · Views: 137
Re: The Rocketeer - My First Real Build (Sort of)

Dude you got that helmet looking fantastic!


Sent from my iPhone using Tapatalk
 
Re: The Rocketeer - My First Real Build (Sort of)

HUGE UPDATE:

So I have completed the rocket engines and have finished 3D printing/sanding/bondoing all the things. Now all that's left is to assemble, paint, and harness up.

First, the engines.

So as I've stated before, my pack isn't going to be screen accurate, but damn do I think these came out cool.

Two plungers, screwed together, PVC extension piece, and random bits glues on.
IMG_20160329_173915.jpg

Engine parts prepped for painting.
IMG_20160329_191517.jpg

After priming.
IMG_20160329_211006.jpg

I found a six inch bowl to hold together all the hose lines, and also act as what will be holding up the engine inside the fuselages.
IMG_20160330_183840.jpg

Testing to make sure the lines fit and don't fall out. They will be secured with glues and ties up in the bowl anyways though for good measure.
IMG_20160330_221206.jpg

Two engines ready to go. I rubbed the water lines with blue and purple paints to give them the heated look.
IMG_20160402_171235.jpg

Next up, all the little bits and pieces.

Last time I showed a 3D printed cone base bondoed up. So I sanded and sanded the crap out of that thing by hand and it STILL looked polygonal. I needed to step up my game.
IMG_20160329_211219.jpg

So I bondoed the crap out of it some more and bought a random orbital sander and power sanded the hell out of all the 3D printed pieces.
IMG_20160408_175047.jpg

Needless to say, if you are every 3D printing pieces, this is the route I highly recommend.
IMG_20160408_175055.jpg

All the bits ready for priming.
IMG_20160408_202259.jpg

Primed.
IMG_20160409_112329.jpg

Here I am as of this morning using Weld-On to attach things. Here is the cone base being attached to the fuselages.
IMG_20160412_112243.jpg

And here is the center piece being attached. It's not perfectly flush, but it works for me. #LearningExperiences
IMG_20160412_121738.jpg

I've got about a week left to get this thing ready for con. So more updates soon.

BONUS: While waiting for things to dry/cure, I've been playing a game called BroForce on PS4 (think Metal Slugish, and all the playable characters are parodies of 80s/90s action stars). While going through, I unlocked this guy. I had NO clue there was a Rocketeer parody in the game, but I found it really funny that he happened to pop up while working on this prop.
IMG_20160411_203252.jpg
 

Attachments

  • IMG_20160405_205931.jpg
    IMG_20160405_205931.jpg
    2.6 MB · Views: 128
Re: The Rocketeer - My First Real Build (Sort of)

So I have finished and am now beginning taken this thing on the con circuit!

First, a completed pic:
13086950_10204638595363614_3486077770816130319_o.jpg

Now, how we got here. Last left off, I was putting the fuselages and center part together. After I left the weld-on to dry for a day and a half, I attached the egg bits and began to use 6mm googly eyes as the rivets. At first they looked goofy and off-setting...
IMG_20160412_121739.jpg

Quick shot of primer though fixed that right up.
IMG_20160412_121740.jpg

After all the "rivets" were put on, I dry fitted the engines to size up the flaps. I forgot to take pictures of me making the flaps, but they are simple "No Smoking" metal sheet signage (because I thought that was funny) bent and cut to shape. The engines sit a little low because I measure incorrectly. Oh well. Something to fix in the future.
IMG_20160413_233705.jpg

Apply coat after coat of Design Master Metallic Champagne Silver paint. I think it looks damn fine.
IMG_20160414_105611.jpg

After paint, dry fitting the top cones one last time. Got super pumped at this point!
IMG_20160414_112251.jpg

Attached the flaps and painted them. Used black primer to look like soot from the exhaust. ****ed up on the right flap, but the engines cover it just enough.
IMG_20160417_173816.jpg

Installed the fan. Didn't have time to rig up a battery or more electronics to it, but it's serviceable. Something to fix in the future.
IMG_20160417_174313.jpg

The completed pack. After hours and weeks and months of working on this off and on out of mostly my room in my apartment, it was done. I was so happy. Wanted a pic of it with my favorite take off scene from the film because I'm a dork.
13014989_2705649760584_1248728774_n.jpg

Another shot of the completed pack.


IMG_20160417_210619.jpg

It's by no means perfect or accurate, but it's mine. My first real build and man did I learn a lot from this. Thanks for following this thread and too any and all people who messaged compliments, encouragement, or advice! This is a fantastic community! I may update the thread when I go back and fix/swap out some parts (looking at you eggs and engines), so stay tuned (maybe)!

Bonus shot taken by King's Photos! I love this shot. Made the whole adventure worth it!
13086665_1322128531134172_6233492401615278423_o.jpg
 
Something about The Rocketeer just really captured my interest like nothing else when I was a kid. It's still one of my favorite movies today.

Awesome build!
 
This thread is more than 7 years old.

Your message may be considered spam for the following reasons:

  1. This thread hasn't been active in some time. A new post in this thread might not contribute constructively to this discussion after so long.
If you wish to reply despite these issues, check the box below before replying.
Be aware that malicious compliance may result in more severe penalties.
Back
Top