Spikeyfied
New Member
So, as promised here is my Update regarding the Hiromi 316G lights for the Tomenosuke 2019 Retailer Edition. Disclaimer: Your results may vary and there is a lot of flimsy things that come in here. Always keep a steady hand, dont force anything in when it doesn't fit. I'm NOT responsible for damages you do to your Blaster or yourself.
Lets start with a little FAQ first:
Q: Do the Hiromi 316G fit into the sightrod?
A: Yes they fit, BUT you will have to squeeze them lightly. If you do not feel comfortable with that: DON'T DO IT!
Q: Will it fit Model XYZ of my Blaster?
A: I can't definitly answer that. Nor will i guarantee that you will have the same results as me. The whole process described here works on the Tomenosuke 2019 Retailer Edition Version of the Blaster.
Q: Where do i find those LED lights?
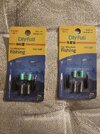
A: I posted the site on the first comment, the site is called Hobbylink Japan, the model of the Light is the Hiromi LED 316G That stands for 3mm diameter, 16mm in length and the color Green. The lights cost about 4,00 Euro per piece plus shipping and taxes/customs.
Q: I can't fit it in. Am I doing something wrong?
A: as stated above: D.O.N.'T. use force or hard pressure to squeeze the light into the rod. Batteries can be dangerous if you squeeze or damage them.
Now to the fun part:
First of prepare your blaster by removing the placeholder LED's Tomen doesn't glue them in. Remove the LED's with small plyers by gently moving them, do not use hard force or pressure or they will break. They sit not to tight so removing them should be not that hard.


Prepare your insert LED Lights

and make sure nothing is in the rod

Now if you like you can remove the rod from the blaster by unscrewing it. However i did not do that.
Take one of the Green Hitomi LED Lights and gently try to push it into the rod. If it doesnt fit try using some lubricant before attempting to squeeze any part of the light. If the lubricant doesn't work: Try the following. Take some small and not sharp plyers like these

and GENTLY, VERY GENTLY squeeze the lower part of the LED light together, rotate with the plyers around it. DO NOT use hard pressure, just gentle small squeezes try to fit it into the rod now using some lubricant (i used WD40)

you will realize that the LED light now at least fits in a little, you don't have to push it all the way it, just as much until it sits tight.

You can push it further in, i recommend not pushing it too far in (believe me... that costed me two of those lights...) good thing i ordered six...

You can now push to turn the lights on and slightly pull under the LED to turn them of, do so very carefully with your fingernails, you don't necessarly need to use both hands as stated on the back of the packaging

You can put the green rubber caps on the lights to blend the silver metal. Also that way it is easier to push and pull the LED.

You're almost done now.
Push your LEDs or the caps on them until they turn on

Pull on the caps until the LED's turn off.

Thats it. As i stated do not do any of this if you don't feel comfortable with slightly squeezing the Battery together. As you can see on the pictures i did not overdo it and it doesn't require much to fit them in a standard rod. I had more succes on the 3D Printed one since the rod differs slightly. It was easier to push the lights into that, but also since that rod is glued on plastic it is easier to break of.
If you have any questions don't be shy, just ask.
Cheers,
Spikeyfied
Lets start with a little FAQ first:
Q: Do the Hiromi 316G fit into the sightrod?
A: Yes they fit, BUT you will have to squeeze them lightly. If you do not feel comfortable with that: DON'T DO IT!
Q: Will it fit Model XYZ of my Blaster?
A: I can't definitly answer that. Nor will i guarantee that you will have the same results as me. The whole process described here works on the Tomenosuke 2019 Retailer Edition Version of the Blaster.
Q: Where do i find those LED lights?
A: I posted the site on the first comment, the site is called Hobbylink Japan, the model of the Light is the Hiromi LED 316G That stands for 3mm diameter, 16mm in length and the color Green. The lights cost about 4,00 Euro per piece plus shipping and taxes/customs.
Q: I can't fit it in. Am I doing something wrong?
A: as stated above: D.O.N.'T. use force or hard pressure to squeeze the light into the rod. Batteries can be dangerous if you squeeze or damage them.
Now to the fun part:
First of prepare your blaster by removing the placeholder LED's Tomen doesn't glue them in. Remove the LED's with small plyers by gently moving them, do not use hard force or pressure or they will break. They sit not to tight so removing them should be not that hard.
Prepare your insert LED Lights
and make sure nothing is in the rod
Now if you like you can remove the rod from the blaster by unscrewing it. However i did not do that.
Take one of the Green Hitomi LED Lights and gently try to push it into the rod. If it doesnt fit try using some lubricant before attempting to squeeze any part of the light. If the lubricant doesn't work: Try the following. Take some small and not sharp plyers like these
and GENTLY, VERY GENTLY squeeze the lower part of the LED light together, rotate with the plyers around it. DO NOT use hard pressure, just gentle small squeezes try to fit it into the rod now using some lubricant (i used WD40)
you will realize that the LED light now at least fits in a little, you don't have to push it all the way it, just as much until it sits tight.
You can push it further in, i recommend not pushing it too far in (believe me... that costed me two of those lights...) good thing i ordered six...
You can now push to turn the lights on and slightly pull under the LED to turn them of, do so very carefully with your fingernails, you don't necessarly need to use both hands as stated on the back of the packaging
You can put the green rubber caps on the lights to blend the silver metal. Also that way it is easier to push and pull the LED.
You're almost done now.
Push your LEDs or the caps on them until they turn on
Pull on the caps until the LED's turn off.
Thats it. As i stated do not do any of this if you don't feel comfortable with slightly squeezing the Battery together. As you can see on the pictures i did not overdo it and it doesn't require much to fit them in a standard rod. I had more succes on the 3D Printed one since the rod differs slightly. It was easier to push the lights into that, but also since that rod is glued on plastic it is easier to break of.
If you have any questions don't be shy, just ask.
Cheers,
Spikeyfied
Last edited: