The PEPAKURA question thread - PLEASE READ RULES IN FIRST POST!

Thanks, i would just have to find a place where i could use the resin. We live in an apartment and cant have the fumes floating around.

You could use something like smoothcast 300 (Smooth-on product), it doesn't have nearly the toxic fumes (or odors) of fiberglass resins and applies essentially the same.
 
Hey guys, I know this may sound stupid but I'm having trouble understanding how to glue pepakura all together, I'm more of a visual learner so if anyone has a good video that would be greatly appreciated, thanks!

Sent from my Nexus 5 using Tapatalk
 
How does one put a hyperlink to a thread/post in my signature now?
I cant fid the little button when editing anymore :(
 
I can't seem to get away from warping. I've tried a few glues, using 110lb cardstock, scaled to my size, everything good to go and the gluing will go good for a while but the closer I get to finishing it starts to warp.

I'll notice in designer that sometimes pieces will visually have splits in them and the paper will have numbers to glue them together. Should I leave those split?

I also notice that sometimes when gluing two pieces together, one set of numbers will line up but the next won't. Then in turn leads to other numbers not lining up correctly down the road. Should I just roll with it and try to make it look picture perfect as possible in this situation (ignore the pieces that don't align)?

How do you all go about gluing them? Do you start from number 1 and go from there? Do you just pick a point and do the whole thing at once? Do you just do it in parts and bring them all together at the end?

I cannot figure out what is causing the warping. I hope I didn't miss a thread on it but I've tried to search here, youtube vids, and on google but all I find is people having warping issues when it comes to using the resin or glue causing warping. But I've tried white glue, hot glue, super glue, and spray glue and still get the warping. So I don't think the glue is the problem.
 
Hey all, I have a question about repair. I finished up a Dredd helmet using the paper>resin>bondo method, and while I was messing around I dropped it ( :facepalm DROKK!!) and now there's a hairline crack in the bondo and another small area where the bondo chipped away to reveal the resin on one of the edges. Any tips on how best to fix this without having to sand the whole thing down? I was thinking I could try to "fill" the chipped area with resin and then just paint over it, but I'm at a loss for the hairline crack.

I'd appreciate the help!
 
I have really limited experience, but maybe I can help a bit...

I'll notice in designer that sometimes pieces will visually have splits in them and the paper will have numbers to glue them together. Should I leave those split?)?

I'm not quite sure what you're talking about here, but when you print out all the pieces, you're supposed to cut all the solid lines and score all the dotted lines. Usually if there are numbers, it means you need to glue that edge to another one, so I guess cut them apart?

...I also notice that sometimes when gluing two pieces together, one set of numbers will line up but the next won't. Then in turn leads to other numbers not lining up correctly down the road. Should I just roll with it and try to make it look picture perfect as possible in this situation (ignore the pieces that don't align)?

I had the same issue, I was able to resolve it for the most part by "dry fitting" my pieces first to see if there were any problems before gluing it together. Basically just line up the piece that you're going to glue down without putting any glue on, then fold it as best you can to your existing piece and see if there are any obvious alignment issues. If they're not lining up properly, try gluing the center of the new piece down and work toward the ends, or start at an area where alignment REALLY matters, like corners. If all else fails, start from the center and fill the "holes" with extra pieces of cardstock.

What really helps to prevent that in the first place, though, is making sure that your cutting is really straight and consistent, and that your scoring is dead on straight. Use a metal ruler to help get the straightest lines possible!!

How do you all go about gluing them? Do you start from number 1 and go from there? Do you just pick a point and do the whole thing at once? Do you just do it in parts and bring them all together at the end?

I've only made one thing, a helmet, but I had to build it several times (scaling issues, ugh), and as I went along I found it easiest to work from the top center to the bottom edges, working evenly on both sides. But I guess how you work on it depends on how the file is laid out. Some builds seem like they have a lot of "rings" while others have more "lines" if you get what I mean. That being said, I don't think there's any WRONG order to build in, so don't worry too much.

I cannot figure out what is causing the warping. I hope I didn't miss a thread on it but I've tried to search here, youtube vids, and on google but all I find is people having warping issues when it comes to using the resin or glue causing warping. But I've tried white glue, hot glue, super glue, and spray glue and still get the warping. So I don't think the glue is the problem.

If you're having trouble with warping while building, before you resin, it's probably because of your alignment issues.. just be really careful about your cutting and dry fit everything before you glue it.

Hope that helps a bit...
 
I'll notice in designer that sometimes pieces will visually have splits in them and the paper will have numbers to glue them together. Should I leave those split?

No - join all the numbers together - the split in the piece is so the piece can create a rounded or curved surface
 
Sorry - double post - but different topic!

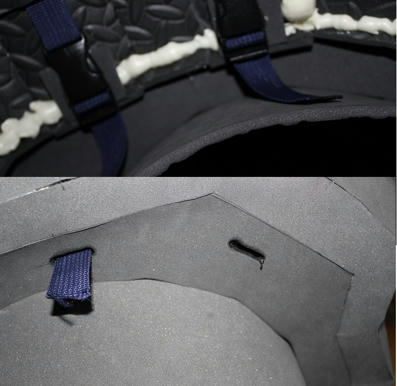
How have or how would I attach this piece to the main torso?
IMAG0399.jpg
 
Sorry - double post - but different topic!

How have or how would I attach this piece to the main torso?
View attachment 316685

I use parachute buckles and webbing, two for each side. If you've got a vertical surface on the torso side to go through, it works even better (but not necessary). Putting two on each side gives the bells all kinds of mobility without them twisting around.

Here's a garbage picture, but you get the idea. Bottom picture is the slots out of the torso's side where the webbing is threaded through, and the top pic is of the bells buckled to the torso webbing from underneath.
 
If your numbers are lined up, you should be good. Is that a jaw section for a helmet? If so, then yeah that would tend to be a pretty straight piece.

Keeping your numbers lined up is a pretty big deal, as things exponentially can get out of kilter as you build out from a poorly assembled piece. Yours looks nearly spot on, and I agree that I don't think glue is your issue at all.

Here's what I would do: Go find the piece that would attack along the top edge of your warped face (the face that has join number 1286, 1284, etc...). With any luck, that attaching piece will be one piece that runs along that whole length. You can then match that piece's edge up to your warped edge, and see how the numbers are lining up. You will likely find a spot where the distance between two of your warped piece's numbers is greater (or possibly less) than the gap between the same numbers on the corresponding piece. YOu might have misjudged a gap in the warped section, and this will show you where it is. Cut the warped piece so you can match the numbers properly, and then when you glue those pieces together your problem should be solved. If you had to open a gap in the warped piece, you may have to back the gap with additional paper.

Hopefully that makes sense. I've been building peps forever, and I still have to do this constantly to double-check alignment.
 
Thanks for the insight. I think I'm just going to redo it. I started to just do pieces here and there so if one part warps I don't have to redo the whole thing, hopefully. It all seems like its so easy, but it really isn't when you have no experience. Or maybe I'm just an idiot lol. Either way I'm going to get this done sooner or later. Helmet number 7 now. I think it warps when I have to stretch the numbers to line them up. But this seems to be a big issue whenever pieces have to bend like that. But if I don't stretch it then nothing lines up and its worse. Could it be the small cuts, since I don't glue those together? I figured it gives a bit of wiggle room so pieces don't stretch so much if I don't. Also leaves small bumps in the build.

I also noticed your shoulder cannon schematics. I will totally try that out, if I get to that point!
 
It could be the unglued cuts, but doesn't seem likely, I glue the small ones anyways just to make the pieces more rigid. Also, sometimes an individual group of pieces glued together won't look right until you have built the surrounding parts that force your piece to shape correctly. I've finished parts before that looked wonky, only to discover that one area has been forced to go concave instead of convex and vice-versa. In other words, parts will come out like a fender with a dent in it, looking all screwy, but then when you push the dent out with your fingers everything 'pops' into place.
Something else I do is start gluing two corresponding parts together from the center, working out each direction. If your numbers do try and wander, they only have half the length to move around compared to starting at one end and gluing a long continuous section. Just because something doesn't look right early on doesn't mean it's not correct too though, you know? Also, you can fix a lot of stuff after the main pep is done both before and after hardening the pep.

Yeah, you wouldn't like the cannon for paper.... On a scale of one to ten, that things is a twelve; it was originally modeled to be 3d printed. :lol
 
I finished the bracers, neck piece, and handplates with minimal warping. But they had a lot fewer pieces. I bet if I tried to make the chest piece it would look like a garbage bag by the time I was done. I really appreciate the time you took to reply, still not sure entirely what I'm messing up on. I've done it from the center, and from the ends. Maybe it's just a minor combination of everything. I've tried to find a youtube video of someone doing all or most of the gluing but only ones I've found were of people gluing one or two tabs and that was it. I'm more of a hands on learner. I'll give it another shot tomorrow.
 
NOT scaling in pepakura

hello, i have a question about NOT scaling a size of my pepakura 2D craft. you see, i made a 3D model in blender/rhino/sketchup with actual size, let´s say, 10cm width, now i need to export eps without scaling it. is there a way?


thank you very much!
 
Re: NOT scaling in pepakura

hello, i have a question about NOT scaling a size of my pepakura 2D craft. you see, i made a 3D model in blender/rhino/sketchup with actual size, let´s say, 10cm width, now i need to export eps without scaling it. is there a way?


thank you very much!

EPS? As in an image file?

In Blender, an exported model's size will translate to Pepakura as 1 Blender unit = 1 millimeter. So, a model that is 500 Blender units tall can be exported as an .OBJ, opened in Pepakura, and it will unfold in Pepakura 1:1 to 500 millimeters tall as well.
 
hey guys i have tried to get ahold of a good army of two pep for the masks. all the links i find are broken or invalid.
anyway how do i get the fileto make the pep. i mean the 3d file. how do you get that to import it into the pepakura program
 
hey guys i have tried to get ahold of a good army of two pep for the masks. all the links i find are broken or invalid.
anyway how do i get the fileto make the pep. i mean the 3d file. how do you get that to import it into the pepakura program

Krizalid has a download link in the middle of this thread page; it's a bunch of different files, but there are several Army of Two masks in there (and the link works):

http://www.therpf.com/f24/noob-field-guide-pep-costuming-175679/
 
Newbie questions here on some parts of the PepAkura process. Please forgive me as I am still reading through everything to get an understanding of all that is involved. Not sure where everyone is but I am here in the US.


Scaling- as I understand it I will have to rescale each wearable piece for my size (6'5"). Is there a standard conversion ratio or what is involved with changing from size A to size B?

Foam - what exactly is it? Where does one get it? How much does it usually run and what are he advantages/disadvantages over paper/resin/bondo?


Basic construction- I am a scale modeler and understand that hobby takes time. In general how long does it take to cut, construct and finish a component?

My youngest son will love some of this stuff for playing. If I just make a paper helmet would it hold up at all for him to play with for a while?

I appreciate any help and insight one can offer.


Sent from my iPhone using Tapatalk
 
Hey all, just a small question. Does it really matter what kind of chicago/binding post screws I use? Also, is it possible that someone has a diagram of where to place washers and the screws to join two pieces.

Any help is appreciated, thanks. :)
 
This thread is more than 3 years old.

Your message may be considered spam for the following reasons:

  1. This thread hasn't been active in some time. A new post in this thread might not contribute constructively to this discussion after so long.
If you wish to reply despite these issues, check the box below before replying.
Be aware that malicious compliance may result in more severe penalties.
Back
Top