The PEPAKURA question thread - PLEASE READ RULES IN FIRST POST!

Newbie questions here on some parts of the PepAkura process. Please forgive me as I am still reading through everything to get an understanding of all that is involved. Not sure where everyone is but I am here in the US.


Scaling- as I understand it I will have to rescale each wearable piece for my size (6'5"). Is there a standard conversion ratio or what is involved with changing from size A to size B?

Foam - what exactly is it? Where does one get it? How much does it usually run and what are he advantages/disadvantages over paper/resin/bondo?


Basic construction- I am a scale modeler and understand that hobby takes time. In general how long does it take to cut, construct and finish a component?

My youngest son will love some of this stuff for playing. If I just make a paper helmet would it hold up at all for him to play with for a while?

I appreciate any help and insight one can offer.


Sent from my iPhone using Tapatalk

Scaling: You can use the point-to-point measurement function in Pepakura Designer to check measurements and approximate fitting sizes. To calculate your estimated scale as a starting point, find the modeler's default scale and size. Take default scale divided by default height in inches, then multiply this number by your height in inches.

So a suit that's a default of 425 scale to measure 81 inches tall, you'd divide 425/81= about 5.25. Multiply 5.25 by your height in inches (77), and you get 404. That would be your approximate scale.

Foam: most people use EVA foam. There are a lot of sources, depending on what country you live in. I buy mine from Sears and from Chair Cushion, Boat Cushions, Replacement Cushions, Patio Cushion. Foam work usually has less detail, but builds faster and is cheaper than resin/bondo paper builds.

Time: everybody builds at different speeds. It usually takes me 3 hours or so for an average component, but it all depends.

Paper helmet: It might hold up for a little while, but even with 110# cardstock it's pretty flimsy. If he steps on it, it's done. A cheap option that can be done indoors, pick up an epoxy resin like this on Amazon: Amazon.com: Environmental Technology 8-Ounce Kit Casting' Craft Casting Epoxy, Clear
This is more than enough to put two coats on 4 helmets, and it'll make the piece A LOT more rigid.

Hey all, just a small question. Does it really matter what kind of chicago/binding post screws I use? Also, is it possible that someone has a diagram of where to place washers and the screws to join two pieces.

Any help is appreciated, thanks. :)

I use 1/2" chicago screws from amazon (I build with 1/4" foam). For elbow and knee joints, I just add foam tabs so that the joint overlaps on each side, and then approximate the pivot point. You can also make adjustable joints by adding velcro to the inside of each joint. You then make the joint with the Chicago screw connection separately, glue velcro to each strip, and then attach it where it works best and spaces the joint correctly. It gives you a bit of extra adjustment room for length as well. Here's a Mk42 arm I added the velcro too, so the length is adjustable. In this pic, only the forearm-side is adjustable:
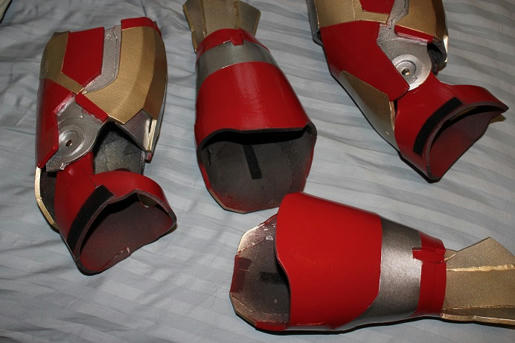
 
I use 1/2" chicago screws from amazon (I build with 1/4" foam). For elbow and knee joints, I just add foam tabs so that the joint overlaps on each side, and then approximate the pivot point. You can also make adjustable joints by adding velcro to the inside of each joint. You then make the joint with the Chicago screw connection separately, glue velcro to each strip, and then attach it where it works best and spaces the joint correctly. It gives you a bit of extra adjustment room for length as well. Here's a Mk42 arm I added the velcro too, so the length is adjustable. In this pic, only the forearm-side is adjustable:

https://www.mediafire.com/convkey/e69f/acg303b2u7u4eps4g.jpg

Thanks. I too am building the Mark 42 and I'm loving it so far. I live in Australia, so I'll try and find suitable screws here.
 
I have a few questions. Please refer to pictures in relation to my questions.
1. For pepping, I used 280 gsm card stock, I'll be using epoxy with a slow hardener. Are supports really necessary? If so, when doing the inside, do I just work around the supports then fill them in later or take them out before I start?


2. Do I / should I fibreglass the inside before or after the outside resin coat dries?


3. Do I/ should I resin the inside as well as the outside before fibreglass sing the inside or is a resin coat only needed on the outside prior?


3. I assume by build will need to be done in sections, should I start at top or bottom? Specifically with helmet as I would be worried if I did horns first, their weight could promote warping.


4. As I will be using car filler and sanding, how do I go about preparing the horns/ spikes for this, as getting fibreglass mat the whole way up and around May be a bit tricky. (Also is it necessary to sand the resin before applying filler?


5. I'm going to have to cut the armour to get it on as I have did a pretty decent job of sizing it. Am I best just seperateing the whole thing in half or (because it's not exactly a flat build) should I cut the collar out, then cut it in 2 and cut a back plate out of the torso?


6. Should I cut after fibreglass or after the car filler?

p.s. When you click the thumbnails, the images might appear stretched for some reason.
 

Attachments

  • image.jpg
    image.jpg
    782.1 KB · Views: 161
  • image.jpg
    image.jpg
    853.7 KB · Views: 153
  • image.jpg
    image.jpg
    1 MB · Views: 161
Last edited:
I have a few questions. Please refer to pictures in relation to my questions.
1. For pepping, I used 280 gsm card stock, I'll be using epoxy with a slow hardener. Are supports really necessary? If so, when doing the inside, do I just work around the supports then fill them in later or take them out before I start?


2. Do I / should I fibreglass the inside before or after the outside resin coat dries?


3. Do I/ should I resin the inside as well as the outside before fibreglass sing the inside or is a resin coat only needed on the outside prior?


3. I assume by build will need to be done in sections, should I start at top or bottom? Specifically with helmet as I would be worried if I did horns first, their weight could promote warping.


4. As I will be using car filler and sanding, how do I go about preparing the horns/ spikes for this, as getting fibreglass mat the whole way up and around May be a bit tricky. (Also is it necessary to sand the resin before applying filler?


5. I'm going to have to cut the armour to get it on as I have did a pretty decent job of sizing it. Am I best just seperateing the whole thing in half or (because it's not exactly a flat build) should I cut the collar out, then cut it in 2 and cut a back plate out of the torso?


6. Should I cut after fibreglass or after the car filler?

p.s. When you click the thumbnails, the images might appear stretched for some reason.

1: Definitely use the supports. The weight of the resin adds up quickly, as it is also soaking into the paper and weakening walls. I add additional temp supports just to reduce warpage.

2: Let your external coat cure first. You can add a second coat as well to increase the rigidity, it won't hurt the piece to do this. Once my external coats are dried, then I tear out my interior supports and apply resin inside. You can also hit the piece with a heat gun at this stage to remove warpage issues; It's a lot easier to do it at this stage than after mat/cloth has been added.

3: (part a) You don't have to resin the inside before fiberglassing, but it's a good idea to be sure the paper is getting saturated with the resin on both sides. Otherwise you can get separation between your first layer of mat and the paper if the mat doesn't soak enough resin through. You probably should also do some research to make sure your epoxy resin and your fiberglass resins will work together as well before starting on a finished piece. If they aren't compatible (they may not bond together, the heat of the fiberglass resin cure might affect the epoxy, etc) you could end up ruining pieces.
3 (part b): Sections are better for larger pieces. The more reinforced your piece is, the better. On larger areas, I will resin the edges, and then 'paint' resin bands across the piece to connect the sides. That first resin coat will dry as a kind of a skeleton, with the bands now working as bridges of hardened paper. I then resin in the missed spots on my second pass. Warpage is going to happen no matter what, but it takes a lot of the stress off of the paper while wet doing it like this.

4: For your horns: After the hardening resin coats, I'll dip patches of fiberglass mat in resin and push them up into the inside of the shape (doesn't have to be perfect) so that the very tip ends up with a ball of resined mat. You can continue with that a couple of more times if needed until you can reach in and lay mat by hand. Spray adhesive on your mat or cloth is a big help too; you can lay most of the mat into the inside of the horn before resin ever touches it. I just scuff my resin with a course scotchbrite pad before applying filler.

5: That torso is a monster. After it's all resined/bondo'd/etc, I would look at cutting the collar out like you said. You could add a flange around the collar so it can be worn as a bib that the rest of the torso would lower down onto. Once again, just me, but I would cut the rest of the torso in half (from the sides), following the natural shapes and curves to hide the seam. Add hidden strapping under the front and rear shoulder areas so they could be snapped together there, and rare-earth magnets on the sides ot hold the 'clamshell' together. That's just me though, that's a challenging piece, it's so loooooong.

6. I cut after. The filler might chip out somewhat on you, but your seams will already be lined up and level.

That was along post. I gotta go back to work.
 
Hello everyone, newbie here. I am working on my very first cosplay which is a Veteran NCR Ranger from Fallout New Vegas. over the past week I have read all through the 65 pages of this thread and did searches but having a hard time finding an answer. My question is, how would I go about attaching pieces to my helmet after applying the resin? For example the lights on the right side of the helmet and the antenna. I already made two pepped versions of this one with the lights attached before the resin stage and the other unattached. I did this because I realized how hard it is going to be to put electronics in the one that is already attached.

Any help with this would be much appreciated. Thank you in advance.

-John
 
Thank you for all that info. I've a better idea on what I'm doing now.

however, just to clarify, my epoxy is industrial boatbuilding resin and is used as fibreglass resin, so no compatibility issues to worry about to my knowledge. =)
what sort of supports would you recommend and placements?
also would you suggest resining the horns on the helmet last? As they would get heavy.
Sorry for all the questions, but tbh the resining is daunting to me as I've never done it before and really don't want to put all that hard work to waste. Lol.
i suppose starting on an a-symmetrical piece with bits flying all over the place wasn't the best of ideas. Haha.
 
So I've put together the Pepakura map for a Halo 4 helmet. Now i need to know what resin/other material to paint over it and layer up with. A friend of mine has suggested Polyester Laminating Resin but i want some other peoples opinions. The helmet will be worn and once i get around to it, it will be part of a full Halo Spartan suit. This means that the ideas need to be cost effective (ie: to do the helmet i would like to spend no more than $40 Aus). Any help would be much appreciated, thank you all.
 
There are low-odor fiberglass/polyester resins out there, I've just always had the space to do my stuff in a ventilated area. And it's ALWAYS worth watching Stealth's videos again.
And to put my $200 number into perspective, look at it this way:

Cardstock- $15
Printer ribbons- $10 (i do refills, all black)
Glue sticks-$10
Resin+cloth- $60
Body filler-$45
Tape, sanding supplies-$25
Primers and paints- $45

...So this is $210 worth of stuff. I have drop clothes, hand and power sanders, spatulas, and a lot of the tools as well needed, so I'm not running out to buy these things every time. Those are also rattle-can paint and primer prices; if I'm shooting auto-quality with the HVLP sprayer, then you might as well add a couple hundred bucks to that primer/sealer/paint bill. You can paper pep a decent halloween costume on a budget like this. You could also spend 500 hours sanding and finishing filler on a suit like this and making it ungodly clean without raising the budget much, but you'd probably hate even looking at the suit by the time you were done :lol

What resin is good to use? I need something that will complete a Halo helmet without costing more than $40 Aus
 
Do you guys think that I could pull off painting a clear plastic Iron Man faceplate with Alclad 2 Chrome to create a two mirror effect? (Chrome on outside, clear on inside) This video here: https://www.youtube.com/watch?v=W2IldTV9BVM explains how this guy did it for Halo visors, I imagine it could be done with a faceplate. It would give full frontward vision.
 
So, I have a sword I wish to create (the Dragonbone from Skyrim), but it is far too jagged as it is. Simple question, how do I smooth it out so it is at least feasible to fold and create?
 
When sealing EVA with diluted PVA, what ratio of PVA to water would I us? I recall Stealth's video saying about 5 coats, but I didn't catch the ratio. Thanks. :)
 
So I looked in the thread but couldn't find a good answer to this, although I may have just overlooked it. I'm doing some pep work in cardstock + fiberglass (I know this makes me a weirdo since everybody appears to use foam these days, but this is going to be a slightly bulky build intended for wearing and so I want it as sturdy as possible).

Do people normally leave the inside of their pieces raw fiberglass and just knock off any points with a file, or are they coating it with something? It seems like for comfort you'd want to have something over the fiberglass (maybe a spray-on plastic or something like that?) but I don't know what would be best.

So my plan with my boba helm is I was just going to wear a balaclava (a head sock normally worn under a snow machine helmet in winter. Not terribly thick but thick enough) due to the tight tolerance of my head and the helm and helms mechanics. What I have seen a lot of people do is coat it in rondo ( I haven't done this but have seen tuts on YouTube just search rondo. It's a mix of Bondo and resin with both hardeners). And then glue small foam pads for comfort and stability


Sent from my iPhone using Tapatalk
 
Yeah, I'd intended to do foam inserts for both comfort and snugness of fit, but obviously that won't cover the whole surface. I've heard of using rondo but it hadn't occurred to me to try for this, it does seem like it is self-smoothing enough that it probably makes for a reasonably comfortable finish...
 
Yeah, I'd intended to do foam inserts for both comfort and snugness of fit, but obviously that won't cover the whole surface. I've heard of using rondo but it hadn't occurred to me to try for this, it does seem like it is self-smoothing enough that it probably makes for a reasonably comfortable finish...

Next question. Whacha building


Sent from my iPhone using Tapatalk
 
Let's say I declare some edges to be cut with "specify open edges tool". After I press "unfold" pepakura adds extra cuts :<
 
Pepakura defines its unfolds into 2 dimensional faces from a 3 dimensional object. In a perfect world, a cube is a cube, with six perfectly square sides, and the unfold would look as much. 3d models are often not made up of 'flats', large faces that should unfold 2-dimensionally level; their surfaces are uneven, I guess you could say warped. Pepakura will compensate for that, creating breaks and folds within the parameters it understands.

Now, sticking with the cube, that's an easy unfold, pepakura will lay it out as such (if it fits on the paper) as one piece. More complicated shapes have to be broken up into more pieces, otherwise they would overlap in a 2d unfold. Pepakura calculates what is efficient, from there you can adjust to your liking.
 
Back
Top