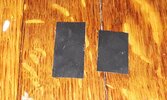
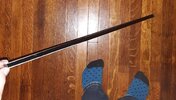
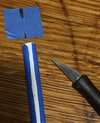
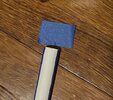
Awesome! I have a replacement section on order. Cant wait to see how it looks. I'm interested to see what the internal diameter is. Just ordered a section of 1/4 rod to try as a tang. I'm a little concerned about how sturdy it's going to be with a single grub screw though! I'm wondering if that's why the second, smaller one was added bellow the emitter face (but that would require a deeper cavity for the tang). Might be something that I end up modifying on my Yuma to accommodate if it seems likely that that's what it was for. It seems possible to me.Good work. I see what you mean about the diagonal 'marks' too. Black insulation tape springs to mind. Something to look out for.
As an aside, I have some old GRP tent poles some where. I'll see if I can find them.
You are using an out of date browser. It may not display this or other websites correctly.
You should upgrade or use an alternative browser.
You should upgrade or use an alternative browser.
The OT stunt lightsaber blades research thread
- Thread starter vadermania
- Start date
Mouse Vader
Sr Member
Had several rummages. I can only find 9.5mm tent poles. I know I have a couple of thicker ones somewhere but at a loss as to where.
While rummaging it occured to me that maybe the Yuma blade is being over thought here. Non contact - straight blade. Would not just a plain ol' piece of 1/2 inch dowel wrapped with insulation tape make just as much sense ? Has that crudity of manufacture I've come to associate with film props.
While rummaging it occured to me that maybe the Yuma blade is being over thought here. Non contact - straight blade. Would not just a plain ol' piece of 1/2 inch dowel wrapped with insulation tape make just as much sense ? Has that crudity of manufacture I've come to associate with film props.
Last edited:
Mouse Vader
Sr Member
Came across these pic's from (vadermania ) on this thread : Converting an OT Stunt Lightsaber blade
Knew I'd seen something recently that matched what I was seeing at the base of the short blade Yuma that I mentioned earlier (hope I got that name right). It's an old HMP CX-4 marine vhf antenna. It may not be the exact item on the Yuma but it does demonstrate what I was talking about earlier.


 (this vers. from Dave P)
Knew I'd seen something recently that matched what I was seeing at the base of the short blade Yuma that I mentioned earlier (hope I got that name right). It's an old HMP CX-4 marine vhf antenna. It may not be the exact item on the Yuma but it does demonstrate what I was talking about earlier.
Check this out, this is my motorized ANH stunt... mostly hand made spacers. It was very frustrating but this time it worked well. The drive shaft included sits inside the bushings. This is a Valor 8 foot antenna cut down to 34 ish inches


Are people interested in pics of the cross section?
also an Irvin kershner shot

Are people interested in pics of the cross section?
also an Irvin kershner shot
This is awesome, Thom! Count me as interested in seeing the cross section! Awesome work.Check this out, this is my motorized ANH stunt... mostly hand made spacers. It was very frustrating but this time it worked well. The drive shaft included sits inside the bushings. This is a Valor 8 foot antenna cut down to 34 ish inches
View attachment 1358169View attachment 1358170
Are people interested in pics of the cross section?
also an Irvin kershner shot
View attachment 1358168
If the quality is low, go to the settings menu and change it up to 480
Great balance for all hand made bushings!
Thanks! Seriously after metal files, sandpaper and sanding drums lengthwise... i ran the dremel backwards spiraling around the bushing with the centripital force kicking back.
lol you got it done though bro
Vadermania included an aluminum sleeve and spacer that sat underneath the blade with a tapped set screw for the D/S but I didn't have metal the right size to fill the gap between the sleeve and blade wall.
So I put it aside and made one the way Brandon says they were made for Jedi, and probably ESB. Its quite simple enough, a thin walled piece of tube for the outside... more meat for the grub screw to bite into... and metal to fill the space inside. I measured the D/S Vadermania made and the inside of the Valor antenna. the carving was me thinning the aluminum .5 mm and then tapering it quite a bit, to match the taper of the antenna inside.
crap I'm on the wrong computer, I'll upload pics when I switch over in a few min.
this was the insert he made, the "collar" is solid and the blade sits on top of it like a hoof. (solid except for the hole for the drive shaft and the sleeve) the blade doesn't touch the saber

I couldn't find metal the right size, so I went back to basics and made this

so now they meet at the bearing


(I think I'm installing a switch next!)
I couldn't find metal the right size, so I went back to basics and made this
so now they meet at the bearing
(I think I'm installing a switch next!)
I also found out today that, for whatever reason, they DID taper the reflective tape.
Due to images ill post from another computer I thought they put a rectangular piece on and it left a triangular black spot, as opposed to a straight one, on the tapered blade


However after measuring and mocking things up with painters tape, the black shape we see cant be done with a regular rectangular piece of tape. At least not on my antennas

Let me explain. I eyeballed the reflective tape width using a few bts images and electrical/vinyl tape. We can see both ends of the reflective strip on the side facing the camera, right? So i reasonably wrapped the tape around the antenna and cut the tape leaving the right amount visible on our side. I did that at the top and the bottom and got two lengths of tape instead of the same length.


I expected this since it is a tapered pole. A rectangular strip would leave that sort of shape on a cone.. but then I realized I was measuring the reflective tape, not the space left over!!! (Using black tape to measure the area that was not black was bound to confuse me)
If it was a regular strip of tape they would be the same size.
I think they used my biggest diameter, which ended up exactly 1 1/2" and trimmed the other end to what I found to be 1 1/4".... tapering the length. I think they had 1 1/2" tape but wanted the black strip to run the full length. 1 1/2" would overlap at the tip and 1 1/4" would leave too much black at the bottom, wrapped around the sides .
Today I masked off my blade with 1" tape to paint a black area. I did it larger than I needed so the reflective tape would cover the right area with no gaps, so some paint goes under the tape. The shape it left was familiar but too tapered! Much more angled than the strip we see on set. They cut down an existing strip so the black would be full length and only on one side.

Due to images ill post from another computer I thought they put a rectangular piece on and it left a triangular black spot, as opposed to a straight one, on the tapered blade
However after measuring and mocking things up with painters tape, the black shape we see cant be done with a regular rectangular piece of tape. At least not on my antennas

Let me explain. I eyeballed the reflective tape width using a few bts images and electrical/vinyl tape. We can see both ends of the reflective strip on the side facing the camera, right? So i reasonably wrapped the tape around the antenna and cut the tape leaving the right amount visible on our side. I did that at the top and the bottom and got two lengths of tape instead of the same length.

I expected this since it is a tapered pole. A rectangular strip would leave that sort of shape on a cone.. but then I realized I was measuring the reflective tape, not the space left over!!! (Using black tape to measure the area that was not black was bound to confuse me)
If it was a regular strip of tape they would be the same size.
I think they used my biggest diameter, which ended up exactly 1 1/2" and trimmed the other end to what I found to be 1 1/4".... tapering the length. I think they had 1 1/2" tape but wanted the black strip to run the full length. 1 1/2" would overlap at the tip and 1 1/4" would leave too much black at the bottom, wrapped around the sides .
Today I masked off my blade with 1" tape to paint a black area. I did it larger than I needed so the reflective tape would cover the right area with no gaps, so some paint goes under the tape. The shape it left was familiar but too tapered! Much more angled than the strip we see on set. They cut down an existing strip so the black would be full length and only on one side.

Last edited:
I confirmed it with another experiment. My black paint shadow did not match our bts shots, and that tape was rectangular. So I basically used painter's tape to estimate the circumference of the reflective coating at the top and bottom of a 44 inch long antenna I have, and transferred that to 44 inch long painter's tape on the floor. I then sliced it with an Xacto blade, from one corner down to the opposing corner, and wrapped it around the antenna. I tried marking the center of the tape and sticking the centers down first. That's tougher than it looks, think I drifted a few mm.
I also was a bit shy with my bottom measurement - the screen blades wrap around a bit further.


Absolutely tapered reflective tape, and only slightly.

I also was a bit shy with my bottom measurement - the screen blades wrap around a bit further.


Absolutely tapered reflective tape, and only slightly.
Mouse Vader
Sr Member
Neat! Flicker is good with the blade still & RPM sounds about right. Do you know the exact voltage your battery pack is supplying? a tad under 6V is right if that motor is the same as I use.
Wow! If it weren't for the rolling shutter on your camera, I'd have thought it was from 1976!
SB
SB
I believe it's 6V - Vadermania made the hilt and he said the motor needs 6V to run. I can see the end of the motor with red and black wires hot glued in place at the end. They run right to a battery pack (4 AAAs)Neat! Flicker is good with the blade still & RPM sounds about right. Do you know the exact voltage your battery pack is supplying? a tad under 6V is right if that motor is the same as I use.
I actually am planning on interrupting the red wire and putting a toggle switch in the booster. AND I'll be switching the 4 AAAs for 2 3V coin cell batteries. The battery pack is much smaller (and it has it's own tiny switch too I guess) so I'll be doing a little soldering at the black wire, 2 at the switch and then splicing that to the battery packs red. I think?
There is a bearing at the emitter plate and the drive shaft runs right up the neck. I don't remember if there is anything else in there.
His drawing
ANH Obi Wan special effects lightsaber replica project
Mouse Vader
Sr Member
Certainly looks & sounds correct. Really nice saber.
Coin cells are not going to work for you, I've just checked the spec's. Max rate continuous amp draw for CR 2032 is 3.0 mAmps (0.03 amp). The spec sheet for JGA 370 motor it draws 20 mAmp (0.2 amp) no load ; 50 mAmp (0.5 amp) under normal load & may even peak near 100 mAmp (1 amp) as used here. Amphr (should I be wrong) is a 3rd that of AAA so would not last long at all. You could look at 2x LiPo AAA. These are normally rated 3.7V so would run a little fast without a buck voltage regulator keep it down. Would last longer than alkalies & be rechargeable.
PS. Doesn't matter which wire you put the switch on, it's just convention it would be red one.
Similar threads
- Replies
- 32
- Views
- 3,409
- Replies
- 5
- Views
- 954
- Replies
- 2
- Views
- 1,632
