Terminator 2 T-800 Endo Skull Build - WIP - Pic heavy

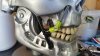
I'm sure that is where I got my silver paint from. Though I might have to buy "chrome" paint for this guy. Right now, it is drizzly and wants to rain, so I can't do anything more today on this. I might be able to mock up the teeth and get them ready.

Possibly try "pledge" to seal it.
Reading about it in the make up thread and people swear by it when wanting a mirror chrome finish


Sent from my iPhone using Tapatalk
 
Looking cool. I would suggest you tilt the skull down a bit to get that iconic look. That's one of the only things Sideshow got right with their busts compared to other companies, which, though more accurate, completely lacked the menace which the downward tilt creates.
 
Looking cool. I would suggest you tilt the skull down a bit to get that iconic look. That's one of the only things Sideshow got right with their busts compared to other companies, which, though more accurate, completely lacked the menace which the downward tilt creates.

I'll see what I can do here. Yeah, interesting how just changing position of the head almost gives an otherwise static piece some emotion. Predator Bios are the same. Tilt them down and they look way more menacing than when closer to level.
 
If it wouldnt cost a ton in shipping, i would have offered to chrome it for you. I have just enough left over from a commission yesterday. That skull is awesome. Good job
 
If it wouldnt cost a ton in shipping, i would have offered to chrome it for you. I have just enough left over from a commission yesterday. That skull is awesome. Good job

Thank you I like it.

That would be awesome, but yeah, return shipping to the US would be close to $300.

Paint experts, even though the skull was painted on Friday, it was still tacky last night. But it appears this tack is on smaller parts what looks like a filler.

Not sure if I should just use metho to wipe it down, or should I break out the turps to clean it back?
 
Its a sunny day today, so I have washed the head down with metho and a fine tooth brush and let it dry. Just checked it and all the tack appears to be gone now. The metho did take off all the tacky paint exposing the grey beneath.

I wish the black paint was chrome, the grey resin underneath was the black base coat as it is a nice weathering effect.

Interestingly enough, same paint was used on the eye balls and they dried without issue.
 
Paint experts, even though the skull was painted on Friday, it was still tacky last night. But it appears this tack is on smaller parts what looks like a filler.

Not sure if I should just use metho to wipe it down, or should I break out the turps to clean it back?


Unknown polymer materials carry with them properties that, in some cases, completely reject paints that are applied to them. Vinyl kits can be the worst because the same chemical additive that keeps the plastic pliable, prevents any paint from drying on them. On the other end, many rattle can chrome products simply do not behave like many of the other paints that are out there. They require a lot of time to fully cure. Especially so if applied heavily. On speculation alone, I would recommend applying a base coat primer utilizing a krylon fusion product. It is designed for plastics. The idea is that if you can get a layer to adhere to the surface and fully dry, then you will know that if there is any delays in the chrome, it is just a matter of time. Not something that is happening beneath the paint.

There are many neat things that you can do with chrome if you know what to expect from it. For example, the body of this car was initially painted with a rattle can chrome. When that layer fully cured, it looked it too.

img7.jpg


I followed that with a satin or gloss clear coat and it toned down the chrome to look more like stainless steel. Both chrome and clear took some time to fully cure but they finally did.
 
Thanks tommin for that explanation. I still won't rule out that I just suck painting :)

Anyway, this where is he is now.

Nice sunny day today, so I gave the black paint a quick clean with a spirit and let it evaporate off, then a hit hit with silver.
attachment.php


After an hour, gave it a 2nd coat.
attachment.php


Then made a start on his teeth. I know termintors don't feel pain, but this guy was I am sure, as I cut a grove into the jaws to make a small recess for the teeth.
attachment.php


He might need to visit a dentist :$
attachment.php


And wired up his eyes :)
attachment.php


Not perfect, but for what he has cost, I'm more than stoked :)
 

Attachments

  • 20160912_100700.jpg
    20160912_100700.jpg
    215.2 KB · Views: 1,114
  • 20160912_102559.jpg
    20160912_102559.jpg
    177.8 KB · Views: 1,102
  • 20160912_131904.jpg
    20160912_131904.jpg
    234.2 KB · Views: 1,119
  • 20160912_160022.jpg
    20160912_160022.jpg
    172.3 KB · Views: 1,092
  • 20160912_160313.jpg
    20160912_160313.jpg
    130 KB · Views: 3,258
Last edited by a moderator:
Looks great. Do a quick search for a timing chain cam sprocket and you'll have one wicked base. Have two extras over here and would be glad to send you one if you would like to cover postage. :D
 
Wanted to add the Cyberdyne logo as a part of my display. This is the look (I think) I am chasing.

attachment.php


I started with this image which I imported into Sketch-Up.

attachment.php


From there I made myself a symmetrical logo and also made a 3D model.

attachment.php


Using some scraps of Perspex, I discovered how out of square my saw is.

attachment.php


Both were made from clear, and I had issues with the dark grey paint where it splattered the job that can needs throwing out). But what annoyed me more was how far out of square it was. Given I like the clear version better, I will break down my model into parts, create a DXF file from that and have all the parts laser cut. and then see if I make a small base or extend the base of the skull to incorporate a small LED.

And I also added a photo of Sarah that I found in the paper props section. I noticed it was out of whack a tad, so rotated the image to square it up. If you right click the image in the thumbnails below and open in a new tab, the full sized image should be able to be saved. I took the file on a USB to a local print shop who printed it, trimmed and also laminated it for a whole $1.25.
 

Attachments

  • terminatorphoto.jpg
    terminatorphoto.jpg
    660.6 KB · Views: 165
  • cyberdyne-system-logo_zps9ce0f976.png
    cyberdyne-system-logo_zps9ce0f976.png
    13.7 KB · Views: 986
  • 20161007_135735.jpg
    20161007_135735.jpg
    90.9 KB · Views: 978
  • 20161007_135446.jpg
    20161007_135446.jpg
    196.7 KB · Views: 987
  • Cyberdine Plaque.jpg
    Cyberdine Plaque.jpg
    34.7 KB · Views: 978
For what ever reason, the paint on this skull always remained tacky, so the other day, I took to it with turps (rags and a small brush) and brought it back to bare resin. I wiped it down with metho, masked up the teeth and eyes and then hit it again with the silver. Seems to have worked this time.

attachment.php


I also hard wired in a new battery box with a switch and tucked all the excess wires inside the stand.
 

Attachments

  • IMG_20170124_124703_386.jpg
    IMG_20170124_124703_386.jpg
    148.5 KB · Views: 951
Whilst I really like my Terminator skull, I want to add the jaw pistons.

attachment.php


I have had a few goes at making them and ditch the efforts because they just look too big or don't allow any movement.

So today in a desperate grab for straws, I dug through my kids Lego and found these parts.

attachment.php


There are still some more bits to find, but this is probably the best result so far.
 

Attachments

  • Jaw pistons.jpg
    Jaw pistons.jpg
    159.8 KB · Views: 931
  • 20170128_163856.jpg
    20170128_163856.jpg
    136.8 KB · Views: 842
For the Chrome finish, I highly recommend an airbrush and Alclad II Chrome. It's cheap and cant be beat. They do sell it in a spray can as well, but be sure to get the gloss black base, spray and polish it to a mirror shine before you add the chrome. It will look identical to the film skull, (of which I have held a screen used T2 skull in 1994)

Alclad is awesome! I painted my Neca Endo with it, although I brushed it on instead of air brush so I could get a slightly dulled/worn look. It still came out really reflective, just be sure to use light coats of Alclad after you have the gloss black done.
The pictures don't do it enough justice but give you an idea of what you can do with Alclad.
EaJfdrsi0Ew5EFhIfl8n1eCqQYTzy_xpdZadnXZnxkg.jpgNcISvtxYJgfeMNr0ql4n0aUjkWOnNe7OC6TP5zKAjZU.jpg
 
For what ever reason, the paint on this skull always remained tacky, so the other day, I took to it with turps (rags and a small brush) and brought it back to bare resin. I wiped it down with metho, masked up the teeth and eyes and then hit it again with the silver. Seems to have worked this time.

http://www.therpf.com/attachment.php?attachmentid=701107&d=1485344743

I also hard wired in a new battery box with a switch and tucked all the excess wires inside the stand.

The lil terminator looks like he just got a time out.
 
Tell him he is a good person and people like him.

Or put clear nail polish on his joints so he stands proud. But put a snow cone is his left hand. Everyone like snow cones.
 
The problem seems to be due to the articulation of the parts of the feet. It is just not solid enough to support the weight of the figure.

Sent from my SM-G900I using Tapatalk
 
This thread is more than 7 years old.

Your message may be considered spam for the following reasons:

  1. This thread hasn't been active in some time. A new post in this thread might not contribute constructively to this discussion after so long.
If you wish to reply despite these issues, check the box below before replying.
Be aware that malicious compliance may result in more severe penalties.
Back
Top