You are using an out of date browser. It may not display this or other websites correctly.
You should upgrade or use an alternative browser.
You should upgrade or use an alternative browser.
Terminator 2 Harley Fat Boy 1/6th scale
- Thread starter Kiwimike
- Start date
It will have to be the iconic pose from the movie poster. Not sure though how well articulated the Hot Toys figure is and whether it will sit naturally on the bike.That looks beautiful, man! Great job!
What pose would you put Arnie in?
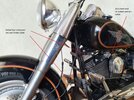
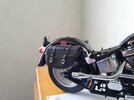
The start of the exhaust system assembly. I decided the finish of the Supertrapp Mufflers wasn't up to scratch so I removed them and the tailpipes and will repaint them. Note the vacuformed heat shields on front and rear exhaust pipes.
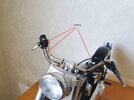
The exact design of the exhaust mounts is giving me a headache at the moment. Still researching as I think my original mounting choice wasn't right.
The exact design of the exhaust mounts is giving me a headache at the moment. Still researching as I think my original mounting choice wasn't right.
Attachments
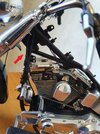
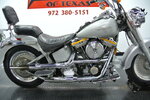
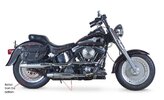
I think I've been looking at the way the mufflers are attached all wrong. I had assumed they were bolted in at right angles to the bike frame. See first picture. I now think they are bolted in from below. See poor quality second picture of the actual bike.
Attachments
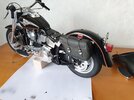
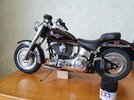
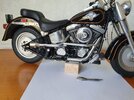
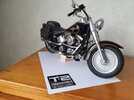
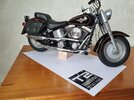
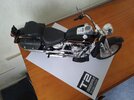
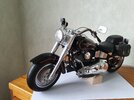
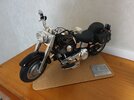
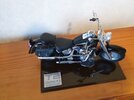
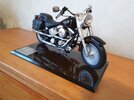
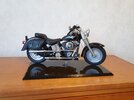
Today, exactly 20 days short of 6 years since I started and the Fatboy is finally completed. What a journey. Parts and purchases from literally all around the world. I learnt so much on this build.
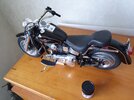
The sheet of paper beneath the bike denotes the intended base size. It's A4, and I deliberately want to keep the base small to give the sense that the bike is literally overpowering it. The T2 Logo is a laser print transparency I'll use to Chemically etch the logo into a sheet of Aluminium. Hopefully the base won't take me 6 years to complete. I'll aim for no more than 2 months.
The sheet of paper beneath the bike denotes the intended base size. It's A4, and I deliberately want to keep the base small to give the sense that the bike is literally overpowering it. The T2 Logo is a laser print transparency I'll use to Chemically etch the logo into a sheet of Aluminium. Hopefully the base won't take me 6 years to complete. I'll aim for no more than 2 months.
Attachments
You are insane, but it paid off, cause that is awesome ") wow
wow
Well done mike!
wowWell done mike!
A little update. Here is a blocked out arrangement of the base. I'm using a cork-backed dinner place mat which I'll paint to look like road. The T2 Logo is best placed at the back. I might paint a median strip too on the faux road surface. Photo taken at night so average quality.
Attachments
OlivierC
Well-Known Member
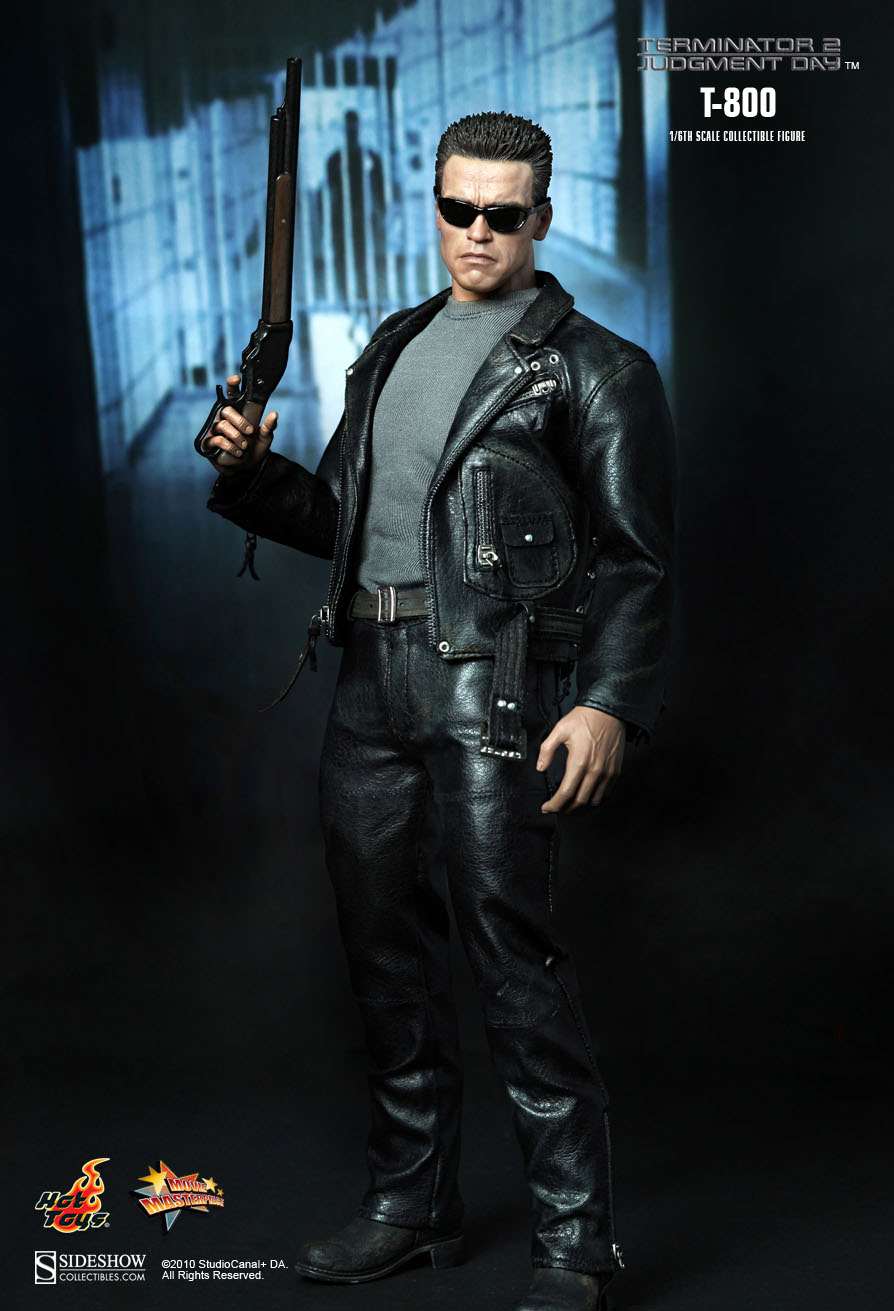
Fantastic work. Do you have the T800 from hot-toys to display with it by any chance?
 www.hottoys.com.hk
Edit : If you don't, great news, it's going for only $600 on ebay
Hot Toys : Terminator 2: Judgment Day - T800 1/6th scale collectible figure
www.hottoys.com.hk
Edit : If you don't, great news, it's going for only $600 on ebay
Thanks Olivier. I do have the Hot Toy. I'm going to build a new left "hand" plus hand-grip for the figure in order to replicate the iconic pose from the movie poster. I deliberately didn't glue the left hand-grip onto the handle bars for that reason.Fantastic work. Do you have the T800 from hot-toys to display with it by any chance?
Hot Toys : Terminator 2: Judgment Day - T800 1/6th scale collectible figure
Edit : If you don't, great news, it's going for only $600 on ebay
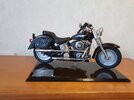
Hi all. It took me more than the planned two months to finish the base. Issues with deciding on its design, and problems photo-etching the aluminium plaque. But finally, here it is. Finished. I decided on a tinted light grey acrylic base which was custom-made. The photo-etched T2 plaque is removable.
Attachments

Too Much Garlic
Master Member
Looks like a full scale bike. Awesome.
Lt Washburn
Sr Member
Just read through the whole project. What a fantastic build. I'm super impressed with the all the tiny detail work as well as your penchant for redoing things that would have pleased most people. Also, the number of techniques learned and used to accomplish it.
I did have a few questions about how you did a few things. On the pin-striping... you experimented with different ways to create masks and whatnot, and I wondered if photo-etching was a possibility too, as you seemed adept at using that method for other reasons.
Also, on the license plates, you say you embossed them on a photo-etched template into thin aluminum sheet? Did you just use a rubbing stick or something to for the metal into the characters? Was it extra-thick etched metal or was the thickness of a regular brass sheet enough to get the depth of embossing you wanted?
HiJust read through the whole project. What a fantastic build. I'm super impressed with the all the tiny detail work as well as your penchant for redoing things that would have pleased most people. Also, the number of techniques learned and used to accomplish it.
I did have a few questions about how you did a few things. On the pin-striping... you experimented with different ways to create masks and whatnot, and I wondered if photo-etching was a possibility too, as you seemed adept at using that method for other reasons.
Also, on the license plates, you say you embossed them on a photo-etched template into thin aluminum sheet? Did you just use a rubbing stick or something to for the metal into the characters? Was it extra-thick etched metal or was the thickness of a regular brass sheet enough to get the depth of embossing you wanted?
In answer to your questions I never thought of photo-etching masks for the pinstripes. I might try that on another project in the future. Thanks for the idea. On this project though I'm not sure how I would have stuck the etched masks to the complex curves of the fenders and gas tanks.
For the license plate I burnished the aluminium foil using a wooden cuticle stick, then rubbed it in for a final finish using a wooden toothpick to get a snug impression of the plate. At this stage of the build I hadn't built a vacuum-form machine. That's how I might have done it had the machine been ready.
Lt Washburn
Sr Member
Good to know. To be clear, I have no idea if photo-etching mask would work for this purpose, I was just curious if you had considered it given your other use of the technique.
Hi, my apologies. I didn't answer your question about the thickness of the brass template used as the former for the license plate. Yes, it was thick brass, around 1.5mm thick. It was also a deep etch, made possible by heating the etchant and using an aquarium air bubbler to keep the etchant solution moving.Good to know. To be clear, I have no idea if photo-etching mask would work for this purpose, I was just curious if you had considered it given your other use of the technique.
Similar threads
- Replies
- 7
- Views
- 1,709
- Replies
- 1
- Views
- 1,353
- Replies
- 14
- Views
- 13,159