Terminator 2 Harley Fat Boy 1/6th scale

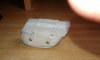
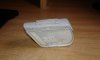
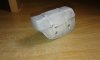
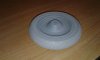
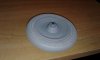
Here's my first cut at the rear tire. Terminator, do you have a photo of the full size tire? I'm concerned I've modeled the edge of the tire tread as too pronounced and sharp. Plus, I'd like to know what's written on the tire, apart from Harley Davidson and Dunlop, etc.

PM:ed you with a link to some high res photos I shot today :)
 
Here's a shot of the final version of the rear tire, with crazy, insane detail on it. Thanks Terminator for the awesome high rez photos of the rear tire. I just hope 3D printing technology can capture this kind of detail.
 

Attachments

  • Screenshot (18).png
    Screenshot (18).png
    963.5 KB · Views: 429
Here's a shot of the final version of the rear tire, with crazy, insane detail on it. Thanks Terminator for the awesome high rez photos of the rear tire. I just hope 3D printing technology can capture this kind of detail.

Whoa, that looks fantastic :eek definitely insane detail on it
 
Here's the thing.... I finished the rear tire, beautiful job, then I got sent this screen grab from T2. See attachment.


It's of the rear tire, and it's a completely different model of tire from the 402 which is also the right tire if you follow me as in, there was a version of the bike with a Dunlop 402 tire on it.

Me, I'm going with the one featured in this screen grab. It's a dunlop touring elite k291t rear mp85h18 tubeless.

I don't know whether to actually thank the friend who sent it to me and must have spent a few hours reviewing the film to find this shot. :)
 

Attachments

  • t2_grab.jpg
    t2_grab.jpg
    231 KB · Views: 395
Here's the final version of the revamped rear tire. Screen accurate this time. All that remains now is to print them in 3D, then take a mould off the printed tire and recast them in some rubber compound.
 

Attachments

  • Screenshot (27).png
    Screenshot (27).png
    1.2 MB · Views: 366
Back again, after nearly two years of radio silence. Not that I haven't been busy. Here's the best version of the rear tire I could get 3D printed, through Shapeways. It's printed in FUD (Frosted Ultra Detail).
Will post some more photos in a few days time. Note, I'm going to build the tire sidewalls myself. 20170820_130703.jpg
 
IMG_0160.JPGIMG_0161.JPGIMG_0100.JPGIMG_0101.JPGIMG_0105[1].jpgMore photos. The license plate was a challenge. Managed to find the right font and after etching a piece of brass (having learnt how to photo-etch) I was able to punch the plate out of a piece of oven tray aluminium. The lettering on the license plate is one big decal, printed on white.
 
Last edited:
Looking good! Though the photos in the last two posts don't work :(

The tire is looking great. I hope my reference photos will help :)
I should have some photo updates of my 1:1 replica bike soon :D
 
Here are some shots of the saddle bags. I wanted to show the photo-etched Harley buckles before I hit them with primer.
 

Attachments

  • 20171126_104904.jpg
    20171126_104904.jpg
    390.7 KB · Views: 386
  • 20171126_104921.jpg
    20171126_104921.jpg
    371.1 KB · Views: 385
  • 20171126_105404.jpg
    20171126_105404.jpg
    1.1 MB · Views: 367
  • 20171126_110215.jpg
    20171126_110215.jpg
    1.1 MB · Views: 414
Last edited:
Front and rear tires primed.

By far the most challenging part of this entire build and the one key design feature that sets this build apart from other builds (which tend to use the tires that come with the Tamiya kit) . The tires and their tread were designed by me after I taught myself to learn Rhino modelling software, then 3D printed via Shapeways in New York, using Frosted Ultra Detail.

Basically there are three parts to each tire, one complete outer ring and two sidewalls. Note the tire rims are from the Tamiya kit and weren't 3D printed. In order to get a very snug fit with the rims, I cut the sidewalls with a razor saw and slotted them into the rims, then repaired the area where I sawed through the sidewalls.
 

Attachments

  • 20171126_150916.jpg
    20171126_150916.jpg
    1.1 MB · Views: 398
  • 20171126_150934.jpg
    20171126_150934.jpg
    1.1 MB · Views: 391
Last edited:
A bit more progress. I replaced the rear disc brake with one fashioned out of aluminium sheet, which I then painted with Alclad Stainless Steel to get the right metallic finish
 

Attachments

  • 20180127_143338.jpg
    20180127_143338.jpg
    527.1 KB · Views: 364

Your message may be considered spam for the following reasons:

If you wish to reply despite these issues, check the box below before replying.
Be aware that malicious compliance may result in more severe penalties.
Back
Top