Star Trek USS Centaur studio scale

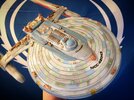
The tank tracks appear to be 'panzer iii/iv track link type 7'

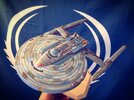
I don't know which exact parts were used on the studio model, only that they're 1/35 scale. I found it hard to get accurate parts, as many are the early ones with the hollow central guide prong. Mine are supposed to be later ones with the solid central guide prong, but mine lack the prong groves as seen on the real life version.

If you Google 'panzer iii/iv track link type 7' an article pops up with the real life tracks. It's my best guess and I don't know which kit parts were originally used.
 
Great. Thanks!

I have lots of ideas on how to repurpose the grooves, and even the central manufacturing circles, into something interesting.

I may be able to work with what I have, but I'll look to see if I can get better reference.

A
 
It certainly gives it a sense of scale and mass when you see it as a block of cast iron:
051de2643e1a84f83646a2db299d76f9.png
 
Awesome. Thank you. I started modelling the actual tread link, but realized I’d fallen down a rabbit hole of too-much-detail that I didn’t need and was not present in the kit part or greeble. Reference of the plastic part would greatly appreciated!
 
I finally got some time to take photos of the Panzer III/IV tank tracks I used on my two Centaur builds. They are the best I can do using my cell phone. If I can find the cords for my camera, I'll be able to take better photos and download them to my computer. Right now my SD card reader is not working, thus using my cell phone. Anyway, here are the photos:

jLizlle.jpg


LJ1NpOL.jpg


vYvyQMj.jpg


I hope these work out for you Adam.
 
Looking forward...

If anyone has the time...

... would be an image of the bridge either by itself or before the shuttle bay is attached.

I'm sure I can find images of a miranda bridge online, but when I get the calipers out, the shuttle bay cowling does get in the way.
 
Would a Enterprise Refit bridge work for you? I thought I had a Reliant bridge left over from other builds, but I can't find it. Let me know.
 
That article mentions how using pre-made greebles saves time..

The ridiculous amount of time I'm spending trying to make these greebles accurate is actually nuts!

(But then they also say that in the article... Pick a random kit piece and the next thing you know people need to meticulously match it... oh well...)

2d84d144d45fb55798f4b37fcf4bd2ee.png


9d66397fdf650929b4bf29f77611b596.png


And I hate this greeble!

Most of the underside of the dish was done in a hurry to meet Gary Hutzel's needs for shooting.

After I make one version of the ship as accurate as possible, I'm probably going to go back and "fix" some of these greebles and try to make them feel a little less stuck on at random.

A
 
I always though that that particular greeble you are working on was in homage to the markings on the underside of the original Enterprise NCC-1701, or that it represented the "landing gear" for the main hull.
 
Heh - thanks for the vote of confidence!

The entire undercarriage was rushed and not very well thought through and most of the detailed pieces just feel "stuck on".

"Fixing" them will be a thing for a later date.

Right now I *am* going to concentrate on the most accuracy I can.

I did embellish some details that were too small to see, such as the circles on the tank treads, but that was as much as an experiment in using the software as it was a necessity:
058b8e6e2946636aa3a9f8353e1ec090.png


The "rings" themselves are probably just errors or artefacts from the molding process.

b627db5f5b6ad123646527618e7697dc.jpg
 
You are correct in that they are "errors" as in those circles are known as "ejector pin" marks. They happen when the polystyrene molded product is separated from the castings. (I probably said that wrong and anyone who wants to correct me, please do.) I would leave those flat surfaces empty and not bother with trying to make something of those circles.
 
Last edited:
I've pretty much finished up my Centaur model! Thanks to all who posted the pics and parts lists! They were invaluable. I tried to match the look of the studio model. I still need to get the M2 Bradley piece and another Reliant bridge back for the bridge, but I can add them later. I also will get around to filling the nacelle gaps which I forgot about one of these days.
 

Attachments

  • 152365597_1870575709756541_6007380348669004020_o.jpg
    152365597_1870575709756541_6007380348669004020_o.jpg
    118.8 KB · Views: 175
  • 152365602_1870575716423207_7424049034143710079_o.jpg
    152365602_1870575716423207_7424049034143710079_o.jpg
    99.5 KB · Views: 170
  • 154959487_1870575723089873_232206426011166199_o.jpg
    154959487_1870575723089873_232206426011166199_o.jpg
    103 KB · Views: 149
  • 155076810_1870575719756540_5852336316047262414_o.jpg
    155076810_1870575719756540_5852336316047262414_o.jpg
    133 KB · Views: 145
  • 154162919_1870575703089875_9180140523489909445_o.jpg
    154162919_1870575703089875_9180140523489909445_o.jpg
    99.9 KB · Views: 145
  • 154460623_1870575713089874_5022599400820303144_o.jpg
    154460623_1870575713089874_5022599400820303144_o.jpg
    112.8 KB · Views: 155
  • 154328700_1870575706423208_181306780687461967_o.jpg
    154328700_1870575706423208_181306780687461967_o.jpg
    139.1 KB · Views: 145
  • 152813746_1870575726423206_251791520734351110_o.jpg
    152813746_1870575726423206_251791520734351110_o.jpg
    147.4 KB · Views: 150
  • 153110831_1870575729756539_4513491716221465517_o.jpg
    153110831_1870575729756539_4513491716221465517_o.jpg
    174.3 KB · Views: 159
  • 152333823_1870575733089872_2208561236180621697_o.jpg
    152333823_1870575733089872_2208561236180621697_o.jpg
    141.2 KB · Views: 187
I've pretty much finished up my Centaur model! Thanks to all who posted the pics and parts lists! They were invaluable. I tried to match the look of the studio model. I still need to get the M2 Bradley piece and another Reliant bridge back for the bridge, but I can add them later. I also will get around to filling the nacelle gaps which I forgot about one of these days.
Wow! That's absolutely fantastic!

I had to go into my study to make sure mine was still there!

Amazing attention to detail.

Well done!
 

Your message may be considered spam for the following reasons:

If you wish to reply despite these issues, check the box below before replying.
Be aware that malicious compliance may result in more severe penalties.
Back
Top