finalfrontier
Well-Known Member
Stupid question, how do you pm? I tried start a conversation but I don't think that is it.Send me a pm. I might be able to help.
Stupid question, how do you pm? I tried start a conversation but I don't think that is it.Send me a pm. I might be able to help.
I have an extra as well, if anyone is lookingNot to get off topic or Hijack the thread but any idea where I can find a Aluminum data drum for a classic build?
Looking forward to seeing progress on this!!
Bummer, I'm still looking for one if you do find it.I have an extra as well, if anyone is looking
Edit: Correction. I checked my parts stash and I don’t know where my extra drum is. My mistake there.
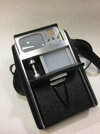
Alley:I’m about to start on a Star Trek Season 3 “Geological Tricorder” project…
View attachment 1715894View attachment 1715893
I’m shocked to find that there really aren’t any builds of this model on the RPF.
Does anyone have an accurate build that they can post pictures of? I’m especially interested in seeing the construction of the “distress signal” blinking light box.
I’m planning on assembling a light box from soldered brass stock (that will be painted black with textured mylar applied), “milky” acrylic, and a blinking incandescent bulb.
I’m assuming the original employed a simple blinking incandescent bulb like the universal translator.
View attachment 1715900
Archived and thanx again, Mr. Trek.Only pic I could find of my Geo build…
Also attached a pic of two trics I built along with the parts to build.
Alley:
Member Lost in Trek Shared some of his TOS gorgeous tricorder builds with us not too long ago—including the attached Geological. Recently, I purchased a gutted Master Replicas that the previous owner planned on turning into a Geo. He offered me the cam and proper watch crowns, but I have other plans for the shell. He might be an RPF Member, but I don't know his handle. I can probably put you in touch with him if you have any interest.
Best. Mike.
") ).
).I know a guy... He's Canadian, typically polite, and has turned many disc arrays for me. I'll be happy to put you in toch if you'd like.Not to get off topic or Hijack the thread but any idea where I can find a Aluminum data drum for a classic build?
Looking forward to seeing progress on this!!
That would be fantastic, Alley great workI know a guy... He's Canadian, typically polite, and has turned many disc arrays for me. I'll be happy to put you in toch if you'd like.
Best. Mike.
This is Mike...That would be fantastic, Alley great work
This is Mike...
If you give me your contact information, I will forward it to him. We do a lot of business on Facebook Messenger, but he certainly has access to email and text
Pm sentThis is Mike...
If you give me your contact information, I will forward it to him. We do a lot of business on Facebook Messenger, but he certainly has access to email and text messaging.
Best. Mike.
Believe it or not, I’ve considered it.You know your going to have to put a wad of chewing gum on it to be screen accurate LOL
Looks good!
Btw, I used the same CAM.