Space 1999 Eagle Transporter Build Club (PIC HEAVY!)

Re: Space 1999 Eagle Transporter Build Club UPDATED Sept 26th (PIC HEAVY!)

Cool! Maybe when you come back you can give me a clue as to what color the CM floor is supposed to be! :)

Oh, and another question. When I seal the two halves of the CM together, I'll need to have detailed the interior before that point. The question is...I guess it's a question...is that I don't know what number to put on the door! :confused
 
Re: Space 1999 Eagle Transporter Build Club UPDATED Sept 26th (PIC HEAVY!)

Well, as with so many T.V. sets, a change in lighting can have a radical effect on illuminated surfaces. I am pretty certain that, at one time, the raised walkway between the two pilot seats was a black rubbery surface, and at another time it was in a mid grey, which incidentally, was then (apparently) used throughout the interior to replace the original beige colour. I can only imagine that the beige carpeting became rather grubby after a short space of time. So, in short, I would I would visit this link below, look at the very first picture in the top right hand corner, and you will see exactly what I mean:
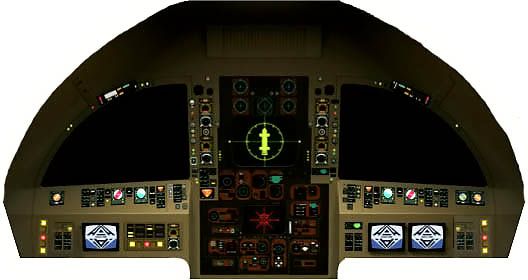
Space: 1999 Eagle - Cockpit
Also, you can revisit page 9 of this thread, post number 212.

Regarding the number on the door, that is entirely your decision! :)
There are references in a couple of episodes to just how many Eagles were in the fleet.....I seem to recall, without actually verifying, that the fleet consisted of approximately 28 Eagles at any one time. So pick a number and go with it! What day of the month does your birthday fall on? What's your lucky number? Heck! why not be totally different and have Eagle 13 !!!??? In short, you choose....:)

Lastly, you mentioned the difficulties that you anticipated, when it comes to the famous never seen cockpit front wall. I would refer you to Page 5 of this thread. Post number 118 to be exact....If you have any photo editing software whatsoever, I would imagine that it would be quite a simple procedure to slightly stretch or squash the image of the front wall to fit your cockpit...Maybe clone a few panels and put them where the seats obscure the consoles...
If you have any issues with doing this, just let me know and I will see to it for you, Mate. :)

Well I hope that helps a little, Boblical Bob! :lol

Superb work, as always!
Darren
 
Re: Space 1999 Eagle Transporter Build Club UPDATED Sept 26th (PIC HEAVY!)

Try this, Bob.

CM1.jpg


You can always squeeze or stretch the width and height. or enlarge or reduce it where needed.....Obviously, you can trim off what you don't need above and around the windows. I have purposely left more of the image than you will need in those areas so I didn't bother trying to get too smooth a curve there, only to be cut off later. You see, this is where your cockpit and mine differ. Knowing that the interior windows were always going to encroach upon the exterior windows, I had to make a choice between the maximum width versus the full depth, (front to back.) I personally decided that the maximum width was preferable for me as, I still had enough depth to install the front console, the seats with pilots, and the 'boxes' on the bottom of the rear cockpit wall, directly behind the seats. I genuinely envy you your beautiful cockpit, and the in scale distance between the back and front walls, but I don't envy your predicament regarding the discrepancy between inner cockpit dome and outer CM shell when viewed from the outside of the windows. Rest assured, I am trying to find some ideas in advace, should you need help. Knowing you, you already have a secret plan.....hehehe!

The other thing was, I noticed today that you can buy a set of 1:35 scale Airfix/Revell military figures for very little money. (Around $10) you should find that they are as close to the scale you need, as my figures are to the scale of my Eagle. You would need to adapt them a little but it would be much easier than scratch building them.

Average man = 6' or 72"
your required figure size = 2"

72 / 2 = 36 or 1:36 scale. Right on the money :)

Hope that is of some use to you Bud!
 
Last edited:
Re: Space 1999 Eagle Transporter Build Club UPDATED Sept 26th (PIC HEAVY!)

Yeah, I'll try to squeeze that into my space, Darren..thanks!

I've got a slightly different idea for the windows, however. That's one of the reasons I've had a bit of difficulty visualizing it. All I can say is...stay tuned!

I thought the floor looked different colors throughout the series! Funny how in real life, when someone gets new flooring, you immediately notice it. On tv, they could have a different floor every week and it doesn't even register until a season or two later!:lol

Thanks, buddy! :)

Oh, I seem to have misplaced my Eagle font! Know a source?
I just know I don't want a 1 on the door, because it won't immediately be recognizable as a number, whereas 6 or 4 or something will!
 
Re: Space 1999 Eagle Transporter Build Club UPDATED Sept 26th (PIC HEAVY!)

Oh, and thanks for the tip regarding the Revell military figures! I'll look into that, very intriguing!

Two steps forward, one step back dept: the lathe I was going to use for my engine bells has been sold out from under my nose, so at the moment I'm up in the air on those...:cry

Hopefully Darren has a source for 1:36 scale plastic wine glasses!:lol
 
Re: Space 1999 Eagle Transporter Build Club UPDATED Sept 26th (PIC HEAVY!)

I am hand drawing my door numbers as I am also hand drawing/painting my control panels. I wish I had done as you have and colour copied them onto satin photo paper. I would have saved hours and hours of work and the results would, like yours, have been soooo much crisper and cleaner....

By the way, regarding alpha fonts, try this:

Alphan Typefaces

1:36 scale wine glasses! :lol

Just out of interest, what size would your bells need to be? Rim to top of glass stem?
 
Re: Space 1999 Eagle Transporter Build Club UPDATED Sept 26th (PIC HEAVY!)

Wow, the Alpha font business is a lot more complicated than I ever realized! Thanks...that's a big help!

My engine bells (helpful actual-size picture included) are about six centimeters wide at the rear, and about 5 centimeters long, to the point where the bells "end".

Helpful actual-size picture:
View attachment 120106

I wonder...would 1:36 scale wine be 36 times stronger, or 36 times weaker?
 
Re: Space 1999 Eagle Transporter Build Club UPDATED Sept 26th (PIC HEAVY!)

Ah, yes...but remember earlier in this thread I think we decided that time moves slower for scaled-down objects, so stronger wine would work less slowly in the bloodstream!:love

This stinks..I have to go to work in 45 minutes, and I'd rather work on my Eagle!:cry
 
Re: Space 1999 Eagle Transporter Build Club UPDATED Sept 26th (PIC HEAVY!)

Okay Bro'

I will look into the wine glass thing just for fun and post before you get back. Good to hear from you and stay safe!
 
Re: Space 1999 Eagle Transporter Build Club UPDATED Sept 26th (PIC HEAVY!)

Here you go. Exactly the right size and shape!
 
Re: Space 1999 Eagle Transporter Build Club UPDATED Sept 26th (PIC HEAVY!)

Here I go...what?:lol

Or do I have to wait to get back from work in the morning to see?:confused

And why, oh why does the mood always hit to build when time and circumstance do not allow it?!
 
Re: Space 1999 Eagle Transporter Build Club UPDATED Sept 26th (PIC HEAVY!)

Because there is nothing like being told to not do something to make you want to do it! :unsure
 
Re: Space 1999 Eagle Transporter Build Club UPDATED Sept 26th (PIC HEAVY!)

You rike my prastic grasses sojahboy? rikey rikey nine dollah!
 
Re: Space 1999 Eagle Transporter Build Club UPDATED Sept 26th (PIC HEAVY!)

Too much to quote, too much AWESOME in this thread. As for the floor color, I remember the black rubber mats and I also remember a burnt orange color in I think the Science Eagle in the second season. But mostly I remember the black mat floors. Which would make sense as the mats could be rolled back to access , access panels for the wiring and hardware with a strip at the edge. We have something similar to that in the family RV where there is metal edging screwed down to hold the plastic runner, to protect the carpet.

It's 4:00 am and am I making any sense?
 
Re: Space 1999 Eagle Transporter Build Club UPDATED Sept 26th (PIC HEAVY!)

Thank you, Greylocke. I appreciate it :)

Well, due to work commitments, I have been finding it ever more difficult to spend time on my Eagle, but I did manage to make a few "try-out" parts for the engine assembly. These pieces are purely for seeing how things will fit together and to give me a rough idea how it will look once built and assembled. Firstly, I have constructed one of the large tanks that fit directly onto the engine bells. The construction method used for these is pretty self explanatory. I have borrowed a lot of ideas here from Studio_1999's build blog, as it seems very close to my own way of approaching things.

EngineParts3.jpg


I know you have all seen my "prototype" engine bell before; I did keep hold of it for this very purpose and here it is with some of my (soon to become,) trade mark bottle tops glued on. They are really close to the correct dimensions - within 2mm so I can hopefully coat them thinly in Body filler to make up the difference. I will, of course, also construct the opposite side of this coupling, which will fill the gap you can see between the bell and the tank.

EngineParts4.jpg


I also made a start on the VTOL bells that attach to the underside of the Eagle.

EngineParts1.jpg


Again, I stress, that these are all just test pieces and will not feature in the final build. These parts are proving to be the single most difficult aspects of the whole build, for me and I need more time to really iron out the build method. The part that is giving me the most difficulty, are the rings that are cut into the surface of the bells; getting these straight, parallel and of even width and depth which mine definitely are not!!! Back to the drawing board....
 
Back
Top