Space 1999 Eagle Transporter Build Club (PIC HEAVY!)

Re: Space 1999 50 1/2" Eagle Transporter Scratch Build (PIC HEAVY!)

All I am saying is that my CM was built in 4 days and that has to be a record...you can keep your plastic boiling.....I will,stick to my papier mâché! :lol
Seriously, though...whatever float your boat.....

Yeah, but your CM wasn't packed away all summer long!:lol
In addition I have no papier mache skills whatsoever. The only thing within recent memory I've made was a four-foot or so long peanut shell. That was as detailed as I'd dare get with the stuff!

Besides, look how well your technique did for your stormtrooper helmet!

(I love it when a rare opportunity arises to dust off one of the seldom-used emoticons!)
 
Re: Space 1999 Eagle Transporter Build Club UPDATED Sept 26th (PIC HEAVY!)

Started gluing down thin styrene sheets to the "window socket" cavity areas, or whatever they're called.
View attachment 118069View attachment 118070View attachment 118071
The outer edges are not perfectly trimmed. There's a bit of overhang, which will be dealt with separately. The final product will have one additional thin layer on top of this one.
View attachment 118072View attachment 118073View attachment 118074
Soon, I'll be ready to attack the cockpit interior...
View attachment 118075
 
Re: Space 1999 Eagle Transporter Build Club UPDATED Sept 26th (PIC HEAVY!)

I think that you are going to have the cleanest, most detailed and best looking CM that anyone will have ever seen. :eek

It really is looking beautiful, Mate. And yes I admit that my outburst was pure jealousy at your incredible build skills and techniques.:lol
 
Re: Space 1999 Eagle Transporter Build Club UPDATED Sept 26th (PIC HEAVY!)

I'm just jealous of the skills you both present and are sharing with the rest of us. Darren and Bob you guys have shown critical thinking skills and attention to detail and taken them to the Nth degree with these builds. I stand humbled in your internet presence. :)
 
Re: Space 1999 Eagle Transporter Build Club UPDATED Sept 26th (PIC HEAVY!)

Thanks a million, Darren and Greylocke, for all your kind words!

As far as being the nicest, cleanest eagle command module out there, Darren, I dunno about that...there are some awe-inspiring builds out there, many of which make me feel pretty humbled! :confused It's like a food-chain of humility around here!:lol But while we're all busy humbling each other, the work must go on!:thumbsup

I'm very close to the stage where I'm either going to screw something up, get it kinda-sorta right, or do a nice job! But whatever happens, we're going to learn from it, since I promised to share all my mistakes, too.:unsure

Keep in mind this is my first build in quite a few years!:wacko
But it's the first of mine to be built with an audience and input...and frankly I couldn't have hoped for a nicer bunch of guys! :)
 
Re: Space 1999 Eagle Transporter Build Club UPDATED Sept 26th (PIC HEAVY!)

Good evening everyone! :)

I apologise for the delay, but I have been somewhat sidetracked in another smaller build for a customer...

Anyway, I have managed finally to find the time to assemble the two halves of the spine by joining them temporarily with 4 pieces of card that are cut to exactly the right dimensions and tacked into position. Everything is as it should be and the spine is straight and true. There is also no rocking when laid on a flat surface. I can now add the horizontal connecting pieces and finally, once they are all in place, I can remove the card jig and clean up/fill/sand etc...prior to painting.

I did take a few test pictures to see how it is looking over all and here are the results. from the rear walkway, looking right down into the cockpit:

InsideLength2.jpg

InsideLength3.jpg


As you can see at the top of the picture, the spine is really starting to fill the void above the model.
Here are a few shots of the outside. I have removed the pod here to allow me to concentrate on alignment etc, of the two cages and the spine, to ensure that all is as it should be. Happily, I can state that all seems to be in good order. I have included the figure and buggy for size/scale reference. the figure is just under 1/3 of a foot high, or, 10cm high.

OutsideLength1.jpg

OutsideLength4.jpg

OutsideLength3.jpg

OutsideLength2.jpg


I am hoping to get back to this ASAP but I also have some jobs that have come in that I need to take care of for the pennies they bring....
Thank you for looking in and I hope this update finds you all in good health and spirit!
 
Re: Space 1999 Eagle Transporter Build Club UPDATED Sept 26th (PIC HEAVY!)

Would it be an underwhelming response if I were to simply say "Wow!"?

I agree...it would be.

Let me try again by saying...

"Wow!"
 
Re: Space 1999 Eagle Transporter Build Club UPDATED Sept 26th (PIC HEAVY!)

I take it you are overwhelmed by my new avatar, then....:lol
 
Re: Space 1999 Eagle Transporter Build Club UPDATED Sept 26th (PIC HEAVY!)

take it you are overwhelmed by my new avatar, then....:lol

Oh, yeah, I was going to mention that, but I forgot! I was too busy "Wow"-ing your work! :)

I'll be posting a "miniature wow" update shortly...
 
Re: Space 1999 Eagle Transporter Build Club UPDATED Sept 26th (PIC HEAVY!)

I am seriously looking forward to it, My friend and Thank you for the Wow! :lol

I have been caught up this week on another little scratch build for a customer's husband who originally wanted it for Christmas but now needs it for his birthday in ten days time so it's been all hands on deck here!
 
Re: Space 1999 Eagle Transporter Build Club UPDATED Sept 26th (PIC HEAVY!)

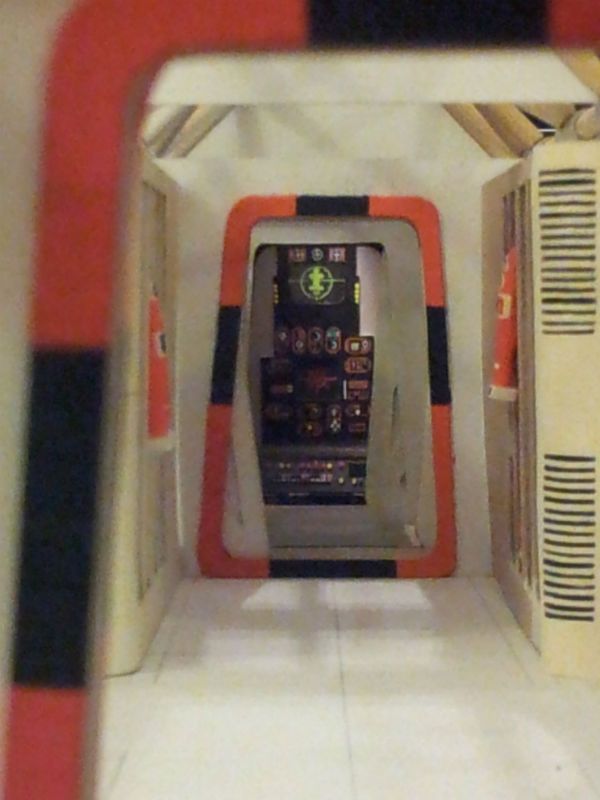
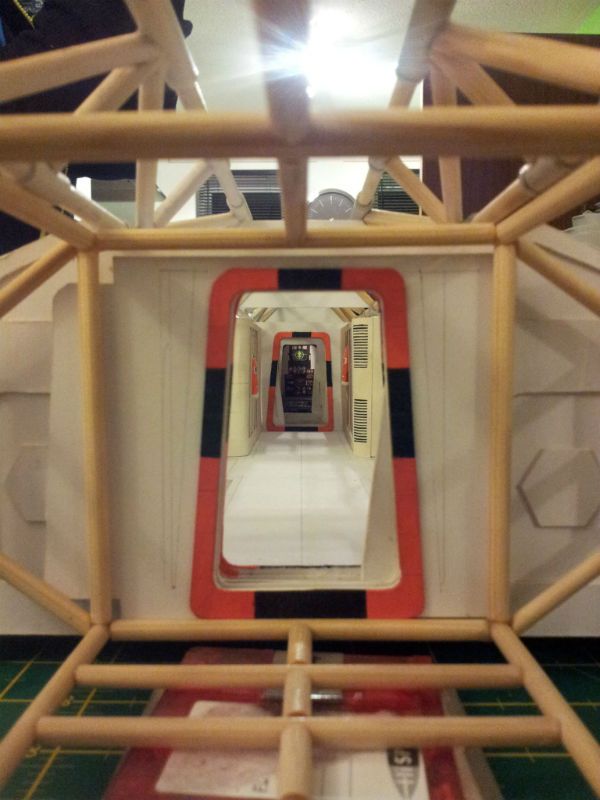
The more I look at your latest stages of build, D, the more I'm impressed by the effect on the scale afforded by the large size. Notice the apparent 'vanishing point' in the images, in the same way you'd draw a picture with a 'vanishing point' to create the effect of perspective by converging all the lines at that point, which provides a visual mathematics to represent distance. Your model, with that in mind, turns this...
View attachment 119287
...into this!
View attachment 119288
Not every day you see a model with this effect!:eek

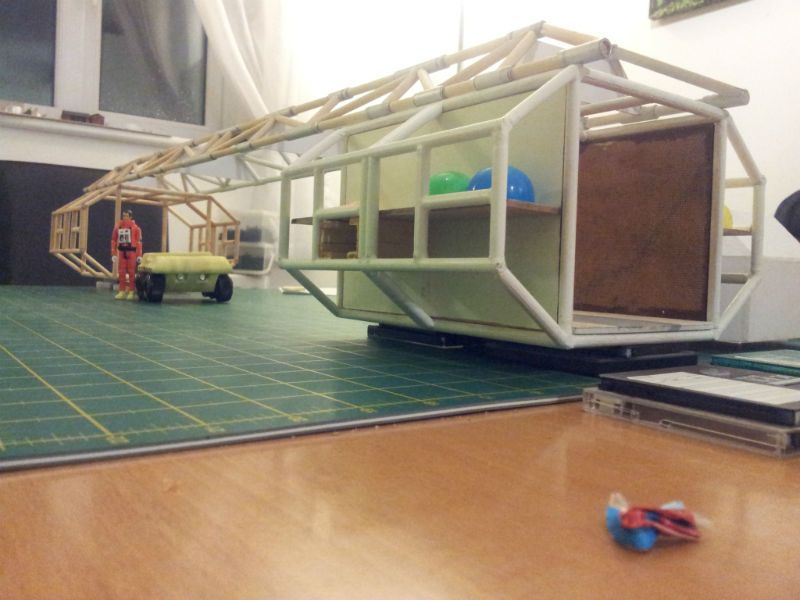
Even the little things like looking up Darren's Eagle hallway, and the sleeves of the spacesuits sticking out a tad into the hall from their hangers. Pretty impressive detail! Every piece of hardware and junk he comes up with adds to the total effect nicely! Heck, I still like the Gumby spacesuit:)

(I'm wondering more and more if the Eagle would've made a nice model designed as a wall-mounted display, held fast to the wall by a Daria-style docking tube! As I'm moving into a bit more limited space..oh, don't mind me, just musing....)

Anyhow, an update. Back to steaming plastic on the stove again! (I know there are steampunk models...but steampunk methods?):lol

I'm going to use the back wall of the command module as a template for the styrene ellipse which will cap off the end of the module.

Concerned about water and steam-combined with wrapping hot, wet plastic around a foam piece of the model-it seemed wise to wrap thick plastic tape around the affected edges. I was cautious when pressing tape against painted surfaces...
View attachment 119289View attachment 119290View attachment 119291

(Needless to say, I can't take pictures with my nose while both hands are busy with heating and bending, so no photos of this stage. Just pretend you had to go to the bathroom and missed that part.)

I made two pieces, and the curvatures seem pretty workable Once again the rear wall of the module is used as a template, this time for gluing the elliptical ring together. You can see how the ring will fill out the "missing piece" across the bottom because the lower portion had to be 'sliced off' to accommodate the floor level...
View attachment 119292View attachment 119293View attachment 119294View attachment 119295
The gluing begins, an inch or so at a time. The right and left corners were completed with straight little styrene "bricks" I cut, which once sanded into their final contour, will work great...but more importantly, makes life at this step easier...
View attachment 119296View attachment 119300View attachment 119301
Once side "A" was completed, on to side "B". I flip the command module wall around and place it against the existing frame and proceed to cement the other half...
View attachment 119302View attachment 119303View attachment 119304View attachment 119305
I cut the excess plastic away from the edge, so now the basic part is complete. I like how the rear wall sort of "snaps" into place. Now with two solid "joists" to work off of, I can see there's going to be some more steam in my near future!
View attachment 119306View attachment 119307View attachment 119308View attachment 119309View attachment 119310View attachment 119311View attachment 119312View attachment 119313View attachment 119314
 
Re: Space 1999 Eagle Transporter Build Club UPDATED Sept 26th (PIC HEAVY!)

:eek :eek :eek!!! Seeing your builds does two things to me - it either inspires me to continue building or it makes me want to give up the hobby. Right now I feel it's the latter.
 
Re: Space 1999 Eagle Transporter Build Club UPDATED Sept 26th (PIC HEAVY!)

:eek :eek :eek!!! Seeing your builds does two things to me - it either inspires me to continue building or it makes me want to give up the hobby. Right now I feel it's the latter.

You kiddin', bro?!:eek You're one of my big inspirations! You're gonna make me give up the hobby myself, considering you could probably build the exact same thing perfectly, except about 1/10 the size these are!

Then, you start adding on to your Cetacean diorama, as if it's a living thing, growing beyond any sea monkey's wildest dreams! And it's one awesome ride watching it happen!:thumbsup

Let none of us quit!:cool
 
Last edited:
Re: Space 1999 Eagle Transporter Build Club UPDATED Sept 26th (PIC HEAVY!)

Bob, your last build post was simply biblical!!!

I am so frigging envious of your talents........you build things properly......cleanly.......such immense levels of patience, experience and skill......you are a master craftsman and it's an honour to share this thread with you!
 
Re: Space 1999 Eagle Transporter Build Club UPDATED Sept 26th (PIC HEAVY!)

Thanks, Darren! Though 'biblical' is too high a praise. I'll be happy to settle for 'Boblical'! :lol Glad we can encourage and motivate each other!:thumbsup

Well, it's time to do some work on the cockpit. I can't work on too much of the outer framework of the rear section, because a) the rear wall needs to be attached so I can add curved outer struts from the rear ellipse to connect it to the mid-section ellipse, and yet b) I won't be able to get the rear wall inside the model after the 3/4 surrounding shell has been added. :confused So, I must work inside-out on this.

I dry-fitted the parts together and looked for any potential problems/discrepancies with the fits, because any problems of this nature must be corrected now, or never!
View attachment 119679View attachment 119680
While test-fitting, I glued a square rod of styrene to the front section, to function as a brace for the side wall. Obviously I'll cut off the excess length!
View attachment 119681View attachment 119682
I then glued the side wall to the rear wall.
View attachment 119683View attachment 119684
My thinking is this: the rear wall and side walls will be built as a single unit. The floor and front wall will be attached directly to the front half of the module. Then, the rear section will "plug in" to the front and both will be permanently attached.
View attachment 119685
So far, so good: the halves fit together very snugly together. Next time, I'll repeat the process for the other side wall.
View attachment 119686View attachment 119687View attachment 119688View attachment 119689View attachment 119690
I could use some advice on the cockpit floor. What color should it be? I still have my cardboard template, from which I can make the actual floor and thereby ensure a good fit...but I'm stuck until I know what color to make it. :confused
View attachment 119691View attachment 119692
My next focus of attention will be the front wall, the "never before seen on tv" part of the cockpit. This should be interesting. I gotta think about this one for a bit...:popcorn...I don't want to screw it up!
View attachment 119693
Lord, still so much to do......:eek
View attachment 119694
 
Last edited:
Re: Space 1999 Eagle Transporter Build Club UPDATED Sept 26th (PIC HEAVY!)

Hey, chrisisall...good to see ya! I was wondering where you've been hanging your hat!
 
Re: Space 1999 Eagle Transporter Build Club UPDATED Sept 26th (PIC HEAVY!)

Got a few things done this evening before my work week starts tonight...

I glued the other side wall to the back. Now I can actually get started on the front wall, or at least for now...plan how I'm going to do it. First up: establish the "ceiling height" up in the front, so I know exactly what space I'm working with.
View attachment 119898View attachment 119899View attachment 119900View attachment 119901
I need to transfer the top contour of the back of the module to the front half. The simplest method that came to mind was using a piece of paper and a pencil and trace the edge onto the paper. Now I have a stencil with which to make actual parts.:cool
View attachment 119902View attachment 119903View attachment 119904View attachment 119905
I also finished the styrene "2x4's" up front to where the side walls will rest eventually. I also started to build up the left edge of the module which will be the bottom edge of the cutaway effect. This will add strengthening and beautification.
View attachment 119906View attachment 119907
I cut a piece of foam board and slotted it for curving to make a quick, representational ceiling to help me visualize where I'm going. I lightly taped the board to the module, so now I can study the implications.:love
View attachment 119908View attachment 119909View attachment 119910View attachment 119911
I cut out a piece of styrene sheet to cover the flat "shelf" created by the cutaway effect.
View attachment 119912View attachment 119913
Once finished, this will be the only viewing angle of the command module interior. But now, with all my contours and measurements made, I can begin the task of the front controls and windows of the module.
View attachment 119914View attachment 119915View attachment 119916
 
Re: Space 1999 Eagle Transporter Build Club UPDATED Sept 26th (PIC HEAVY!)

Hey, I just woke up to this - Spectacular, Mate! :thumbsup :thumbsup :thumbsup
I will write more later but right now, I have to nip out to finish a job at a neighbour's house.
 
Back
Top