laxman09
Active Member
Nice work look really cool !
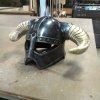
thanks! this was my first time trying to paint it like metal, so i need to keep practicing so i can get it dead on and realistic looking, especially with the horns
Nice work look really cool !
Looks beautiful! I'm working on my first mold right now, and since yours came out so well, I was wondering if you followed any specific step-by-step tutorials that you could point me towards. The paint job looks phenomenal too.
I've got a question for those who attach horns to their helmets:
what is the best way to go about doing so? Because i'm currently just screwing each horn on with one screw, in addition to using some two part plastic epoxy, and i'm not sure how strong that's going to make the whole helmet. I'd just like to hear some input or suggestions before i go ahead and slap on the epoxy and finalize it.
First off, very nice work so far! I've had my Iron Helmet sitting in a tub at about 85% finished for over a year now. Planning on finishing it and the rest of my skyrim gear over xmas.
I had similar issues with the horns as you did, I actually had some sheep horns that were almost perfect, but a little cracked and not exactly the right shape (they were also rather new, so they had a bit of a stench haha). I ended up sculpting mine over some cow horns that were a much nicer shape. Still haven't cast them, they are sitting in the box with the helmet.
I'm planning on using either square keys and magnets, Two screws, or a bolt in the helmet and a nut embedded in the horns (or vice verse).
I have a few buried somewhere on my FB page: https://www.facebook.com/studioAusFX But I don't think those are up to date.
Having them removable with a nut and bolt would make it easier for transport.
yeah, looks like a good size. as for implanting it in the cast, how would you go about doing that? i've got an open-end mold for my horns and i usually just hold a metal plate over the opening while slush casting to close it up.. so i'm thinking i could drill a hole to screw the bolt into the metal plate, and hand tighten a nut to it, with a 1/16-1/8" gap between the nut and the plate so that the plastic seals the nut completely into the plastic. Then unscrew bolt after cure, take off plate and bam implanted nut into horn
If by 1/16-1/8" gap you mean 1.5875-3.175mm (round it up or down, because the metric system wins) then yes I would give that a shot.
I'll try not to make an 'at least our government is working' joke...
Let us know how it goes!


I havent tried it out yet, i just got around to buying bolts today. I will be doing it tomorrow though, and i believe it'll work great!
i do however have an updated photo of a better paint job, one that more resembles iron (in my opinion), so enjoy!
View attachment 244724View attachment 244725
the one with the black horns was before i painted them, but i kind of like that dark look. I might try out painting some darker toned horns to see how it goes
Wicked
thanks!
the best thing about making these in my shop at school is that all of the students are simply amazed by it, even though we are at a college for art..tis a nice ego booster
Yeah, its really convienient having all the tools i need in one big organized building! only problem is that i'm getting pounded with midterm projects so the opportunity to use the workshops is very little right now. and i'd love to see that, i always wanted to make one of those but havent gotten around to it. But pssh who needs a dining room anyway?
