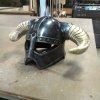
Skyrim Iron Helmet (enhanced realism PIC HEAVY)

I've got a question for those who attach horns to their helmets:

what is the best way to go about doing so? Because i'm currently just screwing each horn on with one screw, in addition to using some two part plastic epoxy, and i'm not sure how strong that's going to make the whole helmet. I'd just like to hear some input or suggestions before i go ahead and slap on the epoxy and finalize it.
 
Looks beautiful! I'm working on my first mold right now, and since yours came out so well, I was wondering if you followed any specific step-by-step tutorials that you could point me towards. The paint job looks phenomenal too.
 
Looks beautiful! I'm working on my first mold right now, and since yours came out so well, I was wondering if you followed any specific step-by-step tutorials that you could point me towards. The paint job looks phenomenal too.

Thanks, it means a lot! as for the moldmaking process, this was my first time making a mold and i did a lot of looking around before i started. I ordered the moldmaking kit from smooth-on and had to purchase just a few extra sample sizes of the silicone. the kits from smooth-on come with a CD that goes step-by-step though the process, in addition to a written manual inside. the only other source i used was volpins tutorials on mold-making, which were similar to smooth-on's but were catered more to how most people make their molds (registration keys, bolt on outer shells, etc.). the combination of these several tutorials helped me figure out how to make the mold, and made the process a lot less stressful. the one main thing i would say about mold-making is that the first few print layers are the MOST important, i suggest doing 2-3 print coats (very light coats, special brush-on technique used) before applying larger amounts of silicone, reason being that you may get air bubbles trapped between the layers, causing possible bumps and dents in the helmet when cast.

this is assuming that you are choosing to do a brush-on mold, and not a pour on mold.

one other good tip is to read up and watch up on the tutorials, get to know the process well and understand possible complications that could happen. if you pay attention to the tutorials and instructions well, then making your mold should be a walk in the park!

link for volpins tutorial
Volpin Props: Daft Punk Helmet (Thomas): Part 2

there's also many more tutorials out there, so i encourage you to look around on here and google, and if you have any other questions about it, i come on from time to time and will try my best to help :)


also i still want to know if anyone has an alternative way of mounting horns to a helmet
 
First off, very nice work so far! I've had my Iron Helmet sitting in a tub at about 85% finished for over a year now. Planning on finishing it and the rest of my skyrim gear over xmas.
I had similar issues with the horns as you did, I actually had some sheep horns that were almost perfect, but a little cracked and not exactly the right shape (they were also rather new, so they had a bit of a stench haha). I ended up sculpting mine over some cow horns that were a much nicer shape. Still haven't cast them, they are sitting in the box with the helmet.

I've got a question for those who attach horns to their helmets:

what is the best way to go about doing so? Because i'm currently just screwing each horn on with one screw, in addition to using some two part plastic epoxy, and i'm not sure how strong that's going to make the whole helmet. I'd just like to hear some input or suggestions before i go ahead and slap on the epoxy and finalize it.

I'm planning on using either square keys and magnets, Two screws, or a bolt in the helmet and a nut embedded in the horns (or vice verse).
 
First off, very nice work so far! I've had my Iron Helmet sitting in a tub at about 85% finished for over a year now. Planning on finishing it and the rest of my skyrim gear over xmas.
I had similar issues with the horns as you did, I actually had some sheep horns that were almost perfect, but a little cracked and not exactly the right shape (they were also rather new, so they had a bit of a stench haha). I ended up sculpting mine over some cow horns that were a much nicer shape. Still haven't cast them, they are sitting in the box with the helmet.


I'm planning on using either square keys and magnets, Two screws, or a bolt in the helmet and a nut embedded in the horns (or vice verse).

Thanks, it means a lot! and do you have any pics of your helmet?

i actually ended up drilling a few holes in the horn and helmet, then used some plastic bonder on it, so that the bonder would seep through the holes on each side and lock it in place. after that i secured it with a screw, and it felt pretty solid. The first person i sold one to loves the helmet, so i'm cranking out a few more now(; I do really like the idea of embedding a nut in the horns, i may implement it into some of my future helmets!
 
Thanks mate.

Id use an M10 bolt, you shouldn't get any movement on one that big as long as its tight enough.
 
yeah, looks like a good size. as for implanting it in the cast, how would you go about doing that? i've got an open-end mold for my horns and i usually just hold a metal plate over the opening while slush casting to close it up.. so i'm thinking i could drill a hole to screw the bolt into the metal plate, and hand tighten a nut to it, with a 1/16-1/8" gap between the nut and the plate so that the plastic seals the nut completely into the plastic. Then unscrew bolt after cure, take off plate and bam implanted nut into horn :D
 
yeah, looks like a good size. as for implanting it in the cast, how would you go about doing that? i've got an open-end mold for my horns and i usually just hold a metal plate over the opening while slush casting to close it up.. so i'm thinking i could drill a hole to screw the bolt into the metal plate, and hand tighten a nut to it, with a 1/16-1/8" gap between the nut and the plate so that the plastic seals the nut completely into the plastic. Then unscrew bolt after cure, take off plate and bam implanted nut into horn :D

If by 1/16-1/8" gap you mean 1.5875-3.175mm (round it up or down, because the metric system wins) then yes I would give that a shot.
 
If by 1/16-1/8" gap you mean 1.5875-3.175mm (round it up or down, because the metric system wins) then yes I would give that a shot.

screw that, Murica know's what up with our awesome system (;

i just need to go out and buy some bolts now, and find some money to buy the bolts with haha
 
I'll try not to make an 'at least our government is working' joke... :p

Let us know how it goes!

I havent tried it out yet, i just got around to buying bolts today. I will be doing it tomorrow though, and i believe it'll work great!

i do however have an updated photo of a better paint job, one that more resembles iron (in my opinion), so enjoy!

IMG_20131018_192021.jpgIMAG1007.jpg

the one with the black horns was before i painted them, but i kind of like that dark look. I might try out painting some darker toned horns to see how it goes
 
I havent tried it out yet, i just got around to buying bolts today. I will be doing it tomorrow though, and i believe it'll work great!

i do however have an updated photo of a better paint job, one that more resembles iron (in my opinion), so enjoy!

View attachment 244724View attachment 244725

the one with the black horns was before i painted them, but i kind of like that dark look. I might try out painting some darker toned horns to see how it goes

Wicked
 
thanks!

the best thing about making these in my shop at school is that all of the students are simply amazed by it, even though we are at a college for art..tis a nice ego booster ;)

That would be awesome to have all of that room! I am currently building a Rinzler costume and my GF is about to kill me, because I have taken over the dining area, haha.
 
Yeah, its really convienient having all the tools i need in one big organized building! only problem is that i'm getting pounded with midterm projects so the opportunity to use the workshops is very little right now. and i'd love to see that, i always wanted to make one of those but havent gotten around to it. But pssh who needs a dining room anyway?
 
Yeah, its really convienient having all the tools i need in one big organized building! only problem is that i'm getting pounded with midterm projects so the opportunity to use the workshops is very little right now. and i'd love to see that, i always wanted to make one of those but havent gotten around to it. But pssh who needs a dining room anyway?

I am basically having to make everything from scratch, including the identity discs. A lot of trial and error, foam, pepakura, bondo, resin, etc... But I am hoping to have it finished within the next couple of days since Halloween parties are this weekend!
 
Loving the new paint job! The only thing I might suggest are some very light washes of red, just to give it a hint of oxidization. (You may have already and I just cant see it in the photos)

It's certainly encouragement to work on mine!
 
Back
Top