Skyrim Iron Helmet (enhanced realism PIC HEAVY)

laxman09

Active Member
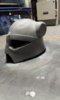
I've been working on this helmet for a few months now and i've run into a minor setback, i keep trying to figure out what design pattern to put on the horns and how to go about doing so. i keep looking at reference photos of ram horns because that's where im trying to go rather than that of what is in the details on the in-game helmet (doesnt look real-ish to me). so here's some pics of where i started taking pics up unto where i am now, enjoy ;)

01.jpg1.jpg2.jpg3.jpg4.jpg5.jpg6.jpg7.jpg8.jpg9.jpg10.jpg12.jpg13.jpg14.jpg15.jpg16.jpg17.jpg18.jpg20.jpg21.jpg22.jpg23.jpg24.jpg you can see progression from bondoed to adding in and modifying details, battle hits/arrow hits and now the oh so tricky horns
 

Attachments

  • 11.jpg
    11.jpg
    777.2 KB · Views: 172
Pesmerga Thanks! and so do i, that's what inspired me to join the rush :D
Sidewalker thank you, yours looks very nice as well, how did you paint the helmet?
 
Last edited by a moderator:
I used an automotive spray paint, and weathered with rub'n'buff and acrylic craft paint. The horns I used tan and brown, and sanded it down between layers exposing the resin.
 
Sidewalker i've heard about the acrylic technique, but not about rub'n'buff.. looks like a good way to do it though, i'll have to look into that!

as for the horns, i decided to scrap the current ones and just sculpt some horns instead. it'd make putting all the "realistic" details into the horns a lot easier and to how i like. only problem is i only have air dry clay at the moment, and i'm not sure if i want to buy a bunch of modelling clay for just the horns.. might be necessary though
 
Last edited by a moderator:
I found the pepakura horns were quite difficult to get the shape I wanted, with the horn growth I wanted. As it is, mine are quite exaggerated, but I'm happy with them. Gotta do what works for you.
 
Sidewalker yeah i didnt thinik they were going to be this much of a nuisance, i tried adding some bondo along two lines i drew to serve as the "crease" that most of the ram horns seem to have, but i gave up on that because it was just too much work when i could be doing something more simple. anyhow, i went to Michael's yesterday to take a look at some modelling clay and i seemed to have forgotten how cheap it was, so i just bought some. i previously did a quick mock up horn out of some spare modelling clay i have to see what it would kind of look like so that's the one in clay already (it isnt the size that i'm making the horn, it'll be larger).
IMAG0667.jpgIMAG0668.jpgIMAG0669.jpg
 
Last edited by a moderator:
Stinkape thanks!i'm hoping to have it done and ready to be moulded by the end of next month at latest :D

update: built some base forms for the horns for support when sculpting (first attempt at horn sculpt without base resulted in a sagging horn) just some pics showing a bit of how the horns came to be at their current state, just trying to get the shape to where i like it before sculpting in the ridges. to make my clay easier to work with, i made a simple "heat box" with an old plastic box lined with foil, and a hot lamp nearly in it to heat it up
IMAG0676.jpgIMAG0677.jpgIMAG0678.jpgIMAG0679.jpg
 
Last edited by a moderator:
somewhat of a delayed update on the horn progress, i decided to scrap all previous horn attempts and start over, i made a sturdier base and put in the ridge details on the horn. i need to smooth out some areas to make it look more realistic (in my opinion) but so far i am pretty satisfied with them. some feedback, tips or comments on what may help to make it look more realistic would be greatly appreciated. once i finish this one i need to get started on replicating it on the other horn, fun fun fun.
IMAG0695.jpgIMAG0696.jpgIMAG0697.jpgIMAG0699.jpgIMAG0700.jpgIMAG0701.jpgIMAG0702.jpgIMAG0704.jpgIMAG0707.jpgIMAG0708.jpg

also, if anyone knows how to show bigger images so you dont have to click em, i'd love to know!
 
small update:
been working on the second horn, got it all shaped out and not just adding in some details to try and make it look better, quick mock-up of how they scale up to the helmet
IMAG0740.jpgIMAG0742.jpgIMAG0743.jpgIMAG0746.jpgIMAG0747.jpgIMAG0752.jpgIMAG0755.jpgIMAG0757.jpgIMAG0758.jpg
I need to cut this part off of the neck protector because it looks lame how it is, also need to put a border around it like on the rest of the helmet. Then i need to add the border around where the horns connect+rivets on it, and some rivets around the back part where they should be. Once i do this real quick, it'll be time to start the moulding process!
IMAG0759.jpgIMAG0760.jpgIMAG0761.jpgIMAG0763.jpg

speaking of moulding, I know how to do it but i've never done it before. does anyone have any tips or pointers to help me not screw it up for this helmet? planning on doing a two part mould for the helmet and then two separate moulds for each horn
 
okay more updates for those who choose to view and not comment :I

over the weekend i added on the bands for the horn bases, need to restart one of them though, the good one needs some rivets on there, also added the border around the neck guard. the horns fit perfectly inside the base that i made so far, cant wait to finish this up!

IMAG0766.jpgIMAG0767.jpgIMAG0768.jpgIMAG0769.jpgIMAG0778.jpgIMAG0779.jpgIMAG0781.jpgIMAG0793.jpgIMAG0794.jpgIMAG0795.jpgIMAG0798.jpgIMAG0799.jpg

also pro tips on the rivets would be great, i usually just make some out of bondo but there's gotta be an easier way! :/
 
This looks really amazing, I love it. You must have used an incredible amount of bondo to get that to be so smooth, really paid off. Can't wait to see it all completed.
 
thanks, means a lot! and yeah i had to put on a few coats of bondo to get the dome all smoothed out, that and some spot putty. and me neither, just a few more things to do to it and i'll be ready to start the mold process!
 
putting on the last few details, the last thing i have to do right now is decide if i want to make the rivets that "connect" the horns to the helmet real, or just like i've done with the others and make them fake.. the pros and cons i've thought up so far are that making the real ones will make keeping the horns in place much easier, but on the other side it'll take a lot of effort and make more stuff for me to mold.. choices choices...

just a few pics of the pretty much final helmet ready for molding

IMAG0824.jpgIMAG0825.jpgIMAG0826.jpg

still havent gotten any advice on molding however, so i'm just going to have to go keep looking around i suppose
 
long overdue update!

finally got around to molding the helmet and one of the horns, demolded the horn already and it came out perfectly. i'm waiting until tomorrow morning to demold the helmet, to allow the plasti-paste shell to fully cure as to reduce deformation during demolding, pics on that will come soon. For now, y'all can enjoy some progress pics!

IMAG0917.jpgIMAG0918.jpgIMAG0919.jpgIMAG0920.jpgIMAG0921.jpgIMAG0922.jpgIMAG0924.jpgIMAG0925.jpgIMAG0926.jpgIMAG0927.jpg

also a big thanks to the advice that's helping me get along!
 
big big update today, i finished the first cast completely! i'm updating this right before class so i wont go into much detail right now, the pictures below kind of show how i went about painting the helmet, also the first cast shown how i did it wrong by using too much smoothcast in one go, lesson learned! if you have any questions about the process of how i painted it or anything else,feel free to ask!

HELMETS WILL BE UP FOR SALE SOON :D

IMAG0935.jpgIMAG0936.jpgIMAG0937.jpgIMAG0940.jpgIMAG0943.jpgIMAG0944.jpgIMAG0945.jpgIMAG0946.jpgIMAG0947.jpgIMAG0949.jpgIMAG0955.jpgIMAG0957.jpgIMAG0959.jpgIMAG0960.jpg
 
Back
Top