You are using an out of date browser. It may not display this or other websites correctly.
You should upgrade or use an alternative browser.
You should upgrade or use an alternative browser.
Scratch Built Delivery Ship 3011AD, The Nylon Gag MK.1 FINISHED.
- Thread starter TheNylonGag
- Start date
SmilingOtter
Master Member
Re: Scratch Built Delivery Ship 3011AD, The Nylon Gag MK.1
It just keeps getting better and better!
Question - how does the pilot access the corridor while in flight? (Or is it only accessible between missions?)
It just keeps getting better and better!
Question - how does the pilot access the corridor while in flight? (Or is it only accessible between missions?)
Re: Scratch Built Delivery Ship 3011AD, The Nylon Gag MK.1
The the cockpit paint looks good -cut yourself a whole lot of slack")
The whole build is beyond words -keep those updates coming, this is one of my favorite threads.
The the cockpit paint looks good -cut yourself a whole lot of slack
The whole build is beyond words -keep those updates coming, this is one of my favorite threads.
Re: Scratch Built Delivery Ship 3011AD, The Nylon Gag MK.1
Hello Mates
Thanks for the support guys, a quick update......Pix
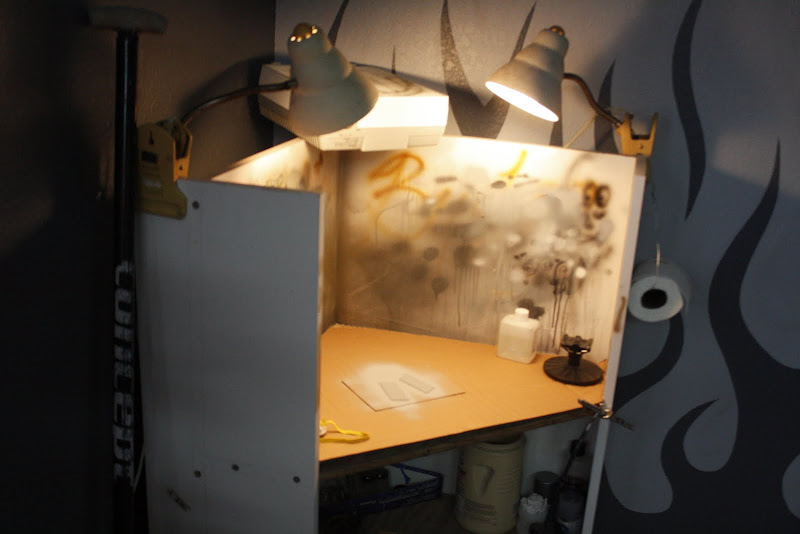
Spray booth up grade, went from this....
To this.....
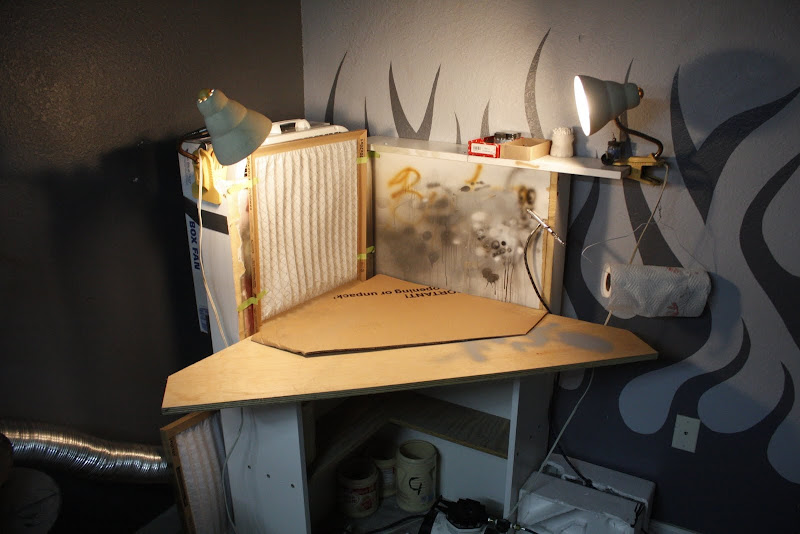
Took me an evening and $65, 20" fan ($16.88) and various fittings and lots of gaff tape, it works ok, well, the misses hasen't complained about a stinky house so far. ;D
On with the show
Brought some Tamiya spray cans, Silver leaf and a few other colours that I'm gunna keep you guessing over?
Layed down, well used the whole can on this thing, a fine mist over the whole thing to create my 'base' colour/material effect.


Masked the Radar for more base colour, top tip, ziplock bags are good for masking stuff.
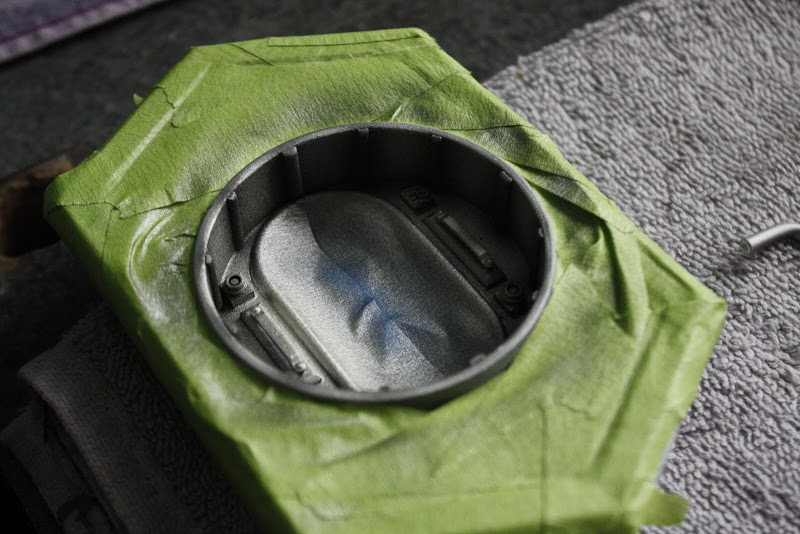
I then AB'ed the top box on the cockpit module flat black and gave it a dry brush with siver.

The radar was futured, hair srayed and salted then given a coat of the light grey, the salt was then removed with a stiff brush and tooth picks ready for a wash or two and some other weathering.

I then started to salt the underside, but I ran out of hairspray.

Thats it so far, off work tomorrow, got a full day of painting ahead, can't wait.
Stay tuned
Thanks mates
Gagsterman
Hello Mates
Thanks for the support guys, a quick update......Pix
Spray booth up grade, went from this....
To this.....
Took me an evening and $65, 20" fan ($16.88) and various fittings and lots of gaff tape, it works ok, well, the misses hasen't complained about a stinky house so far. ;D
On with the show
Brought some Tamiya spray cans, Silver leaf and a few other colours that I'm gunna keep you guessing over?
Layed down, well used the whole can on this thing, a fine mist over the whole thing to create my 'base' colour/material effect.
Masked the Radar for more base colour, top tip, ziplock bags are good for masking stuff.
I then AB'ed the top box on the cockpit module flat black and gave it a dry brush with siver.
The radar was futured, hair srayed and salted then given a coat of the light grey, the salt was then removed with a stiff brush and tooth picks ready for a wash or two and some other weathering.
I then started to salt the underside, but I ran out of hairspray.
Thats it so far, off work tomorrow, got a full day of painting ahead, can't wait.
Stay tuned
Thanks mates
Gagsterman
SmilingOtter
Master Member
Re: Scratch Built Delivery Ship 3011AD, The Nylon Gag MK.1
That's pretty much a given!
Stay tuned
That's pretty much a given!
NakedMoleRat
Legendary Member
Re: Scratch Built Delivery Ship 3011AD, The Nylon Gag MK.1
+ 1. Like we can pull away now!
That's pretty much a given!
+ 1. Like we can pull away now!
Re: Scratch Built Delivery Ship 3011AD, The Nylon Gag MK.1
Every time I come to this thread I'm constantly taken aback by the progress you've made. The level of detail on this build is truly astonishing! Things like the rock salt weathering are just wonderful!!!! One of the most innovative and clever works on the forum.
Every time I come to this thread I'm constantly taken aback by the progress you've made. The level of detail on this build is truly astonishing! Things like the rock salt weathering are just wonderful!!!! One of the most innovative and clever works on the forum.
Re: Scratch Built Delivery Ship 3011AD, The Nylon Gag MK.1
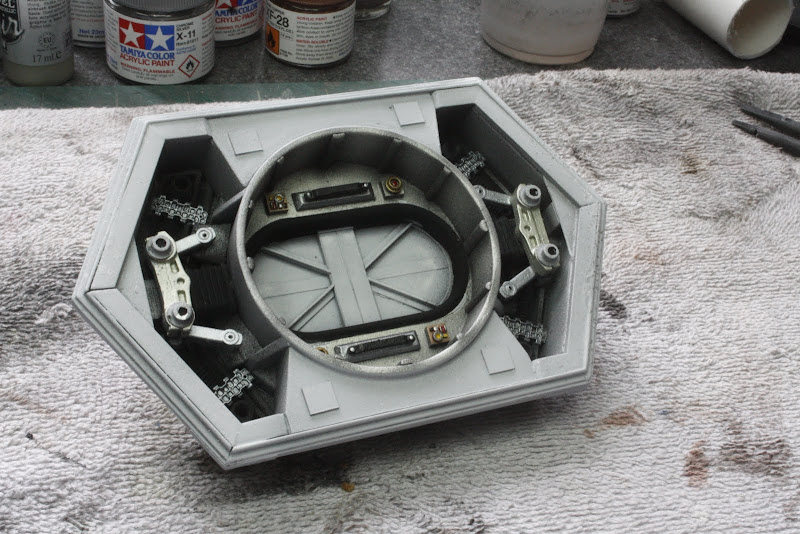
Now the paint is bringing out the hidden details. Love the fastners in the corners of some of the main underside panels.
Can't wait to see the full colour palette.
Now the paint is bringing out the hidden details. Love the fastners in the corners of some of the main underside panels.
Can't wait to see the full colour palette.
Re: Scratch Built Delivery Ship 3011AD, The Nylon Gag MK.1
Morning Everyone,
Thanks for stopping by and for the comments.
So, everybody ready, this is gunna go fast so hold on tight, keep your arms inside the vehicle,
Oh and there will be a quiz later
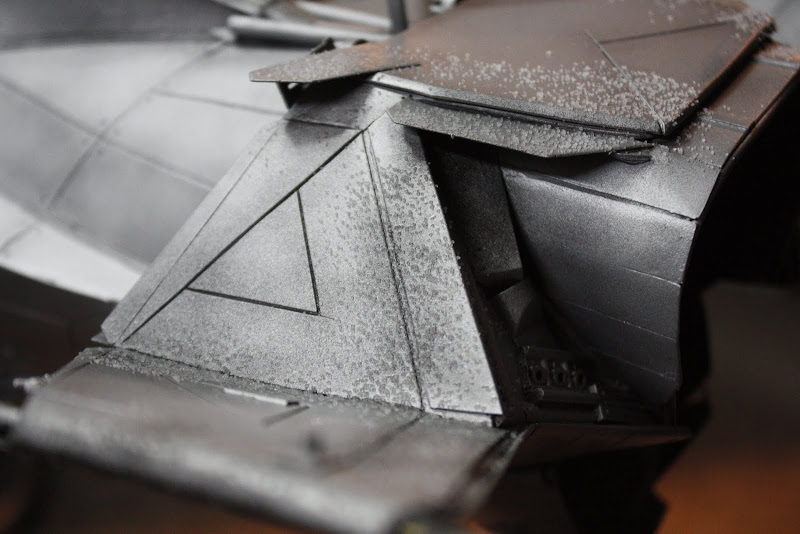
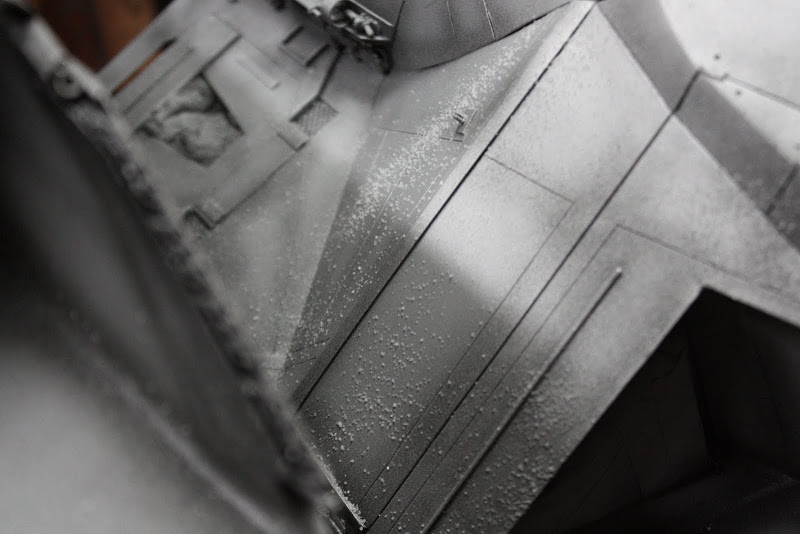
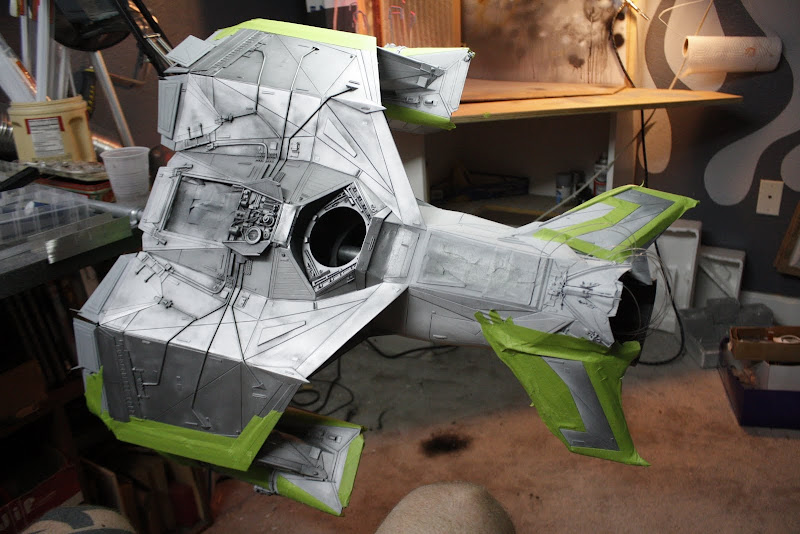
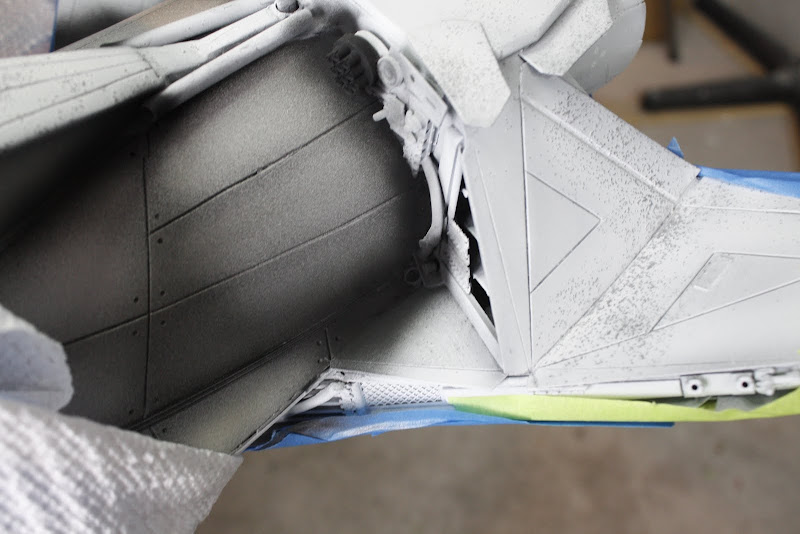
Friday I continued to apply the hairspray and salt on the underside.
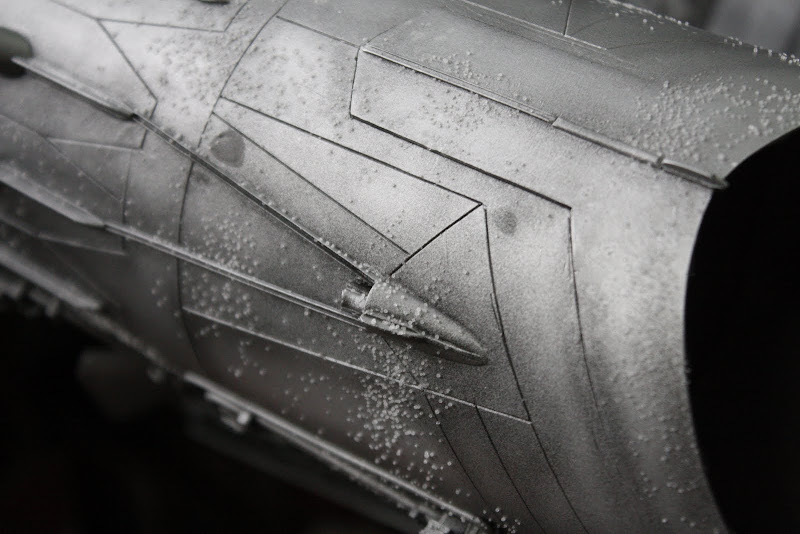
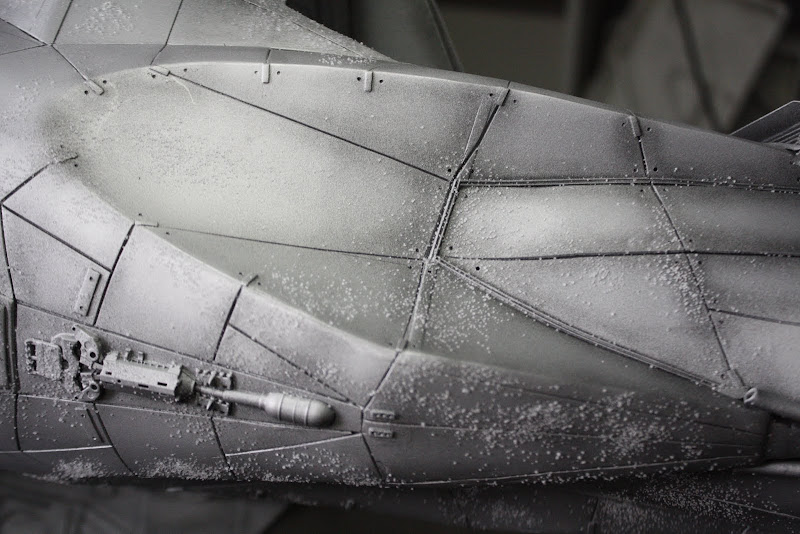
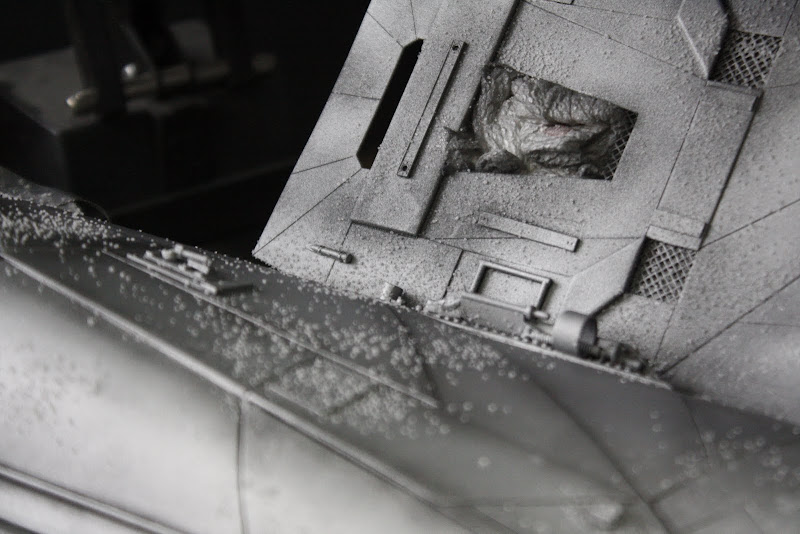
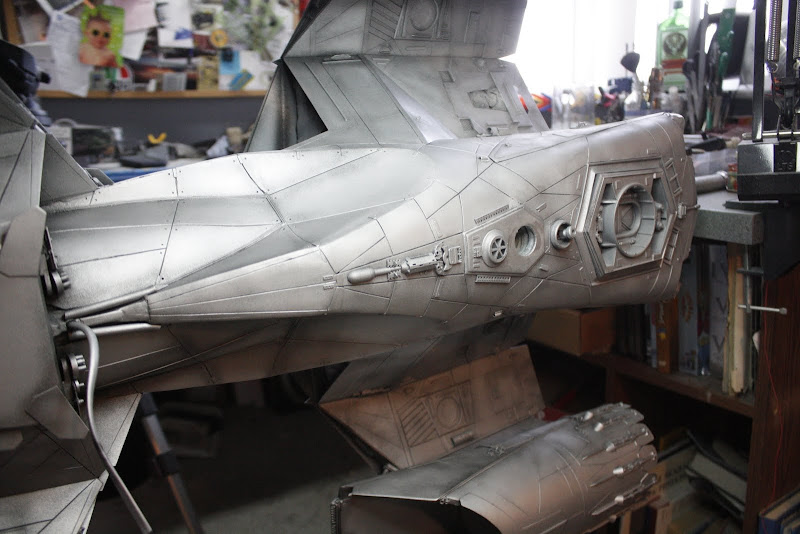
I then sprayed each panel individually with my base colour, Flat white, light grey, crome silver and a spot of buff, starting in the center working outwards.
This took about 4,1/2 hours with a few breaks to let my compressor cool down.


When the paint was dry I removed the salt with a stiff brush and various tooth pick/chop sticks, this took me about 3 hours and was a bit fiddly to get all the salt out of all the nooks and crannies, I got most of it, I think :rolleyes.
The overall effect is very subtle but I was going for the 'less is more' look, with a couple of washes I think it will look ok.

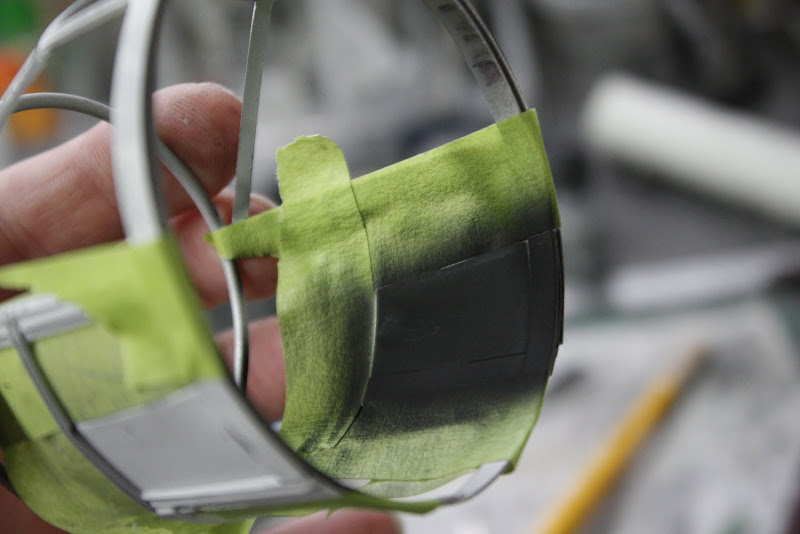
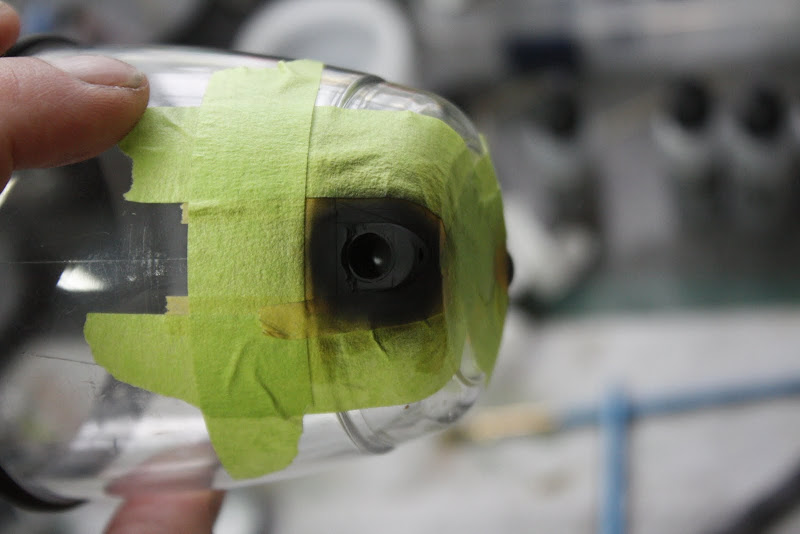
I did the same on the canopy frame and added the Outside Thingy's (technical term)


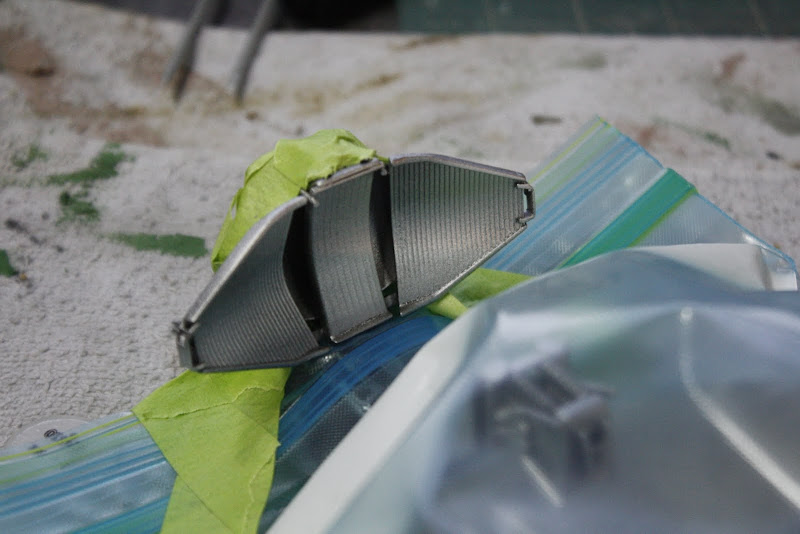
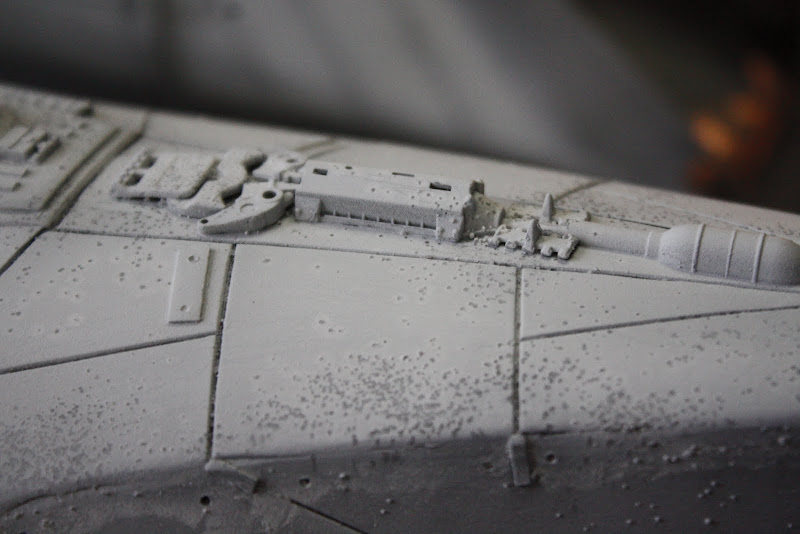
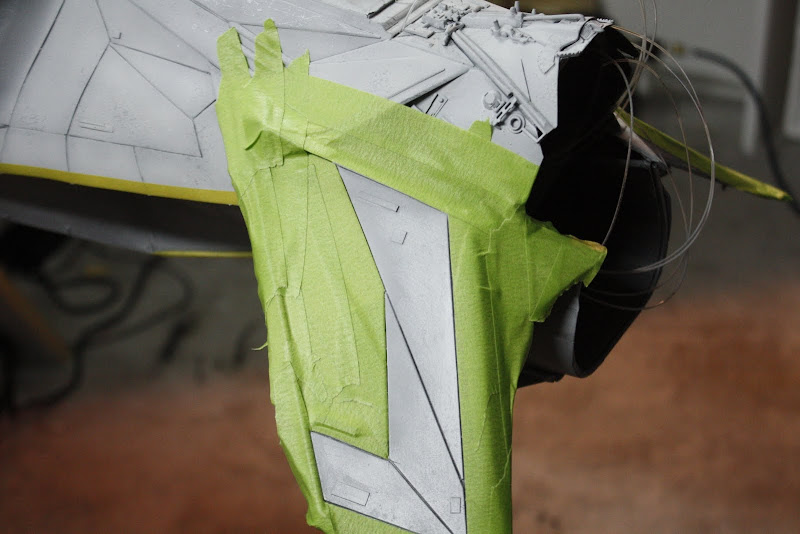
Last night I masked and painted various small pieces.
Airlock door seal

Some underwing deflectors

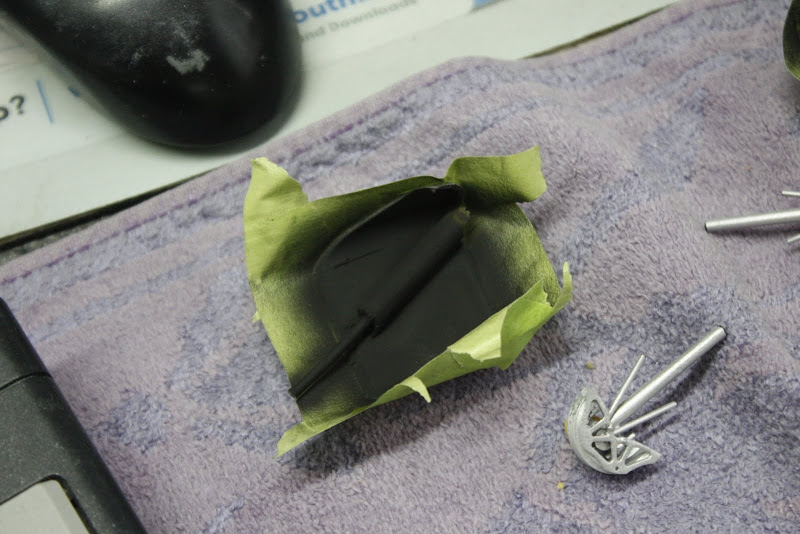
Two panels on the inside of the canopy frame
The thingy mounting points on the canopy glass

And two panels on the underside of the wings that will get tubing added over the top later.

Thats all so far.
Progress seems very slow to me at the mo and I am still losing sleep over the final pattern, I have the colours but nothing is really clicking so far.
I think i will just have to focus on the top panelling first and worry about that when its time.
Anyhoo, till next time
Take care
Gag
Morning Everyone,
Thanks for stopping by and for the comments.
So, everybody ready, this is gunna go fast so hold on tight, keep your arms inside the vehicle,
Oh and there will be a quiz later
Friday I continued to apply the hairspray and salt on the underside.
I then sprayed each panel individually with my base colour, Flat white, light grey, crome silver and a spot of buff, starting in the center working outwards.
This took about 4,1/2 hours with a few breaks to let my compressor cool down.
When the paint was dry I removed the salt with a stiff brush and various tooth pick/chop sticks, this took me about 3 hours and was a bit fiddly to get all the salt out of all the nooks and crannies, I got most of it, I think :rolleyes.
The overall effect is very subtle but I was going for the 'less is more' look, with a couple of washes I think it will look ok.
I did the same on the canopy frame and added the Outside Thingy's (technical term)
Last night I masked and painted various small pieces.
Airlock door seal
Some underwing deflectors
Two panels on the inside of the canopy frame
The thingy mounting points on the canopy glass
And two panels on the underside of the wings that will get tubing added over the top later.
Thats all so far.
Progress seems very slow to me at the mo and I am still losing sleep over the final pattern, I have the colours but nothing is really clicking so far.
I think i will just have to focus on the top panelling first and worry about that when its time.
Anyhoo, till next time
Take care
Gag
NakedMoleRat
Legendary Member
Re: Scratch Built Delivery Ship 3011AD, The Nylon Gag MK.1
Everything that could be said about this amazing build has already been said, so let me just say, thanks for taking us along for the ride!
Everything that could be said about this amazing build has already been said, so let me just say, thanks for taking us along for the ride!
Archive&Future
Sr Member
Re: Scratch Built Delivery Ship 3011AD, The Nylon Gag MK.1
Every time I come to this thread I learn so many new tricks and tips and ideas, just wow. Such stellar work!
Every time I come to this thread I learn so many new tricks and tips and ideas, just wow. Such stellar work!
Re: Scratch Built Delivery Ship 3011AD, The Nylon Gag MK.1
That is the plan Mike
Still debating the pattern but i got me colours and they will be chipped, i hope.
Toe
Are you going to reapply salt & hairspray for chipping your final colors?
That is the plan Mike
Still debating the pattern but i got me colours and they will be chipped, i hope.
Toe
Re: Scratch Built Delivery Ship 3011AD, The Nylon Gag MK.1
Afternoon Peeps
Thanks for stopping by everyone
I do need to get some sea salt for the top i think Mike something with bigger crystals, i think i'm also going to apply more hairspray to increase the chipping effect for the top colours.
What type of rubber cement do you mean mate like a silicon rubber?
So, whats been doing then, more painting, oh yes and masking
And
Masking & painting & masking, painting, masking, painting......its enough to drive you mad, MAD i tell you. :wacko
Pix
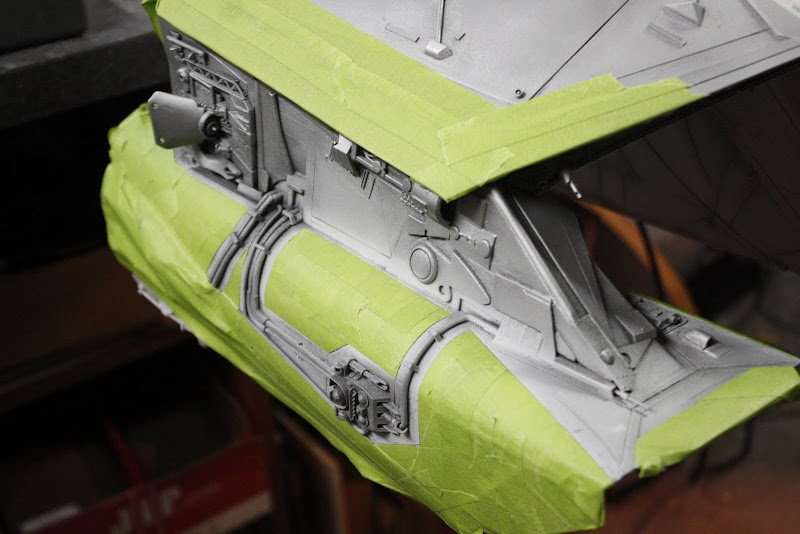
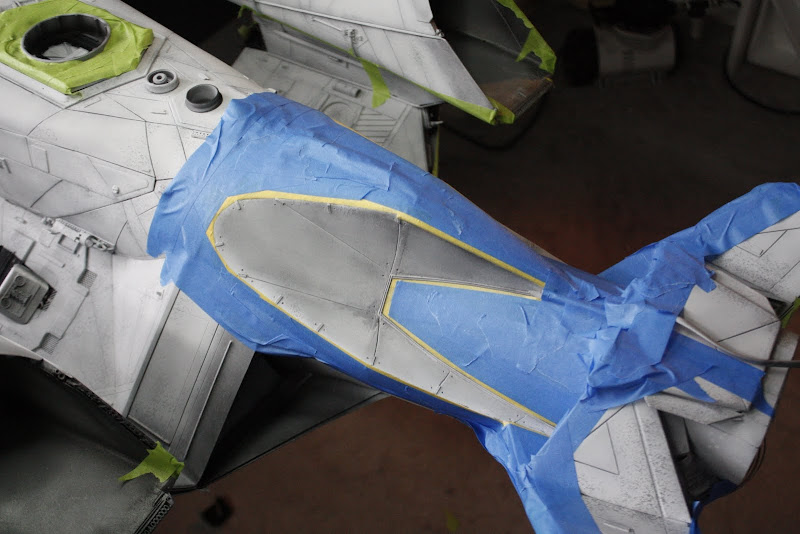
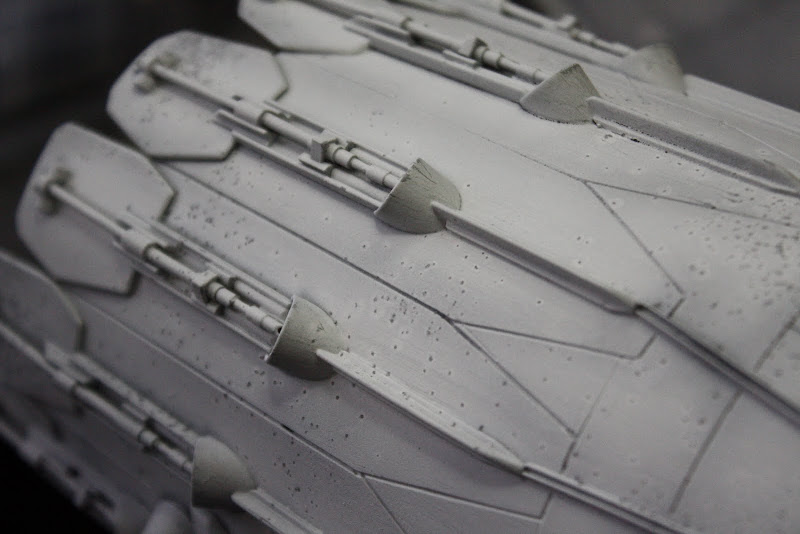
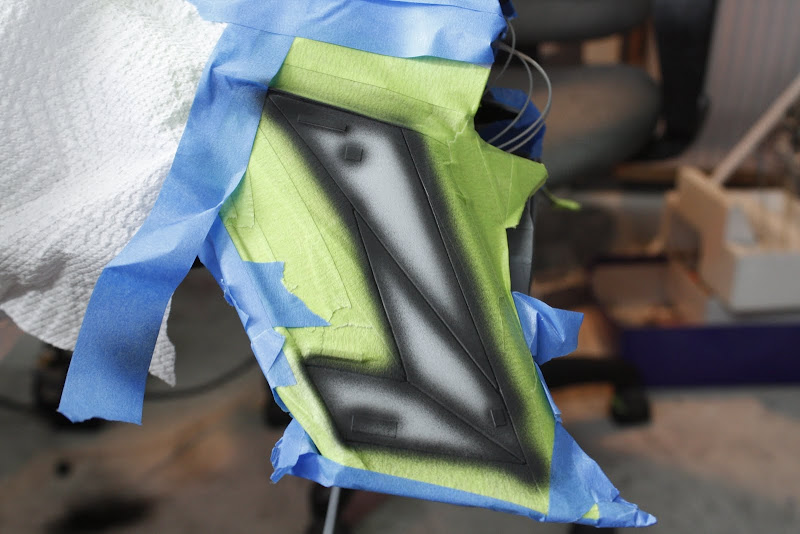
Wanted the cut out to be a bit different from everything else.
A pre-shade with flat black
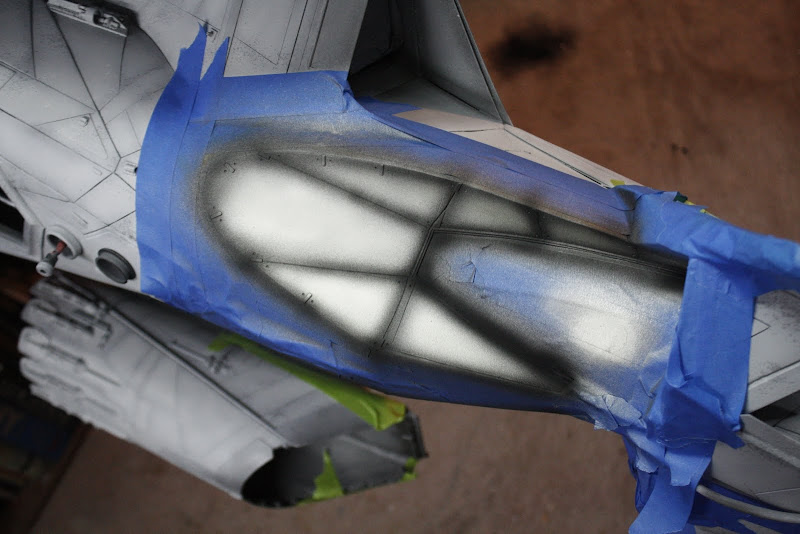
Then a base coat from the center of each panel with Titanium silver (X-32) and a very fine dust with Crome silver (X-11)


Masking removed

Then did a bit more work on the Airlock also gave this a quick blast with the Titanium silver and a bit of fine shading with some flat black
Removed the masking and did some detail painting with a brush
Then applied masking for the other part of the cutout

Then a very similar process as before, pre-shade

Then fill in each panel from the center out again, this time with metallic grey (XF-56) and a light dust with Crome silver (X-11)

Then free handed some exhaust outlet pipes

Then i started pre-shading the sides and the front winglets ready for their 'panelling' to be painted

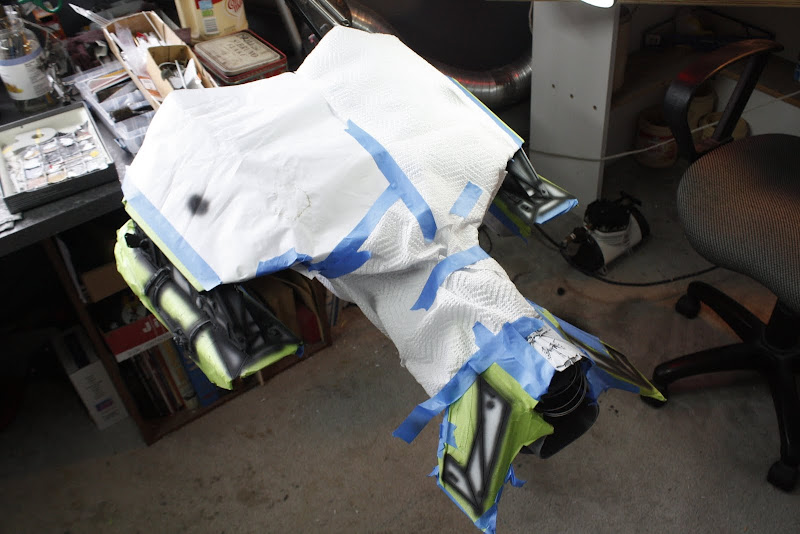
Noticed a tiny bit of overspray on the underside so i wraped her up this time.
I'm pretty pleased with the progress so far, i'm just experiencing some problems with my airbrush spitting water when it gets to hot, i have a separator, which i drain regularly but it doesn't seem to help

But anyhoo,
if the problem persists i'll go and get my craftsman from the garage, that has a tank and a regulator, because at this stage i cant have water stains spoiling me paint job :facepalm
Take care
Gag
You know you can use kosher or sea salt for bigger chips.
I'm also fond of using rubber cement for chipping.
-MJ
Afternoon Peeps
Thanks for stopping by everyone
I do need to get some sea salt for the top i think Mike something with bigger crystals, i think i'm also going to apply more hairspray to increase the chipping effect for the top colours.
What type of rubber cement do you mean mate like a silicon rubber?
So, whats been doing then, more painting, oh yes and masking
And
Masking & painting & masking, painting, masking, painting......its enough to drive you mad, MAD i tell you. :wacko
Pix
Wanted the cut out to be a bit different from everything else.
A pre-shade with flat black
Then a base coat from the center of each panel with Titanium silver (X-32) and a very fine dust with Crome silver (X-11)
Masking removed
Then did a bit more work on the Airlock also gave this a quick blast with the Titanium silver and a bit of fine shading with some flat black
Removed the masking and did some detail painting with a brush
Then applied masking for the other part of the cutout
Then a very similar process as before, pre-shade
Then fill in each panel from the center out again, this time with metallic grey (XF-56) and a light dust with Crome silver (X-11)
Then free handed some exhaust outlet pipes
Then i started pre-shading the sides and the front winglets ready for their 'panelling' to be painted
Noticed a tiny bit of overspray on the underside so i wraped her up this time.
I'm pretty pleased with the progress so far, i'm just experiencing some problems with my airbrush spitting water when it gets to hot, i have a separator, which i drain regularly but it doesn't seem to help
But anyhoo,
if the problem persists i'll go and get my craftsman from the garage, that has a tank and a regulator, because at this stage i cant have water stains spoiling me paint job :facepalm
Take care
Gag
Mike J.
Master Member
Re: Scratch Built Delivery Ship 3011AD, The Nylon Gag MK.1
Nope, just regular old rubber cement, like you'd use for gluing paper.
Just brush it on or dab it on in little irregular splotches where you want your chipping to be.
Apply your paint over it, then after the paint dries, the rubber cement simply rubs off, taking the paint on top with it.
Voila - irregular paint chips, anywhere you like, any size you like.
I don't claim to have discovered this technique, but I have used it a little.
Oh, also, when using the hairspray technique, you can also go at it with a toothpick or a toothbrush to chip the paint.
Best to test it first, of course.
-MJ
Afternoon Peeps
What type of rubber cement do you mean mate like a silicon rubber?
Nope, just regular old rubber cement, like you'd use for gluing paper.
Just brush it on or dab it on in little irregular splotches where you want your chipping to be.
Apply your paint over it, then after the paint dries, the rubber cement simply rubs off, taking the paint on top with it.
Voila - irregular paint chips, anywhere you like, any size you like.
I don't claim to have discovered this technique, but I have used it a little.
Oh, also, when using the hairspray technique, you can also go at it with a toothpick or a toothbrush to chip the paint.
Best to test it first, of course.
-MJ
Similar threads
- Replies
- 31
- Views
- 3,211
- Replies
- 13
- Views
- 1,636