Rudy Pando V3 WIP

Eruonen

Sr Member
RPF PREMIUM MEMBER
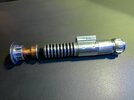
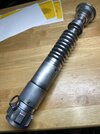
I couldn't pass up getting a Rudy Pando V3/SS before I missed out forever, but I'm not as versed with this particular prop, so I need some help.

My main question is whether I should finish it like the prop exists today, or in the screen used style? (This is an invitation to drop pictures of y'all's builds. I'm hoping to find some inspiration from amongst the community!)

The follow up question I have is how come almost everybody finishes theirs how the prop looks today? Is that just because of the lack of good reference material from the production?

***EDIT***

I’ve decided to finish the prop as it looks now, and will be using this to post pictures/ask for help as I go. First time doing something this complicated, and I can’t wait to get cracking!
 
Last edited:
i know a guy who did a detailed video
The acid aging on that is epic! Gives it that extra level of detail
Stephen Colbert Chefs Kiss GIF by The Late Show With Stephen Colbert
 
I went with the today version on my Anakin Starkiller V3 and (painstakingly) added the serial number seen in the space shuttle box pic.
 

Attachments

  • 8DA6FB1C-8600-4086-ACE6-A096B91EE5AE.jpeg
    8DA6FB1C-8600-4086-ACE6-A096B91EE5AE.jpeg
    1,011.1 KB · Views: 167
Last edited:
Okay I’m going for it. Starting with stripping the anodizing, you’re just using Easy Off grease cleaner? Like the stuff they sell for grills?
Yeah .. it’s called “easy off” .. exactly the same stuff as grill cleaner yeah... I just did mine too from Halliwax s tutorial. Took a bit of scrubbing but it does end up coming off easy lol :p
 

Attachments

  • 14CF445F-7871-4CAA-BD2C-D5657CB8652A.jpeg
    14CF445F-7871-4CAA-BD2C-D5657CB8652A.jpeg
    2.9 MB · Views: 157
I opted to how the prop looks today.. although I couldn’t replicate some of details, I wanted to have that version. If there was a run of these with an attached blade, I think I would have opted to make the screen used version. I think also like PPP said, there isn’t a lot of references to the V3.
 
Yeah .. it’s called “easy off” .. exactly the same stuff as grill cleaner yeah... I just did mine too from Halliwax s tutorial. Took a bit of scrubbing but it does end up coming off easy lol :p
Okay sweet. Excellent work there!

Where are y'all sourcing the acid from? And how long are you letting it sit in the acid? My Google-Fu must not be strong enough to get decent answers from the internet....

I opted to how the prop looks today.. although I couldn’t replicate some of details, I wanted to have that version. If there was a run of these with an attached blade, I think I would have opted to make the screen used version. I think also like PPP said, there isn’t a lot of references to the V3.
Yeah, from the research I've managed to do I've come to the same conclusion. PPP's run of cast aluminum versions had me intruiged, but the appeal of the production used V3 is definitely the blade.
 
Follow this excellent tutorial from Halliwax!

It has the steps and materials you need to weather it down :D

Here is how it looks after ( that’s my V2 but same process )
 

Attachments

  • 2B1633B4-3014-4A68-BFC5-1DD9212C584F.jpeg
    2B1633B4-3014-4A68-BFC5-1DD9212C584F.jpeg
    1.6 MB · Views: 159
WEAR PROTECTIVE GEAR!!!

Do not follow those instructions unless you are in a ventilated area and wearing a respirator..

I have seen more and more Facebook users come here use my tutorial and not taking the most important steps into consideration

Which is PROTECTING YOURSELF

this is cancer causing chemicals.. do not get it on your skin, or breath it in! A respirator is a must!!!

I go through gallons and gallons of this stuff a year. I have a complete suit I now wear where I am totally covered head to toe.

A complete self contained respirator with built in face shield, and industrial chemical gloves

The second I am done, I take my suit off, making sure not to touch the hot spots, I put my cloths in a 5 gallon bucket of water to neutralize any spray droplets on my cloths, then put that through the wash, jump in the shower and wash up

Super paranoid about it

After seeing so many people posting pictures of not even wearing gloves I have debated on pulling that tutorial.. I don’t want anyone getting sick…

A new record heat wave hit us this summer.. it blew up a tank in my shed, ate some of my quick change tool holders for my lathe.. ate my multimeter and destroyed the floor..

It’s no joke, be safe
Copy that. Definitely not interested in hurting myself for this hobby. Appreciate your advice (y)
 
I agree with Halliwax and should have mentioned that as well ( even he mentions it in the tutorial and even once directly to me) .. this stuff is NO joke.. very hazardous to work with and like him, I immediately dispose of rags, gloves , the mask and shower after using. With the proper precautions, the results are amazing. But yes please be careful!!
 
Well, I’ve made just a little progress, life has been getting in the way. Finally nailed down the Easy Off and finished stripping the anodizing. Took a lot of toothbrush scrubbing and sanding, but it looks pretty good I think!

31DC2861-3750-406E-9309-470A7D3421D4.jpeg


Next up is the large damage part of weathering. I’ve been collecting images of the V3 to map out where everything is. Also, for those of you who put the machining mark on the pommel, what’s the size of that bit?
 

Your message may be considered spam for the following reasons:

If you wish to reply despite these issues, check the box below before replying.
Be aware that malicious compliance may result in more severe penalties.
Back
Top