Roman Props MK1 / ShtokCustomWorx Chassis Question

SuperSnarf400

New Member
Ladies and Gentlemen,

This is my first post here on RPF but I've been lurking around for a few months. I've taken my first steps into a larger world, and decided I want to build/install my first lightsaber! I admit I probably picked a difficult one to start off with but hey it's my favorite hilt!

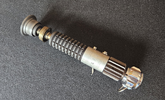
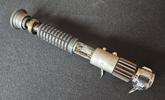
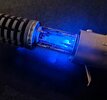
I currently have my hilt (beautiful) and a Rudy Pando CC (also awesome), and my next step is getting my chassis. I've settled on the ShtokCustomWorx Chassis from Shapeways, and planning on using a Proffie board.

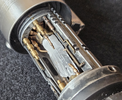
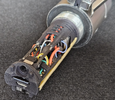
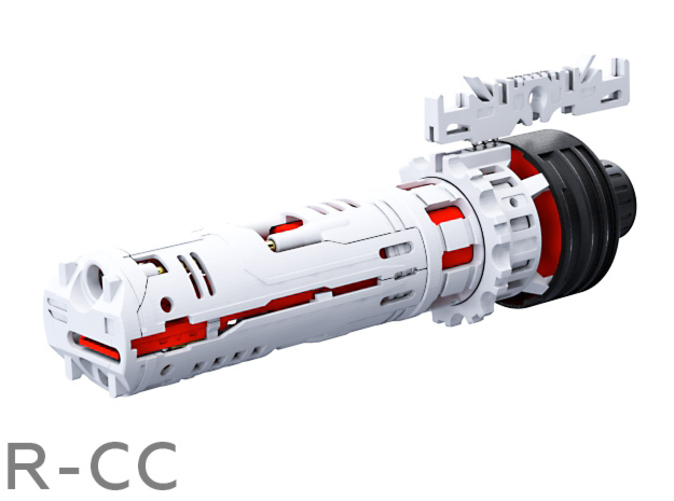
In doing my research, I understand that the Rudy Pando has changed a little over the years. I'm fairly confident that mine is the most recent rev. If so, there should be a "speaker holder" already built into the CC, correct? If that is the case, do I still need to order the speaker holder from Shapeways (R-CC Chassis PART 4 28mm Flat Speaker Holder)?


I don't want to order parts I don't need if I can help it, and also don't want to realize I need a part after I got everything else. I understand I need Parts 1 (which is a few pieces), 2, 3, and the Clamp Switches Holder.

Any insight is helpful. I tried looking around for the answer on RPF, so if this has already been answered my apologies. MTFBWY!
 
Hi SuperSnarf400. Welcome to the RPF!! I just recently completed this exact build. Unless I didn't receive Rudy's most recent CC version, you will need to purchase the speaker holder of your choosing (corresponding to the speaker you purchase). You will also need the various neopixel pcb holders (unless you plan to make your own).

Edited for disclaimer and greeting
 
Last edited:
Hey thanks for the info! I will be ordering the pcb holders as well. I have a picture in my head of what I want to accomplish but I'm hoping they aren't delusions of grandeur. Any tips or things I should look out for in this build? I'd love to see how yours came out! Did you add some accent LEDs to the CC? How many?
 
A few tips that I'm very glad I followed but even more that I could've used (or perhaps I just needed to find out the hard way) include:
  • Follow Shtok's Assembly Manual
  • For most of my chassis parts, I went with the Multi-jet Fusion Plastic in black. I'm very happy with that choice as it has been a very durable material and I love the look and texture in person (at least).
  • For my top/bottom covers, I chose the Versatile Plastic since it offered more choices in color. I really wish I hadn't as the ones I received were very brittle (I'd liken to an uncooked lasagna noodle) and ultimately were not suited for functioning as a removeable cover. For example, at some point during the build, I needed to remove and reinstall the covers. Upon removal for the first and only time, at least one side of most all of the clips broke from both the top and bottom covers. I was able to get the top cover back on and secured well enough, but when reinstalling the bottom cover, it literally shattered into an unusable amount of pieces (see picture below for reference).
  • Shtok's metal crystal chamber upgrade parts are amazing, beautiful works of art. Pulling them out of the cloth bag they arrived in for the first time seriously took my breath away. If you decide to use them, you will not regret it!
  • Spend some time adding greeblies to the left/right edges of the crystal chamber. It's a great way to add your own personal touches to the build.
  • There's a ring on the bottom of the CC which is affixed by a set screw. That ring may not be correctly oriented (clocked) when you first receive the part. Be sure that the CC, CC Ring, Clamp Cage and Shtok Battery Holder (from Part 1) are correctly oriented before cutting into the CC for sound relief (Step 1 from the Assembly Manual).
  • When routing wires at the connection between the Shtok Battery Holder and Middle Extension, be sure to take into account the "twist to lock" functionality. I initially ran my wires while they were apart from one another which resulted in wires getting pinched during the twist to lock the two together.
  • Purchase at least 3 - 4 additional SIP pin connectors (Clamp switches holder connector pieces). They're inexpensive and you may need extras (perhaps the ones I got were faulty but I broke several during different phases of the build).
  • I decided to swap the stock (plastic?) crystal for a real quartz one. I like it better but your results may vary.
  • I only added one LED to the bottom of the crystal chamber by drilling a hole into the bottom of the speaker holder. I really wish I would've added another to the top (which I may go back and add eventually).
  • I also wish I would've added the "fins" that mount to the tubes towards the backside of the crystal chamber; I think I'm missing the light reflection that they would offer.
  • If at first you don't succeed, try once again - but then reach out to the RPF for help.
  • And lastly, have fun with the build!
I hope at least one of these help!!
 

Attachments

  • OWK_RPCC_Closed.png
    OWK_RPCC_Closed.png
    1.3 MB · Views: 47
  • OWK_RPCC_Open.png
    OWK_RPCC_Open.png
    991.4 KB · Views: 55
  • OWK_RPCC_Close_1.png
    OWK_RPCC_Close_1.png
    2.6 MB · Views: 55
  • OWK_RPCC_Close_2.png
    OWK_RPCC_Close_2.png
    2.4 MB · Views: 62
  • OWK_RPCC_Chassis_Bottom.png
    OWK_RPCC_Chassis_Bottom.png
    2.4 MB · Views: 48
  • OWK_RPCC_Chassis_BottomCover.png
    OWK_RPCC_Chassis_BottomCover.png
    3.5 MB · Views: 53
WOW! Thank you for such a detailed write up! 1st off, your CC is VERY IMPRESSIVE. I've been scouring the internet for finished examples to draw inspiration and yours is incredibly detailed! Such small parts, all intricately placed, must have taken a lot of time and thought. I'm planning on at least 2 LEDs for the CC, one on either end, but have seen some very talented installers put what looks like a couple ring LEDs in there to illuminate the "base" of the crystal holder. Might be way out of my abilities, but we'll see what I come up with. Definitely planning on getting the metal upgraded pieces as well.

So, get the whole chassis in Multi-jet Fusion Plastic? Sounds good. I don't care much about what it looks like when installed, and no matter how good the full metal chassis would look I don't feel comfortable throwing that much money at it. The "fins" are cool, might get them later down the road, taking my time with this build for sure.

How did you weather your parts? I figured I'd get some grease and apply/wipe away/apply/wipe away until it looked right, but I'd take literally any advice you have.

Also, I've seen people use the "toilet paper roll spring" trick to give the CC reveal a bit more pop. I picked one up the other day and its a nice addition in an empty hilt. Would the spring get in the way of the connectors in the grenade section once installed?

OH also for the emitter, did you mount the blade connector directly to the "emitter connector screw" thing and go with a recessed blade, or do you recommend cutting down the "emitter connector screw" thing and mounting the blade connector closer to the base of the emitter so you can use a standard 1" blade?
 
Thank you for the compliments! But I'll forward on that praise to God because I could do nothing if it weren't for the abilities he's given me!

If you're even the slightest bit inclined to trying something like the LED rings, I'd say go for it!! There's never been a time when I've tried to do something and walked away with less knowledge than I had before I tried. And in the end, you'll surprise yourself at how much you can accomplish if you take it little bite by little bite.

As for the other saber particulars though, if I'd known then what I know now, I would have definitely chosen at least the Multi-jet Fusion Plastic for all chassis parts. That is, of course, just based upon my personal experience and the intended use of my saber which was to be primarily a display piece w/ occasional use as a prop). On the other hand, if I was looking to do anything with it like heavy spinning or dueling (which isn't the greatest idea when talking thin necks, but regardless) I would've likely considered upgrading to nylon where available. As it is though, I feel that this MJF material seems to be plenty strong enough for anything I will throw at it - while still exhibiting flexible properties too.

Weathering was performed primarily with Grade #0000 steel wool and various Birchwood Casey metal finishing products:
  • Brass Black - used for brass, bronze, copper
  • Aluminum Black - used for, yep, aluminum
  • Perma Blue Paste - used on a few small greeblie bits made of steel)
These are chemicals so obviously follow all stated precautions, but IMO they work amazingly well and are very forgiving if you need to rework areas to get the look you're after.

I came across the toilet paper spring idea and thought about including it in my build but ultimately decided to move along without it. I'd imagine it could be done with enough careful measuring and/or ol' fashioned trial-and-error, but I'm not in a position to give any experienced answer on that one.

Regarding blade mounting, I honestly can't say I've even heard about the "cutting down the 'emitter connector screw'..." method to utilize standard blades. After briefly mocking up a standard blade tube to an emitter with standard holder, I knew I wanted to go the recessed route for the sake of stability (just in case a stray Sith does come along while I'm armed with my saber lol).
 

Attachments

  • 20240304_224815.jpg
    20240304_224815.jpg
    2.2 MB · Views: 35
  • 20240304_225001.jpg
    20240304_225001.jpg
    1.4 MB · Views: 32
Yeah this thing is going to be a shelf queen of the highest order lol absolutely zero plans to duel or anything. I’m going to definitely check out some of your weathering tips. I’ll have to share with you how everything is turning out, but it’ll be a while until I can move forward while I wait for parts and everything. Did you build your own blade?
 
...I’ll have to share with you how everything is turning out, but it’ll be a while until I can move forward while I wait for parts and everything.
I completely understand the waiting game but certainly look forward to hearing about the progress!! If, while waiting on parts, you get bored to the point of twiddling your thumbs, I'd highly recommend checking out various "thin neck" lightsaber build videos online; there are some pretty nice tricks out there for sure!

Yes, I built my own blade using:
  • 2 - 144LED/meter light strips (from BTF-Lighting Co. via Amazon),
  • Thin-walled blade tube, blade tip, foam light diffuser material & blade-side pcb - from TritiumSabers.com,
  • e6000 adhesive and super glue from a local hobby shop, and lastly,
  • A pcb holder I designed and 3D printed to accommodate recessing the pcb into the blade tube (but I'm sure you could just sand down a regular one if desired)
 
UPDATE

Alright, so I finally received all of my chassis parts and spent a bit of time fiddling around with the pieces. I spent a lot of time on making the Crystal Chamber look just like I want it to and it's going to be amazing once I have this thing all wired up! I noticed a few things and was hoping someone could shed some light on some of the issues I've come across so far.

I poked around and found the Assembling Instructions Manual, but had some questions. I found that the lengths of the brass rods is confusing. It says 35mm for R-CC and 31-31.5mm for proffieboard. The 35mm was wayyy too long (using a proffieboard so I guess that makes sense), and I found that 31-31.5mm is still a bit too long. With the pommel screwed on it is just long enough to pop out the back cap. The Top and Bottom (Parts 2+3) sound board covers are just barely fitting onto the chassis. I can shorten the rods a little more and maybe even shave off a few MM's from the covers, maybe even sand down the back of the chassis a tiny bit, but has anyone else had this issue?

It appears that the Speaker Holder (part 4) is not necessary. Not sure when it happened in his revisions, but it looks like Rudy cut into the CC a space for the speaker to sit at the base of the cylinder. Judging by some other builds I've seen this is how others have put it together. It's pretty convenient, and looks like I won't need the Speaker Holder at all. Might even help me have a bit more room for the battery (more on that in a moment). Did anyone have this same experience?

Now for the battery. I've done a ton of looking around and it doesn't seem like anyone has a definitive answer on what battery is best for this build. I am in no way electronically inclined, so much of the science of batteries flies well over my head. It seems like for much of the lightsaber world the 18650 is a common answer. After research and some measuring, I can't see how that battery could fit, or at least it would be VERY close to the speaker. I bought an 18350 button top after somethings I read, but it is not pre-wired, and soldering directly to a li-ion battery sounds like a terrible idea for someone like me. I did find an 18500 that I'm pretty sure will fit, it is pre-wired, but I'm not sure if it has the “power” to run everything? I read some discussions about amps, that 10amps is what you need, but again this is not my field. I found an 18500 that has 7amps and is pre-wired. Again, this is going to be a shelf queen that is only used occasionally. I have zero plans of dueling or having the thing running for hours on end. Is this going to get the job done? And if so, could it power the blade, 2 accent LEDs, and 2 accent rings?

https://onlybatteries.com/3-2v-800-mah-18500-lifep04-battery-pack-for-gama-sonic-solar-lights/

I spent a ton of time on the aesthetics of my CC and I am very happy with the result. Can't wait to get this thing up and running, I have a long road ahead, but I'm having an absolute blast putting it together! Any help is greatly appreciated!
 
Hey Snarf. Very happy to hear that it's coming along!!

I'll let others chime in on the "will 7 amps work" question, but one important aspect that I don't think you've specified is the method you're using to power your blade, i.e. neopixel vs. Tri-Cree vs. some other method. Im running a neopixel blade so I went with a 10 amp 18350 - per Shtok's recommendation for neopixels (see Assembly Manual, p. 5; image attached for reference)

Screenshot_20240401_004038_Chrome.jpg

As for the brass rod length, I went with the 31 - 31.5 mm route as a starting point but then used the top/bottom covers as my guide when actually securing the rods into place (so that they'd just barely fit). If memory serves correctly, that also left my chassis a bit too long as well, but that's when I remembered the set screw on the ring at the bottom of the CC. Pretty sure I was able to loosen that set screw and slide the ring up higher on the CC which, in effect, "shortens" the chassis and provided enough room to clear the endcap (it's still a nice tight fit though). This is also about when I realized that my cage to CC clocking/orientation didn't match up with how I wanted it to look so I'd recommend giving that some thought at this point if you haven't already.

Hope some of this helps, MTFBWY & let's see some in-progress pics!! lol
 
Oh I should have clarified that waaaay earlier in the thread. Going with a Neopixel blade setup.

So if you went with the 18350, you soldered directly to it? Any tips on something like that?

Here is my chamber pretty much buttoned up. I might have to cut down the metal inserts a bit to make sure I have room for LEDs and the speaker, but otherwise this is where I want it to be. I wanted to go for a "well taken care of, but used" look. While I was test fitting the chamber to the rest of the hilt, I found that the rings were just slightly too loose even with the set screw tightened down, so I am using some thermal tape to fill the gap and help keep them from wiggling around. We'll see how well that works in the long run.

Looking forward to getting into the next phase. I have to build a wiring diagram so I have a good map and I found this awesome proffie board configuration generator that should really help with that.

Proffie Configuration Generator

A couple questions when it comes to that. How do i know what resistors (if any) I need for my LEDs and Accent Rings? Are they just "plug and play" where I just wire them to the board, or should something go in between them? These are what I got (although I actually got them from SaberBay but for some reason they are not on Etsy right now?):

Pixel Accent LED
Pixel Accent Ring

Using the configuration generator it looks like I will have connections for the Blade, the CC LEDs, and then use "Neopixel Crossguard" for the Accent Rings. Treat those rings with a crossguard font like in a Kylo build, but make them do what I want in the chamber instead. That's my current plan anyway, we will see how that pans out.

20240402_105846.jpg
20240402_105859.jpg
20240402_105852.jpg
20240402_105914.jpg
 

Your message may be considered spam for the following reasons:

If you wish to reply despite these issues, check the box below before replying.
Be aware that malicious compliance may result in more severe penalties.
Back
Top