You are using an out of date browser. It may not display this or other websites correctly.
You should upgrade or use an alternative browser.
You should upgrade or use an alternative browser.
Rocketeer Cirrus X3- The Veepy Build
- Thread starter MTB
- Start date
Look fantastic. !!
Do NOT clear coat it!!! I heard even with the specific clear coat from spaz stix it can ruin the finish
Or test on a scrap piece first!!!!
You sure? Bill Doran used the Alclad Aqua Gloss Lacquer on metal painted parts many times with success, I thought? That's what I was going to try...or am I missing something?
He even suggests a light retouching of metallic paint on top of the clearcoat to give you the best of both worlds.
I know it should be able to show fingerprints like the real thing and all that, but that's one element of realism I'd like to forego. Shiny and new, non-weathered for me!
I guess some testing is in order!
gnolivos
Sr Member
I think it’s best to test. I believe best case is it will dull very little.
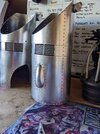
looking at MTB pics I feel the current finish is a little too chromey for my liking, comparing to the real thing. So if the clear coat dulls it just a little it would probably look perfect.
I just fear it may dull too much.
TEST!!!
looking at MTB pics I feel the current finish is a little too chromey for my liking, comparing to the real thing. So if the clear coat dulls it just a little it would probably look perfect.
I just fear it may dull too much.
TEST!!!
MTB
Sr Member
Look fantastic. !!
Do NOT clear coat it!!! I heard even with the specific clear coat from spaz stix it can ruin the finish
Or test on a scrap piece first!!!!
My hopes is that it will dull it a little as it is a bit too shiny for me. I will do a test on a spare part. But the brushed effect came out fantastic!Fantastic paint job...and, as gnolivos said: ``don`t clear coat it!!`` It`s going to be dull in no time
Thanks! that was my next part to figure out!Use this paint for the cones:
View attachment 1449125
MTB
Sr Member
This was so nerve-racking gluing the hull in place! I did one side just fine but lining up the other with out dripping or glue running out was scary!
I did scratch the inner part of the tank a bit but I'll touch it up later. Now to pray for no earthquakes tonight!
Once it's fully dry I will clamp the inner part of the hull as you can see a small gap.

I did scratch the inner part of the tank a bit but I'll touch it up later. Now to pray for no earthquakes tonight!
Once it's fully dry I will clamp the inner part of the hull as you can see a small gap.
MTB
Sr Member
Thanks!! And yes I do! It's was my dream car for my whole life and finally got one about 2 years ago.Looks amazing. And wait what? You have a delorean?!!!!
MTB
Sr Member
Thanks! I really don't like painting but with the guidance from people here is came out great! (See above posts on how it was done)That paint job just looks amazing...and compared with the real alu from the Delorean you'll have a lot of difficulties knowing which is which
MTB
Sr Member
I know it been a long time since I posted anything, work had been just crazy busy for me and I haven't had much time for this.
But the other day I was able to paint the cones.


I'm happy with how they turned out! Hopefully I'll be able to get more done in the upcoming months. Normally winter is a slower time for me so we'll see!
But the other day I was able to paint the cones.
I'm happy with how they turned out! Hopefully I'll be able to get more done in the upcoming months. Normally winter is a slower time for me so we'll see!
MTB
Sr Member
Well I got the bug and made this.......


I always knew I was going to make this from the moment I starting printing. I will be using expanding foam to make the impression of the rocket in the box so it won't move around when I carry it. All the angle iron is cut I just need to drill the holes for the rivets. I'll be picking up the lettering on my next trip to Home Depot too.
My only struggle is the corner guards. I can not find the correct ones. I can't even find any that are close and the right size! From my measurements they have to be at least 2 inches long. The ones I'm finding are only 1 inch. That is way too small! I may have to just make them myself, but I would rather buy them and save time lol.
Well hopefully I'll have more to show, but I will be getting pretty busy starting Monday, so we'll see.
Attachments
Similar threads
- Replies
- 14
- Views
- 2,993
- Replies
- 26
- Views
- 2,525
- Replies
- 8
- Views
- 345
- Replies
- 20
- Views
- 771