Rey - Star Wars: The Force Awakens Build (open for everyone!)

Hi all,

Hope you've all had a fantastic weekend!!

I've made a series of videos showing how I built my Rey's staff, and sling......hope they come in useful!!

Rey's staff build part 1
https://www.youtube.com/watch?v=zuU_npA5z-8

Rey's staff build part 2
https://www.youtube.com/watch?v=PirSIrFlnM8

Rey's sling build
https://www.youtube.com/watch?v=PDltmxEo7mI

All the very best

Dave

Handmade Props

These are sooo helpful. I am just about to build my sling and was a bit stuck. Your videos really helped clarifty what I need to do. Thank you!
 
Hi there,

I'm so pleased to hear the videos were helpful!! It makes it all worthwhile!!

All the very best

Dave

PS: If you need any help or advice, please feel free to message me on YouTube, and I'll try my best to help.
 
Hi there,

I'm so pleased to hear the videos were helpful!! It makes it all worthwhile!!

All the very best

Dave

PS: If you need any help or advice, please feel free to message me on YouTube, and I'll try my best to help.

I do have one question. Is the slide buckle on the sling 1.5" wide?

Also, it is hard to tell from the pictures what color the slide buckle is. Do you think it is a bronze color? Or a rusted silver?
 
Yes, i used one with a 1.5" opening. At first i thought it was too big, but it needs extra space to go over the center part, so i think 1 1/4 is too small.

Im currently working on the backpack and awhile ago I saw a pic of those 2 small bottles that go on the backpack, the little ones not the water bottles, but now I cant find it. Does anyone have a good pic(s) of what those look like?
 
yes I do.

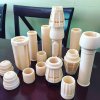
here are all of the canisters for the backpack laid out:

20160611_203353.jpg

and then each of those two individually:

20160611_202934.jpg

20160611_202943.jpg
 
Last edited:
Hi there, apologies for the delay replying.

It appears that the width is indeed 1.5".

The finish on the clasp metal work appears to be antique brass as the base, which has been weathered with a light rust to knock it back a bit.

Hope this helps.

All the very best

Dave
 
Thx for the pics, just what i needed. That amazon messenger bag is working out well, got it cut and now im working on getting it sewn back together.
 
love this thread :)
I thought I'd share some of my work that I've done on my Scavenger Rey build :)

Goggles:
I used EVA foam and stormtrooper lenses as the base, then covered them with fabric.

g4.jpgg6.jpg

For the toggles, I used clothes pins and craftfoam.
g1.jpgg3.jpg

I made the flashlight using a mini LED flashlight covered in craftfoam. It's secured with a metal hinge and screws.
The toggles are on with nuts and bolts.
The finished product:
gog1.jpg

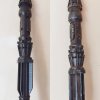
For my staff I used a 3D print by a Belarusian artist, glued pieces on a wooden dowel. I painted it and weathered it using acrylics and pastels.
s3.jpgs2.jpg
s1.jpg

The finished product:
st1.jpgst2.jpg

Wrapped with material and cheese cloth;
st3.jpg

The sling is made from leather, I cut out the shape and added the snaps.
st5.jpg

That's it for now! Currently working on the backpack :)
 
Last edited:
I posted on this thread back in November 2015 (page 30?!) but just wanted to say a belated huge thanks to everyone who posted info here. I won the costume contest for the Star Wars VII wrap party at work back on 30th November and couldn't have done it without this thread. :D So thank you!

Here's a rather blurry photo someone took of me with the two runners-up (JJ Abrams and Casual Vader):
IMG_6746.JPG

And here's a better photo with my wee Sphero BB8 that shows the goggles a bit better:
IMG_7615.JPG

I'm planning to wear this costume out again to London Film & Comic Con at the end of July but have to replace the wrap dress as someone spilled red wine all over it at the party and my belt pouch fell apart so have to fix that as well, hahaha.
 
I used the Dharma stonewashed silk crepe de chine, dyed it with watered down Dharma Safari Grey (half the amount of dye suggested on the site), then overdyed with Colombian dark roast coffee, and the result is absolutely spot on. The drape and texture match the reference images, and the color I got is a sandy taupe that looks gray in some light and tan in others, just like her clothing does in the film. I still have to sew the tie onto one of the legs, but then I'll post a picture.

I'm about to order this fabric for the pants, but the only "Safari Grey" I'm finding on Dharma's site is the Reactive Procion Dye. Is that right? I was looking at the Acid Dye but don't see that color available.
 
I know someone used Sand Dune, rather than Safari Grey.
I had the chance to see the color in person and it looks very close if not perfect, IMO.
 
I'm also interested in the bandages. I've been following this thread sporadically since January and it's been an amazing source as I've slowly gathered materials, so thanks to everyone here!

Just as a heads up, if anyone has a sample (I do mean a sample, like maybe an inch off cut) I'm happy to try and match to bandages here in NZ. We have a few different crepe bandage manufacturers sell here in pretty much every pharmacy and it would be really simple for me to check them out. I can also just hunt out in the meantime based on screencaps and specific widths, but a swatch would be simpler.

I just realised when I was browsing cosplay.com that a lot of people have been asking for bandage options for a variety of costumes and thought I'd offer to help with the sourcing :) I won't be making the costume myself but more than keen to help anyone who is :)

Just as an in case, we may have been getting bandages that are rebranded :)
 
Hi everyone! A little update from me!

My po-zu boots arrived, my bag is complete and my arm wraps, wrist cuff & pants are on the way! yay!

I also just bought myself the fabric for the body wraps as suggested here http://www.therpf.com/attachment.php?attachmentid=539295&d=1444527869

Can anyone recommend a dye to use and specifically how to dye it for this particular piece? I'm absolutely terrified I will over dye it and it will be to dark or I'll spoil the material!
I'm completely new to dying fabrics (except this shirt I did in coffee like in Grade 5 for a project about ancient Egypt haha)

Thanks so much guys!
 
Just as a heads up, if anyone has a sample (I do mean a sample, like maybe an inch off cut) I'm happy to try and match to bandages here in NZ. We have a few different crepe bandage manufacturers sell here in pretty much every pharmacy and it would be really simple for me to check them out. I can also just hunt out in the meantime based on screencaps and specific widths, but a swatch would be simpler.

I just realised when I was browsing cosplay.com that a lot of people have been asking for bandage options for a variety of costumes and thought I'd offer to help with the sourcing :) I won't be making the costume myself but more than keen to help anyone who is :)

Just as an in case, we may have been getting bandages that are rebranded :)


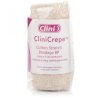
Here is what the brand was that i purchased:

s-l1600.jpg

As far ast the texture of the fabric is concerned, it is identical the the BOOTS brand bandages that I gathered and sent out for free to several people a while back. The only notable difference is that the BOOTS brand were about 3" wide and these are closer to 4" wide... which i find superior in that they stay wrapped much better (I don't even use compression sleeves) and due to the wider width I don't have trouble with my elbows poking out.

That isn't to say that the BOOTS brand necessarily suffers from these problems.. only that having an extra inch of width helps to ensure that you won't.
 
Hi everyone! A little update from me!

My po-zu boots arrived, my bag is complete and my arm wraps, wrist cuff & pants are on the way! yay!

I also just bought myself the fabric for the body wraps as suggested here http://www.therpf.com/attachment.php?attachmentid=539295&d=1444527869

Can anyone recommend a dye to use and specifically how to dye it for this particular piece? I'm absolutely terrified I will over dye it and it will be to dark or I'll spoil the material!
I'm completely new to dying fabrics (except this shirt I did in coffee like in Grade 5 for a project about ancient Egypt haha)

Thanks so much guys!

I used the crinkle viscose from ebay, and dyed it according to the ratio Kristen posted on here a while back and it came out perfect.
The ratio was 8 tablespoons of liquid Rit Tan and 5 tablespoons of Taupe in 3 gallons of hot water. I did two test pieces first, adding a little more tan and taupe as needed until the fabric matched the color in the force awakens visual dictionary.
Once I had a dye I liked, I put the fabric in. As soon as it was the right color I pulled it out, rinsed it lightly, double checked the color ( you really have to do this, I had to stick my fabric back in for a minute or two) then threw it in the dryer on medium low. Probably could have done a slightly higher setting, but I was worried about shrinking the fabric.
Hope this helps!
 
Yes... I had to notch the leather to fit it on there. One would think that would be a clip on the front of that canister, but at least mine was solid so I notched out for it. I put a spot of CA glue on the can when I put it in place to keep it from moving or falling out. I carry the pack as my everyday purse... and it hasn't fallen out yet :)

The chain is ladder chain. Division6 actually IDed it quite some time ago, and posted a link--which I bought from. We'd need to go back a bit through the thread, but I'm sure I can find it.
 
I used the crinkle viscose from ebay, and dyed it according to the ratio Kristen posted on here a while back and it came out perfect.
The ratio was 8 tablespoons of liquid Rit Tan and 5 tablespoons of Taupe in 3 gallons of hot water. I did two test pieces first, adding a little more tan and taupe as needed until the fabric matched the color in the force awakens visual dictionary.
Once I had a dye I liked, I put the fabric in. As soon as it was the right color I pulled it out, rinsed it lightly, double checked the color ( you really have to do this, I had to stick my fabric back in for a minute or two) then threw it in the dryer on medium low. Probably could have done a slightly higher setting, but I was worried about shrinking the fabric.
Hope this helps!

this REALLY helps i think! I'll definitely refer back to this when the fabrics arrive, thank you so much!
 
Back
Top