mcusanelli
Well-Known Member
Hey guys,
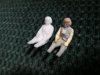
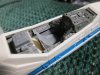
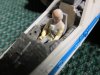
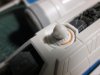
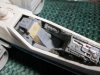
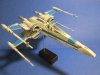
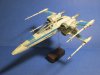
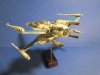
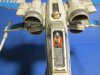
I thought I'd share some pics of my X-Wing build. I know that many are unhappy with this new 'beginners' kit, but it was Force Friday, and there it was on the shelf at Target, so I figured I'd see what I could do with it. Turns out, it's a nice basic kit with some surprisingly detailed parts, super-clear canopy, and some nice engraving, at least I think so! The first thing I decided to do is fix the cockpit, and find a pilot that looked right. Fortunatly, I've never thrown away any pilot figure in 45 years of modeling (in fact, all those figures eventually led me to become a sculptor, with a little inspiration from ILM's magnificent artists whose work I'm for ever greatful to!) so, a 1/48 Airfix jet pilot who is way to small for 1/48 scale fit the bill. He was modified with superglue paste (Lock-tite and baby powder) solder wire, and sculpting wax for the fine details I can't do any other way. He got rubber molded and cast in Alumilite, because I know I'm going to do another one of these), and painted with acrylics. The cockpit was cut apart, because all of it's elements are usable,electronics got tossed, and the side consoles and seat were added to a cut down Monogram F-86 cockpit tub. This was then trimmed to fit up against the computer equipment part at the rear, and the control stick made from a piece of paper clip and some masking tape. I also took BB-8's head, and sunk it further down into his socket, to use as the body, and made a new smaller head from a chunk of sprue. I added a piece of styrene rod around the opening to make him appear smaller. The detail was then painted on. I added some height to the seat with some of the plastic left over from the electronics package. All of the interior was painted with British Ocean grey, washed with black, and drybrushed to pick out the details. The instrument panel and coaming are excellent as is, just need a good paint job to bring them to life. The holes in the fuselage for the sounds were filled in with 'crazy-paste', and the cannons were cut off, pinned, and rotated so the orientation of the 'c' things was correct. Apple Barrel and Folk-Art paints were used throughout, custom mixed where necessary. Weathering was done with black washes, I might go back and chip some paint here and there, and maybe make a couple of panels bare metal. Hope you like it!
I thought I'd share some pics of my X-Wing build. I know that many are unhappy with this new 'beginners' kit, but it was Force Friday, and there it was on the shelf at Target, so I figured I'd see what I could do with it. Turns out, it's a nice basic kit with some surprisingly detailed parts, super-clear canopy, and some nice engraving, at least I think so! The first thing I decided to do is fix the cockpit, and find a pilot that looked right. Fortunatly, I've never thrown away any pilot figure in 45 years of modeling (in fact, all those figures eventually led me to become a sculptor, with a little inspiration from ILM's magnificent artists whose work I'm for ever greatful to!) so, a 1/48 Airfix jet pilot who is way to small for 1/48 scale fit the bill. He was modified with superglue paste (Lock-tite and baby powder) solder wire, and sculpting wax for the fine details I can't do any other way. He got rubber molded and cast in Alumilite, because I know I'm going to do another one of these), and painted with acrylics. The cockpit was cut apart, because all of it's elements are usable,electronics got tossed, and the side consoles and seat were added to a cut down Monogram F-86 cockpit tub. This was then trimmed to fit up against the computer equipment part at the rear, and the control stick made from a piece of paper clip and some masking tape. I also took BB-8's head, and sunk it further down into his socket, to use as the body, and made a new smaller head from a chunk of sprue. I added a piece of styrene rod around the opening to make him appear smaller. The detail was then painted on. I added some height to the seat with some of the plastic left over from the electronics package. All of the interior was painted with British Ocean grey, washed with black, and drybrushed to pick out the details. The instrument panel and coaming are excellent as is, just need a good paint job to bring them to life. The holes in the fuselage for the sounds were filled in with 'crazy-paste', and the cannons were cut off, pinned, and rotated so the orientation of the 'c' things was correct. Apple Barrel and Folk-Art paints were used throughout, custom mixed where necessary. Weathering was done with black washes, I might go back and chip some paint here and there, and maybe make a couple of panels bare metal. Hope you like it!
Attachments
-
 IMG_6046.JPG1.7 MB · Views: 371
 -
 IMG_6050.JPG1.9 MB · Views: 317
 -
 IMG_6051.JPG1.8 MB · Views: 332
 -
 IMG_6048.JPG1.6 MB · Views: 289
 -
 IMG_6049.JPG1.8 MB · Views: 307
 -
 IMG_6081.JPG1.9 MB · Views: 420
 -
 IMG_6079.JPG1.8 MB · Views: 390
 -
 IMG_6078.JPG1.7 MB · Views: 357
 -
 IMG_6084.JPG1.8 MB · Views: 417
 -
 IMG_6082.JPG1.8 MB · Views: 373
") Too bad you didn't use the electronics. I'm waiting for the Level 2 version since this has better proportions and is much closer to 1:48 scale. However, I too find it a bit weird that the new kits do not come with a pilot figure since all the previous ones did.
Too bad you didn't use the electronics. I'm waiting for the Level 2 version since this has better proportions and is much closer to 1:48 scale. However, I too find it a bit weird that the new kits do not come with a pilot figure since all the previous ones did.


