Revell release schedule

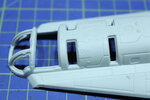
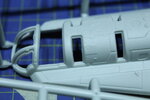
Extra large detail shot from the real kit...
There is a fine texture - not the worst "texture" showed in the promotion picture - this is caused by a terrible paint job.

Interesting. Thanks for those. Could you possibly take a photo of the cockpit window framing area? From this YouTube video, it seems to have the worst texture.

269596845_10160266044927150_2135999333576961571_n.jpg
 
The texture notwithstanding, the level of detail and accuracy on the kit is definitely a step up for Revell's SW kits. Seems on par with Kylo Ren's shuttle, which is an excellent kit in terms of detail (had they offered positionable wings, it would've been a complete home run). The kit isn't an assembled toy and, so far, it seems its flaws are manageable. I'm the first to wish it was Bandai making a 1/72 kit, but I've suffered through worse kits.
I'd be ecstatic if Bandai did even a 1/144 RC. I'd love to display it with my Falcon, Slave 1, and U-Wing.
 
Against all complaints - if eligible or not - I love Revell's Razor Crest! Found it under the christmas tree and had a great time with the preassembly. Imo the best Star Wars kit Revell released so far (not talking about the bandai and Fine Mold re-releases). Fantastic that this time also a lovely interior is created. Can't say too much about the details since I havent done a comparison to pics etc. but hey! Mando even got thumbs to grap the steering sticks! Just miss a tiny Grogu.
Really great that Revell found the series worth to put a new level of effort into that star wars kit - unlike the quick shots for the last trilogy kits. Maybe its not that bad, that Disney developes more of those Star Wars series which last longer than only one summer and creating more interests in the ships and hopefully also kits.
 
Mine's just arrived, the texturing really isn't all that bad unless you get up real close and personal to the surface - and I'm talking tip of the nose.
The panel lines are good, but those window frames are going to need some serious attention they're way too thick & chunky.
Have some ideas for lighting the exhausts which will involve making resin casts - I'm not drilling and sanding the original parts!
All in all, I'm happy with it.

Sweeet. Mine should come tomorrow! Pretty excited!

SB
 
Sweeet. Mine should come tomorrow! Pretty excited!

SB
The box is actually smaller than it looks in the videos. Mine got a little beat up on the way to Australia from the UK, but nothing looks damaged inside... We should probably start a dedicated thread for this soon...
 
I got mine today!

IMG_7435.jpg


The first thing I did was to take the hull part and hit it with some Tamiya primer to see if it would solve the texture problem. Here is the part straight out of the box:

IMG_7437.jpg


Honestly the texture looks worse than it really is to the touch. Anyway, here it is with a LIGHT mist of primer:

IMG_7438.jpg


And here it is with a very light sanding:

IMG_7439.jpg


Took a whole 5 seconds to sand it smooth. Easy peasy. I don't really forsee the texture being a problem for a metallic finish.

SB
 
I got mine today!

View attachment 1524688

The first thing I did was to take the hull part and hit it with some Tamiya primer to see if it would solve the texture problem. Here is the part straight out of the box:

View attachment 1524689

Honestly the texture looks worse than it really is to the touch. Anyway, here it is with a LIGHT mist of primer:

View attachment 1524690

And here it is with a very light sanding:

View attachment 1524691

Took a whole 5 seconds to sand it smooth. Easy peasy. I don't really forsee the texture being a problem for a metallic finish.

SB


That doesn't look like a light primer coat to me. It seems to have pooled in and around details.
 
If you're seeing a model of the Razor Crest with a mirror-like finish, someone's done a terrible job with the weathering...

I know it's not supposed to shine like chrome, but it still should have a cloudy reflectivity to it, similar to an unpainted P-51 Mustang. Not one that has an airshow finish, but one that is war weary. If someone wants to paint it up with aluminum, feel free, but a rough texture is a little disheartening since it may limit the reflectivity and sheen for others who may want to make it like what is seen on the screen.

TazMan2000
 
To be honest, I think you'd actually be hard pressed to see any texture once it's been primed, lightly sanded, painted and weathered.
I'd be much more concerned about the hideously thick canopy frames and, if you are lighting the engines, solving the problem of how to achieve that effect with kit supplied opaque plastic.
 
Taz, one possible work around for the cloudy reflectivity finish you describe is to hit certain sections of the hull with silver Rub N' Buff and some Q-tips. The paste should fill in any rougher texture and polish up. I used Rub N' Buff on my Eagle engine bells after a gloss black undercoat and they turned out great (at least to me).
IMG_4780.jpg
 
That's exactly the effect I'm looking for Hunk a Junk.
I just want to see someone do this physically on the Revell RC, not just quote theory.

TazMan2000
 
Got the Revell RC as a Xmas present,…just had to have a go at carving those engine thrustersView attachment 1524990View attachment 1524991View attachment 1524992View attachment 1524993View attachment 1525001View attachment 1525003View attachment 1525004View attachment 1525005


View attachment 1525002
I’ve other kits to finish,…but this is so tempting

John
Great work, John. I went the casting route - took a mold of the nozzles, cast in resin and then sanded down until the holes were visible. I'll send a pic in the morning.
 
Back
Top