You are using an out of date browser. It may not display this or other websites correctly.
You should upgrade or use an alternative browser.
You should upgrade or use an alternative browser.
Reforged Kylo Ren Helmet Build - FINISHED
- Thread starter Magnavis
- Start date
Magnavis
Sr Member
Update:
I've spent the past week working on the lighting system for the helmet. I started by creating an inner foam piece, which would house the lights. This was a pain honestly, as I don't really like working with foam, because it's not something I'm very well practised in. I started by creating a very rough 3D model in Blender, using my helmet files as reference. I offset it roughly 10mm from the inside, as I wanted gap between the helmet wall, and the foam, so the light could spread evenly.

I then loaded the file into Pepakura Designer, and printed it out as a paper template, which I stuck together with some tape.

I test fitted it a few times to the helmet, and made some further adjustments to make sure the shape was correct. I then re-cut the paper template, and transferred it to foam.

It was a bit of a mess, but it didn't have to look pretty. I still needed to add the back flared section, but I did a quick test of the basic principle, to make sure it would work as intended. I temporarily taped some foam spacers inside the helmet, and then temporarily taped a strip of LED down the middle of the foam insert, and inserted it into the helmet.


Success! Knowing it would work as intended, I went ahead and finished up the foam insert. It's been tidied up as much as it needs to be, and I'll probably add a purely aesthetic skin layer to the inside with some 2mm foam - but that can be done later on down the road..


Once I was happy with the foam insert, I could move onto actually adding the lights.
I started by simply loosely taping them into their positions, and then test fitting it in the helmet again, to make sure the lights weren't obstructing anything. I had to avoid the little foam spacers I had placed into the helmet, and the little black squares you see on the foam represent those, so I knew roughly where they were, and to avoid them...Once happy, I stuck them down using the sticky strips on the back.

I then used some tape to plan out my route. The strips had to daisy chain essentially, and I had to make sure it was a nice clean loop with a start and end point. This wasn't as difficult as I expected it to be, and the tape made it pretty easy to visualise.

I then went ahead and soldered all of the connection points, prior to wiring.

I then went ahead and wired it all up, wiring all of the positive wires first, and then all of the negative. This proved to be a surprisingly relaxing task, and I actually quite enjoyed it!


Totally looks like I can now contact all of the X-Men now! CHARLES!
Some of it's a little higgledy-piggledy, but it worked on it's first try! (No...really!)

I was then able to fit it into the helmet, and see how everything lines up (as I had to sort of guess)


Mostly everything lines up - there's only a small section which isn't getting any light (and I'm not entirely sure why!) but a few adjustments, and it'll be perfect. I'll also hot glue all the lights too, which should help A: secure it all, and insulate - B: help diffuse the hot spots a little.
I've got a little more to do light wise: A small panel where the faceplate is, and also the lights for the nose piece. All super simple, and easy to tie into the main piece, as I've got easy to wire points left specifically for that.
It's likely that by this time next week, I'll be done! It depends how everything else goes, and how long things take. But after a few adjustments to the lights, it's painting time!!
That's all for now - more soon!
I've spent the past week working on the lighting system for the helmet. I started by creating an inner foam piece, which would house the lights. This was a pain honestly, as I don't really like working with foam, because it's not something I'm very well practised in. I started by creating a very rough 3D model in Blender, using my helmet files as reference. I offset it roughly 10mm from the inside, as I wanted gap between the helmet wall, and the foam, so the light could spread evenly.
I then loaded the file into Pepakura Designer, and printed it out as a paper template, which I stuck together with some tape.
I test fitted it a few times to the helmet, and made some further adjustments to make sure the shape was correct. I then re-cut the paper template, and transferred it to foam.
It was a bit of a mess, but it didn't have to look pretty. I still needed to add the back flared section, but I did a quick test of the basic principle, to make sure it would work as intended. I temporarily taped some foam spacers inside the helmet, and then temporarily taped a strip of LED down the middle of the foam insert, and inserted it into the helmet.
Success! Knowing it would work as intended, I went ahead and finished up the foam insert. It's been tidied up as much as it needs to be, and I'll probably add a purely aesthetic skin layer to the inside with some 2mm foam - but that can be done later on down the road..
Once I was happy with the foam insert, I could move onto actually adding the lights.
I started by simply loosely taping them into their positions, and then test fitting it in the helmet again, to make sure the lights weren't obstructing anything. I had to avoid the little foam spacers I had placed into the helmet, and the little black squares you see on the foam represent those, so I knew roughly where they were, and to avoid them...Once happy, I stuck them down using the sticky strips on the back.
I then used some tape to plan out my route. The strips had to daisy chain essentially, and I had to make sure it was a nice clean loop with a start and end point. This wasn't as difficult as I expected it to be, and the tape made it pretty easy to visualise.
I then went ahead and soldered all of the connection points, prior to wiring.
I then went ahead and wired it all up, wiring all of the positive wires first, and then all of the negative. This proved to be a surprisingly relaxing task, and I actually quite enjoyed it!
Totally looks like I can now contact all of the X-Men now! CHARLES!
Some of it's a little higgledy-piggledy, but it worked on it's first try! (No...really!)
I was then able to fit it into the helmet, and see how everything lines up (as I had to sort of guess)
Mostly everything lines up - there's only a small section which isn't getting any light (and I'm not entirely sure why!) but a few adjustments, and it'll be perfect. I'll also hot glue all the lights too, which should help A: secure it all, and insulate - B: help diffuse the hot spots a little.
I've got a little more to do light wise: A small panel where the faceplate is, and also the lights for the nose piece. All super simple, and easy to tie into the main piece, as I've got easy to wire points left specifically for that.
It's likely that by this time next week, I'll be done! It depends how everything else goes, and how long things take. But after a few adjustments to the lights, it's painting time!!
That's all for now - more soon!
Magnavis
Sr Member
This could well be the final update before I'm finished, as I don't normally show of painting until it's done, which is where I'm at now.
I made some final adjustments to the lights, adding a few, and moving some around a little to remove some 'hot spots' I also added the lights for the faceplate. The internal parts of the helmet are more or less done now, but for the installation of the visor, fabric (which covers the holes in the faceplate) and also the nose pieces - but all of that can be done after painting. This was the biggest part, and I'm super glad I did it before painting, as by now, it would likely be scuffed to hell with the amount I've handled it.
I still have to do the lights for the nose pieces, but that's super simple to set up, and can be done after painting.


So that's it - and perhaps the final update!
More soon!
I made some final adjustments to the lights, adding a few, and moving some around a little to remove some 'hot spots' I also added the lights for the faceplate. The internal parts of the helmet are more or less done now, but for the installation of the visor, fabric (which covers the holes in the faceplate) and also the nose pieces - but all of that can be done after painting. This was the biggest part, and I'm super glad I did it before painting, as by now, it would likely be scuffed to hell with the amount I've handled it.
I still have to do the lights for the nose pieces, but that's super simple to set up, and can be done after painting.
So that's it - and perhaps the final update!
More soon!
Magnavis
Sr Member
WE ARE DONE!
Yippy!!
But before I post the final images (which are yet to be taken - expect them in a couple days) - I'll update the thread to the finish line.
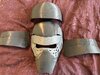
So, we left off with everything ready to paint. I started off by masking off the chrome sections of the helmet, as I didn't want them to get any primer on them. I then used masking fluid to mask off all of the resin cracks.


I left the primer overnight, and then the following day, I sprayed the textured paint. I used Rustoleum Aged Iron for this. There is a lot of inconsistency with the finish of Kylos helmet, but in TRoS, it seems to be much more matt and rough in texture than in the previous two films.


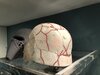
I left it for a couple of hours until it was touch dry, and no longer tacky. I then sprayed a couple of coats of matt black.


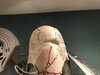
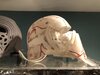
After removing the masking fluid on the nose piece the same day, and discovering the paint was a little too tacky for my liking, I left the paint over night to fully dry before removing the masking fluid from the helmet. I used some fine wire wool to clean upon the cracks, and to remove any flaking. Some small areas needed touching up before the clear coat, but nothing major.

With the clear coat on and dry, I could remove the tape, and expose the faceplate.

After removing a bunch of tape, I then had to put a bunch back on - this time masking off the black sections we'd just painted. The helmet was protected with a plastic bag, just taping around the edge.


My tape was a pain in the ass, and refusing to stay stuck, but it was good enough in the end - just meant a little cleanup was needed after painting.
I used Alclad gloss black and Alclad chrome to paint the faceplate - starting with 2 or 3 wet coats of the gloss black. I let it sit for 15 minutes or so, and then applied the chrome in light coats.

At first, I wasn't overly happy with the finish - it didn't seem as punchy and clean as I had hoped, but after revisiting it after a few hours, and indeed the following day, I was actually really happy with it.
The following day, I removed the remaining tape.

I left the Alclad to sit for a day before doing the final bit of paint work, which was just adding the black areas. This meant more annoying and fiddly masking! I used some Vallejo Model Air Black, spraying a couple of lights coats.


After 30 minutes or so, I removed the tape. I ended up getting a really nice subtle bleed between the chrome and the black, which matches original Kylo helmet references.

I then did a few touch ups to the black areas, which were a little tatty in places due to the masking.

With the painting done (but for some light weathering) it was time to get everything installed, and attached.
The the faceplate fabric, I made a couple of simple shapes in Blender, and transferred them to Pepakura Designer. I printed them, and cut them out in foam, an then used some PVA glue to attach the fabric. Once dried, I hot glued them into the helmet.


The final big job was to add the lights to the front nose piece, and attach it to the main circuit. This was easy enough. I started by cutting out a hole in the back nose piece, and installing a foam panel. I then attached the lights, and wired them up.


After confirming the circuit worked, I could then attach the nose piece lights to the main insert. I started by removing the temporary USB cable, and soldering some new wires, which would go to the nose piece.


A new USB connection was then added to the nose piece, which completes the circuit. I powered on to make sure it was all working.

With the soldering all done - I attached the nose cover using some hot glue, being careful to align it properly. I then installed the foam insert - which took a a little tweaking to get it to sit properly. Once happy, I hot glued what needed to be stuck down and installed the visor.

It's not the prettiest or most interesting thing to look at, but It serves it's purpose, and looks somewhat tidy.
Once everything was installed and working, I did a little light weathering to the helmet - being sure to leave the chrome well alone - I used some black, and off black washes, aswell as some edge wear in places - it's all very subtle.
BUT....you dont get to see it...yet.
SoonTM - Wednesday I expect. I need to get a bunch of photos taken, to best show it off. But I'm super happy with the final result, and I hope that when you guys see it, you will be too!
That's all for now!
Yippy!!
But before I post the final images (which are yet to be taken - expect them in a couple days) - I'll update the thread to the finish line.
So, we left off with everything ready to paint. I started off by masking off the chrome sections of the helmet, as I didn't want them to get any primer on them. I then used masking fluid to mask off all of the resin cracks.
I left the primer overnight, and then the following day, I sprayed the textured paint. I used Rustoleum Aged Iron for this. There is a lot of inconsistency with the finish of Kylos helmet, but in TRoS, it seems to be much more matt and rough in texture than in the previous two films.
I left it for a couple of hours until it was touch dry, and no longer tacky. I then sprayed a couple of coats of matt black.
After removing the masking fluid on the nose piece the same day, and discovering the paint was a little too tacky for my liking, I left the paint over night to fully dry before removing the masking fluid from the helmet. I used some fine wire wool to clean upon the cracks, and to remove any flaking. Some small areas needed touching up before the clear coat, but nothing major.
With the clear coat on and dry, I could remove the tape, and expose the faceplate.
After removing a bunch of tape, I then had to put a bunch back on - this time masking off the black sections we'd just painted. The helmet was protected with a plastic bag, just taping around the edge.
My tape was a pain in the ass, and refusing to stay stuck, but it was good enough in the end - just meant a little cleanup was needed after painting.
I used Alclad gloss black and Alclad chrome to paint the faceplate - starting with 2 or 3 wet coats of the gloss black. I let it sit for 15 minutes or so, and then applied the chrome in light coats.
At first, I wasn't overly happy with the finish - it didn't seem as punchy and clean as I had hoped, but after revisiting it after a few hours, and indeed the following day, I was actually really happy with it.
The following day, I removed the remaining tape.
I left the Alclad to sit for a day before doing the final bit of paint work, which was just adding the black areas. This meant more annoying and fiddly masking! I used some Vallejo Model Air Black, spraying a couple of lights coats.
After 30 minutes or so, I removed the tape. I ended up getting a really nice subtle bleed between the chrome and the black, which matches original Kylo helmet references.
I then did a few touch ups to the black areas, which were a little tatty in places due to the masking.
With the painting done (but for some light weathering) it was time to get everything installed, and attached.
The the faceplate fabric, I made a couple of simple shapes in Blender, and transferred them to Pepakura Designer. I printed them, and cut them out in foam, an then used some PVA glue to attach the fabric. Once dried, I hot glued them into the helmet.
The final big job was to add the lights to the front nose piece, and attach it to the main circuit. This was easy enough. I started by cutting out a hole in the back nose piece, and installing a foam panel. I then attached the lights, and wired them up.
After confirming the circuit worked, I could then attach the nose piece lights to the main insert. I started by removing the temporary USB cable, and soldering some new wires, which would go to the nose piece.
A new USB connection was then added to the nose piece, which completes the circuit. I powered on to make sure it was all working.
With the soldering all done - I attached the nose cover using some hot glue, being careful to align it properly. I then installed the foam insert - which took a a little tweaking to get it to sit properly. Once happy, I hot glued what needed to be stuck down and installed the visor.
It's not the prettiest or most interesting thing to look at, but It serves it's purpose, and looks somewhat tidy.
Once everything was installed and working, I did a little light weathering to the helmet - being sure to leave the chrome well alone - I used some black, and off black washes, aswell as some edge wear in places - it's all very subtle.
BUT....you dont get to see it...yet.
SoonTM - Wednesday I expect. I need to get a bunch of photos taken, to best show it off. But I'm super happy with the final result, and I hope that when you guys see it, you will be too!
That's all for now!
ChickenHaunt
Sr Member
Looking good!
Magnavis
Sr Member
Finished!
Super happy with the final piece. It was a little tricky to photograph the cracks with my phone - but with some tweaks tot he settings, and lighting, I think I captured everything super nicely.
So, without further delay, here is my Reforged Kylo Ren Helmet!
Showcase Images


Studio Images (Selected)
Full Album:


I've had a blast working on this over the past couple of months! I've done a full project write up, which can hopefully be helpful for anyone using my files, and wanting to achieve something similar: Build: Kylo Ren Helmet – The Rise of Skywalker – Magnavis
As always, if anyone on here prints my files, I'd love to see your final results. The best way to contact me is on Twitter @MagnaProps
Thanks for the support in this thread. I'll see you all again real soon with my Dark Rey Lightsaber build!
By for now
Super happy with the final piece. It was a little tricky to photograph the cracks with my phone - but with some tweaks tot he settings, and lighting, I think I captured everything super nicely.
So, without further delay, here is my Reforged Kylo Ren Helmet!
Showcase Images
Studio Images (Selected)
Full Album:
I've had a blast working on this over the past couple of months! I've done a full project write up, which can hopefully be helpful for anyone using my files, and wanting to achieve something similar: Build: Kylo Ren Helmet – The Rise of Skywalker – Magnavis
As always, if anyone on here prints my files, I'd love to see your final results. The best way to contact me is on Twitter @MagnaProps
Thanks for the support in this thread. I'll see you all again real soon with my Dark Rey Lightsaber build!
By for now
Last edited:
PhantomPickle
Active Member
My goodness you did an amazing job. I just bought a 3d printer and I'm going to have to do this soon. I've actually downloaded the older version already but this looks too good to pass up.
Magnavis
Sr Member
well that's really awesome, the result is really working well
Thanks!
My goodness you did an amazing job. I just bought a 3d printer and I'm going to have to do this soon. I've actually downloaded the older version already but this looks too good to pass up.
Thanks so much! Depending on when you downloaded the files, you might want to make sure you have the new faceplate model (V2) - it's much easier to work with.
ChickenHaunt
Sr Member
Excellent!
Darthlarry
New Member
What a great job you done. And awesome tutorial. Im doing a 3d printing of the model now but I don’t have much spear time to work on it (and no experiance in this, but i will do my best) so it may take long time but when im finnish I’ll send you pictures
Thank for everything!
Thank for everything!
Magnavis
Sr Member
Excellent!
Thank you so much!
What a great job you done. And awesome tutorial. Im doing a 3d printing of the model now but I don’t have much spear time to work on it (and no experiance in this, but i will do my best) so it may take long time but when im finnish I’ll send you pictures
Thank for everything!
Thanks for the kind words! I'd love to see your finished helmet whenever that might be. I hope the thread and my write up are helpful
Good Luck!!
Darthlarry
New Member
Now all the ”fun” begins! One step of manus to try to do your perfekt kylo ren! If i can do it half as good as you then I will be satisfied! I Will update when i got the time to continue! Will follow your steps! As your tutorial was perfect! (Some parts missing in the pic)
Attachments
Magnavis
Sr Member
Now all the ”fun” begins! One step of manus to try to do your perfekt kylo ren! If i can do it half as good as you then I will be satisfied! I Will update when i got the time to continue! Will follow your steps! As your tutorial was perfect! (Some parts missing in the pic)
Good luck with your build!!
vebo1
Sr Member
Magnavis Your files really turn out nice. Trying to figure how you got clean lines for the cracks using a dermel . When I try the Pla melts . What’s the trick .I will try a soldering knife .
Attachments
Magnavis
Sr Member
Magnavis Your files really turn out nice. Trying to figure how you got clean lines for the cracks using a dermel . When I try the Pla melts . What’s the trick .I will try a soldering knife .
PLA will just melt, unfortunately. I printed in PETG which is much better to work with, as it has a much higher heat resistance. To minimise the amount you need to dremel out, you might try drilling a series of holes along the cracks first, and then just connect the dots. It makes it much easier, and might be a little more PLA friendly.
squirk
Master Member
Sorry to necro this, but I am about to start this very same project, and I was wondering if the inner nose/mouth piece (not the outer one with the cracks) is a slightly different finish than the rest of the helmet? Seems like it's the same color, but smoother and not as textured (not "aged iron") like the rest of the helmet?
Similar threads
- Replies
- 2
- Views
- 1,136
- Replies
- 14
- Views
- 2,549
- Replies
- 9
- Views
- 1,009
- Replies
- 10
- Views
- 679