Update 19 Dec (Post newborn update) -

Progress -


So my last set of tasks were
- Fix the stupid TN / Lee Rapid logo placement in GIMP. (Done, easy duplicate layer group in GIMP and move it to where it needs to be)
- Reprint vinyl with the correct placement. (Done, burned up several more pieces of expensive vinyl, good thing I bought extra)
- Make a stencil for my white airbrushing fiasco...I mean adventure. (Did that, see below for details)
- Test the stencil/white background for the leaves. (Done, see also below)
- Find lots of problems in these upcoming tasks. (How many did I find???? (66)
- Find solutions to all those problems. (Working on this part)
- Report back to you. (Here I am)

Stencil -

The first thing I had to do was use the leaves outline to make a stencil to spray white behind my vinyl on the tin. I opened up YouTube, found some tutorials, went into GIMP, then duplicated the layer (never work on your only copy!) and shrunk the outline of the leaves and simplified it. Cleaned it up a bit and got this.

1671514501994.png


I had to go back and fix some "islands" that wouldn't work on a stencil, but that was easy.

Next, I exported that layer into an SVG file so my stencil cutting device (whatever one I chose in the moment) could make the stencil. I then took the SVG file on a thumb drive back up to my new favorite place, the Maker Space, to decide which machine I would use to make the stencil. After chatting with people more experienced than myself, we decided to try the laser cutter. Worst that could happen is...I use the machine wrong and set the entire Maker Space on fire......

xHs-O22yh7J4-8GsUfKju1JXh0i54loHzmbc3K0fWmaAWx8ecz3pNO_VLwRF5W-M0oFabIodwgjSDxio-f_aaNTC1d1uOo4ZT1JrAUS0j5s1ItSDLpD3GFnoMVMH5y-nOaDSqqR0BdVB7r_fTuJLEUpdSoW0IBQuw8gvCkbJnDvjpCsJ2_9PTJytzGP7V6O9ztUn0WdWGPD6O6i9mLsmzMkW1JpDpLegjL6BF8G8TllYugmCryP5wrhNUekS7gi4CrBU39nHrFeBQMehEHef_UCQxp_o3a2LYmou_U3dyWATt7pJQoPf3ddkfaSJp9kT2u-x6tuwRgeGXwtOM4Egp6TEO7wxMaAGJmLSXiIsLRUlBvdJbqS2XJANksvSrcL8i9nQT9k-7w8eGZnb6O7xB_d2J3iOjcvTg1Bdu-5PvV8gaEt16RkXXrStCFFBay3PQ77ASdUxH4JR4Oz10wgtVizczK9pjFuplWddD2MjymvXBTzUuwfl6hO_hrVa4u59ATJPmd3T86eeB92Udej0rGf-vDTuj3oIZDS9uxMPJc_vM4tF9M--VNgnSvF4enaB8l8AFE1KKi5kQKfn7y3saq4q_nBmH44zKd0TulHstkhvTbi2hlMmANxhWw2689WcQj3_mMdMbay3xEjeMghKSxLjKfI1ScGYYA77BnoAx7e0gSZTgDGPFXtItNcM7rF93MjpOeIXGbqZpAO0zDi1-8V_7LlYkZBG6MpV5CkTNKLKMYM2gL04-d2AlADFuVOMkuccMbRDUsqGTBFyQ0qfOgOHt3Bp7jPYOcdI5wASyG3659ncSbkUIfQCLwIL8DwVQXSNeOJ9t51dTvi5vn-q8NdA_TBztioBx6ejC-mezntJ1sV7GA5Nm8-h-4QlyzYLFbIS6lo_2c3qjyyXHN_ds7kB80_8PhrgaqZXuNeLmMmEoMfNOSi_CFApGHKO_TxDpVIsg0yRDWOcCBzklCE=w1139-h854-no


This thing was AWESOME!!! The first thing we tried turned out to be perfect!

h0TwJljmI_PMgb7SUJNYtjPf4W52jGSCRV6XnwnXmKQls9LnYOEsTwATVKJLsHxSuF00Z_mQcUQTvffeYz5DegJvGCRCVfRFJcaQkwAlF84pRigmEKtIeGJojURgFA7gZm3jsBXvRFKpIp8CS4d55O7bywCaClD-Q_KhLeV761gsYmcOb8esbcl60ota2QDcDVb9i1m-2YuV0OfpW89btxVo70D8ZyAxCW8yhR_Mu4QTTK6tKCYhgncJ8dcZShjffKnp4gqDhnWbbiAoPJ_s1JetmUCiCGWFHP8Hj12w--NkuGwxwfQkuK8bqyEKPDGOSwwqan4AqkYx4upHUolGHuIoWyVhH6T3znsg7ov0lF1QPeLcMxqTup3h_mBXgge_yk7p6mTPHb4Khqxhg5gnMzDWEiW7tVqvvz-_Zex1HGbfRk4baQ80i8MKZBWoYNlcSfF6mcdJx5fcMeCFFwPzJpO82OcwkhDmRC6VhtZ585QKIn_wlttIn_A8rc7pqmlgobuT9qazkjQ6FU6dDNacCVfVRt_Zjj5fqYXJ0y3-Zt4aY6_RE7DbSukeBaFbodotK5sizjAoNcYr04DSGEVWizQTXaJi3W8_Qn19tB5srsOyeixKVBw4Aj60z956bKyy--0H1FcJUjL12y2LKTy3Z2q3aJ5RobOq2Jl_FQSxSTvqcHQOpT4dz2GYmyw3weJi7E5msuEUUEDJaeRXh848MuHD1vD8TyEBurnWmHgSWRpWX1HOnrsg2VP1pyzScbAC6QFlI1tbh_eElG5XePPUiu4nUFGaz7TS8fWx_E8BnvWyToU9Km2uooRemr9NVS-wQVUNEinlsUhhbRC5C9MKY0n1Y90NLFvZaX-8wTpzVaFgDymapeHAOME5cX586n9zT-kruLd0kEvIqMJM71c-IIBM29C_Gv-fRHWeyoKAePEwm1U_iiVrlyjlCOpM7JmJrhV--P9cXqTn52bbseI=w641-h854-no
woa7gD-jMqyEKw4QShROIxQTozWsG5cfr8jbPowX8qJ4_WNdEIpSDTcRefEDi_L2Vjy7zQ3UtXDp0gQFQSRyoO-XWhbgXxFuHKiONvAn-sdwLNYPwZO7hniZUZJlPBPsbKZnaVbUWiTD-4pbKkoA7kbx8v4XzVu9fhWVGJCHmDnjuvIzcwxbv9YgyxERh193FOasVNM06DlpMngEguZutJCSXeOkLmZ6HNqExyy2TOTEBowNSdWPBsFaeWlN2ZMCLzLQiLsOWbWd-A8lpCR2BKdcv9a7wP4mPHkgF6lqt0eys_gTXbL7mzHoUkalvbB66Mqih0TpMHP8YPCa90V6RQ3pK8i8VxelGCinmTdN-H5AM7VOHFseygVWUJTSf-EuI40NfOAc20O3rFF68PLVhh9QV4AvivEbDAXQrQc0LCqKCp2B7IBjQnlMOIizQeJY_dqC5PcprfwHijU-79lG_-2SzHGBWN-k7CEnNHB499EgaLNdjl5obRheOO5vchaqqrvyjybn7SBOuQErVqJXUuSqkb3ZO_pN4kmzZhFhZP3g3e9MHsG_21FngxmTDlxqq9QAWirP2pE2ZNSga9Pp-FLUPeNsEiZt8ZohBM1F4lEJGkuvxMSqxlsUHKbZ3ue-JG2F2LITW5boQoopjF4eJ8HxkXy41ukVnzMs9stTxh_edLRebQD9cZbLYLxCCXQxI7ZCh8RH8JuVGNWmxgOe5p2t7_m-tiq6GiHVQ2aGgkssRpUxwV5V4sl0llmesVt2towUK2MYtBZPL6azmxiBftZZxdHHxtDQc5J6RRy3otKsqG-vmaSpoH0H06drf4-Sv44RHB_TjvZaajc2IjoW-3FgnivOI22aCeLqEHSwlk80EUGMozCiJMLpV_y9maTpsxdiLNr2ds_n0K-kkWuoH-tOOaVlcH746gKdvvbe7kcT7twYS4vJoBFO2xhM9IaVz_iIpnuO9lQVqp-CtdQ=w641-h854-no


I even cut holes around the outside to make sure the stencil cant move when I'm painting it.

Next thing I had to do was paint. I got to try my hand at airbrushing. Not to brag, but I've been doing some sort of art for almost 35 years, so I'm pretty confident in my artistic abilities. I like to think I can do basically anything artistic without much trouble. So I decided not to really look up any tutorials on how to use an airbrush before just jumping right into it. And....turns out I DEFINITELY should have looked up some tutorials on how to use an airbrush before just jumping right into it. I was humbled to say the least. If you're good at airbrushing...mad props to you! My results...weren't great.

7_fkM19oC_JLPXEAKleDNP23gQdUrFwTBWd-jck6p1BcsYRTLNtVZyV2rTSP28Yma-Dxi0YkP8NttvudgDP2kdeVttxVAvxj5KzOsHN-zcBGT0psbVzPCjoaTDxJqtJgm_xUeW3-HQl2bsFoaeyK7pOdt45yMfXVLj-ZvaRI4YW4_cEjByBHKGbBTWzCfhyzLoe2Pptq7GfKUEDet60QrjXO7UG5fx0xsWAeFgSNxKZragADcdZuM4yNQn7sp2P5BCPy3jnDeiX_vH0u7lAWFn8rtcvcqjVt4O95gerkko6OSAOUYEtLff_dJ4JxsnN4nE81L427frxkAk83S-Ch7UoMQMvChEkV5jnx6CdASGU0xhTlbbEwaRd6fcqcbf-JWWzeyVyAgPmrKSEawTjXETjIn4oRAA6VWsgCU6nQ52C2EGmeYbrP7p0Z-geLQ7-Y8C-7YHI794ypjON9ZOcvdAhdRspYjAizRxROOHekDSvvGYFxdeoP4lJWC5R96XuG0vk1WLTCfayDHrIGMU-n-6fPQxk1ODzYBsyYmkl7Pk2R_XVUgSlK7JuwjCadLF3UwQCAHz9uKPz5QnD40VMgBC8rngalFhQmCB85IS2M-dbjjbkLW-e8CyCyYfXHjWOwN1jqbS8Lf4GYLF9GTSMf8ia_vv92tTsSK8ILqUd1pzd3URU8DF4CW08ivyAX-j_ocB9y9tb4sHT5uclWKCxgbUHrJTRFFd4LKCsLrPfR6OZiNbKZ912o34eL6_cot9BizMTN7FwOT0qCJC0OPGfGAb2-PJyUPgE1_o0fe81w41fE3Vda7ybxI68ypR-yjuB6qZPDgJtgU7810PRR5vU0DqVc3y-9Ui64lRGQ4gm3ZjpgzLvkz5ipQmfxMPF2FCTGg_RywyqSdQfLthuc_mY8_0dtKlzKGm3gcYAfU7fj66nYLmif85fVqtj4DObFI81mAm82-AmG_gWQQQT--Hg=w641-h854-no


They were decent enough to be able to see how it would look, but not much past that. I had lots of overspray, inconsistent color, pooling up where I put too much on, etc. I also ran into the (non user-error) issue my embossing around the outer edge wasn't getting a clear edge because the stencil wasn't in contact with that part of the tin.
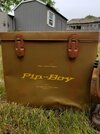
Adding the Vinyl -

Up next was to add the vinyl to see if the white behind the vinyl corrected the color to what it should be.

qebkMlvs60Z05fXQKvKDlqvA-loyeNZKreYWidEFuvS5dimVSRoBx2P7HwlFA7AMQnYWkRwdIEhSgQQevb_D8Tp4ce74XKIKYiNljxYFvYR40iSsNu_bC8Y1MWKTdgp47D5mpY6o_pPViCXxtCYrQjH_1L5gWwm9tOImwz0hnH6UwGFGqE3_FhV8imDDezzFcXOGQwt9nsA1SBHXeVsbb7Yn5TrPGDEdQYG9NVlp-F6dY0mLsE6qZTpN1a11LDmsSUzqCyUrM2dGgQqatR-L3Poc6BsoqivKJdEcz4Qoal58pk8iEu1dP3WePk6sNozamZA4OpgZxqL08qctL-Vd2L7mub-ez-PRMXHkbf4B4pxmZF16Z_mbK0Gv0vxAijvI-xgMO1uIlNpzVUkdgzQp8i86hgT4qnJg-iUCBiyS6IG9dE00sNmmLeohMSt_aL8OX8Gczpzq5s-uz9iIUZQKrhQUYIRfB-fEK7LM-GW6S_OiuBsNuPRwZQCoj5G_G_Jgb18d_5b5hbvwLWP79TuujV60pXYZoMBdkY2hx8OxpMYj_PKc3oIV1aqi3whZIB7uiqSTStVhmElzeWSvhakPyj2Wv87wfGaQ_OeJmKzilyI1yAXb4SuI7nMElfV6Un16Jdl2-48mfxd5rU-Bqg-2qqoI6Y280MG_H1QfSw3hQ1afKwD-3kv1X4SnRv7s5ZnsZTkNTnJQA001wVIA_jYe0GW9VT9e7l8LhC0O7xzjmjyx3AFkELmp4f2kcVfEvNPFsD7jfNzvcf3P4ig5sqVuRWbD154KJHbpVHY5dI7QjAJvw-tynZ0X51zaPCbfmiHg2uXHiga9G3J9MXb8xdhqTQIWJVlC-eEPd2CbcdLi6YIpzqCY5SjMn750CS9TEDY5kXczoEoqiB-EESDvJnfDPlcRHgcAmMYI6ooO7Ej6MOPkFTYTK6nZmdqd-f-e8wWOKAtNBtsC68Vp0TmWse4=w641-h854-no

a9OhkI6NjdwkPQnMy_vasM7oc7g6KULUj6O-fqQ0FrwZENbAfwxBz-ppHWBEPY62VD5tuu52qCQYv1GFCDSL1SN4phyaXWEUc39AWz546Bt5c4jV7UCjqpVCgBHRPe7jqooNymHGEMo9fJZurZZjiJgdhcpXKifsSai6k9_WMhyvlPwtqfv5uX4i-FcLQ12wqOSlRN8wos59afLjNmm32jfMwmddb8IR7WksdeDCUpgHcqkbZbce2gQuE9pBtEmeahGviUg1nAEasq1BIUNczXy-HI5lrniVDdQlol_i9O3hTWAN4CDKvzd63aYHsOxhk1sg0FQh5JPkqncMmkukzLfSU_H5ZiVR9Liv4xUQxlcIVll01vCj6QX8gIcVPnRs1yBll35K0hs6GVmXWMCTQFQg8n2Di1trltk3M2LgUODBEHhtJWkBJN2Tnt_5eWkXQu15C-y1yR8NUGhuTNvl_FyFX-Ff6Zukva1znPWcdfKm9xB4uS6I12dIQabE17nqWQWkB91b_tmE77TgRYbtemYkRm5bsEgRRc5ZpFE_izbK-ylQmX_eblxBHuaeSsCQIdcpxfX_1TOp2rqyLgFgGUZN0vOds6rw7xPuBEtaNDSbGDh-z8cTZGuPaaxNUC3o9Y-kgDwRr4jz9cwAfBXEhqg-TJl6B17S7xmCcnmzI9T6YqubUipxDoFdDqCy_Z5-WGTPXupZmdYTd-aHdosPQKNNznfBFvVNx9p9O1sBpe_M0KQdUhorQQ44GwWB81NaNlBMpm9Lml-OwUTOBxc8fmkSHZdkY3BfnMAzIG_u_FF8HoZUEgc0_LO1L0ogtpzztGOIdbNuNjUmoAbzUsAJuLaqNCOWXRQ_AKLO7-o2zgxC3oyKk7zeZSKtfT9hYQCA49WWrrgyBl41GRk5GGocl4sU3l4F1yA8PtVqZNKDxmGxpc8YSAAgbScLBWuDxh97OmNWbPaiWCJ0enEDiGk=w641-h854-no


So not only is the color still off, this time in a new and exciting way, now I'm running into the issue of the vinyl not matching up perfectly with the stencil behind it. It's most noticeable at the top. I'm assuming the reason for this is because the tin is embossed so it's pulling slightly up in certain parts, pulling the vinyl farther and farther from where it needs to be.

OIl13Fy7dfsNiOOnrx9RkvioaGq2b3mWSTOuJ-nHX33otmW6s8yq9QSjFWrXONUQeUoKBfV0uNs54AcbwUy41mpB6uIqm3AqHvUMP_np74tPRY6dzK6uiBLCYl1G349U7FzpzQQlR7qXHmwsDgqCOwH_jrNLNBMJAe_GiLmSOGNmJ0xzryuaSTYdMGtya71SQ9jnFg_vVZ1TdiTso0R5DubGVMo0y7mkBjzHf4LDPXRVPorkf6jL2zS65zjIn3gjwAkbPh-UMc1hfy-ASp2D8sF27kcPi3XhkiQAd_U8Lp0LMF-9x_NkylWiO3so0HZQPDfz0xvvb4QnaMw1GIlvevjtkC4yBFbNU2pztv92Tdriq77wKeO2nlwqbm6kJ36LOOdjpN_3Yfd8cJBHPR1D9wMWhpBbXnA8tjgZKZbeQCfHM6n-4sFGRpxngA8jzEmqbCvNhHuyXuHBgoS76uKkamLdsRomQBCrMaVMFpPn9SjHqC0Dyk0km9xVAdnZAG5OBAzapgCJAWyPB2VBRtZ4L93VPN0YOPk8DbSQKMmjFQs042PNi5Wa2oDgRi_223Ft3cFKrlVVa0NgXC_7LxcU2P0Awsn6C1wesxrbnAx21YB1BmehXh6EkbjTvMNgImy0r8BAynw24BNzPsAs560QT23nnpC74zwXEqxV9AEzJGUPQtBtWwQ7R3UgeWq2q6afCrT8w6uz7yKQT8RoosszEprF5vB5rWB8T5ncTrHvqaz775l0KZ4ck2I4fWD0xcBAK8i68hu50IBGu_T7WJmHMQY2cRVLTGdV6UKJ7imfFC_pWmbwh467I_7FzTqTSeidSVjVVPrgHW0ezKQefJSAyVMJBbmmsL5XL_yCUoYJqTNG6TL1gHFvpH61n2k8gpxnji3suZ975tY0Utc61yQxcqntpyhOw_bQsNjIm9a5Z_SVfmnmmjWHRNT7DIhqb1aXLTUADsW4H8lmhkhugu8=w1139-h854-no

0nyjghm-cCjfFdM3teGHyLSjhEul-T_I3pO47x_CqELqO128Bjro-Zx2SNumVIqte38_JTc160KOa2IzOyh9v0FriIH7cKql9fX36IchbCbMUuhK_VI2cWs8LN0IPOjZbovDcocJWzyBTHVPAkUiQYwXyLF42_BvQMHSCNe68m9zPkPXgHzJNj1Y7ELbyR4u2ruF6rOTgsHI1okHDVAsnMmd_7xjScGEdKMcNllAXbakad1aCaUhwVe7lTlAtYeKexOYg5YpJnqda6sU67DSEI2JoY3Hyca4qim14dWwZh9FGunkqVT0kKmd81fKrg-N3KFVoaVNcfQOYTfez3HSXLRW6FkGfNv0xxGA7WZ8eAQzYgMNy_EOEGi3DhEw1SGpe7Qe-Cougmw-Tvx_gAfmqXLTiAPM6kZxDHT6fcxdf1onJGhhxr3zsUdjZ4jdz5juOIs7pLWnjnEhVY_1sL3ZmOfsr8joO_d8e2CFdl8UmuHQyNktGGPPocaKtmodo5UuC-YVZx5TKZVqaL_qWTB9qZOLvxw0nY8i9gLEIQh8Y2YbfEx3t4MNu2w8e6775tERXsRett8T9qAwq-o6eXRwq8Kbq8tuqWmK0tbGHPrh2cXrp603Ucj84doKSSZOpH4waokCOZ8C9pgx22oKG0_m2Q7hSwP6gaHyWIoKUqlLbgBSdvYQADpGFyBCFHUqnN9ZF_m8mcGNyxNL2nNDbOFPtgLL7UXWPs-34S5YXTIG_BhbfdGLsCr8m1Wj6PiUS2Ztt2Jw6kNs7XRfbauCcOyqhjp75ASqtPA0xc0GS4IE_SfHQkJIE3BMVTDJlOug2vMOXpFAd_s9hDbI1MPkSWFOsTKOi7AQ9mkv3OHYjkmjDlFUWG9jMR0bYCgzhQV5dOEFmwUofKeUfi78WRR3rbtjbMCPtpPP_q7OamAuPHp9QyJgT84smYdWJH65E-PLgPa3tswSfEt4aQx6qYTeA-c=w1139-h854-no

r2Jo4GTJ59UqECYOancLWk2kkij-qILuIyo9FUj4RwWqEmtceQCjUan-DoHcGN8cNmClSU9rjHGkoMd-bjVA7ZpWupn1D52KIOVOO42Gjb2AD2TV_LJbjJS8AqQBTsyzenLIh8UBW4NF8BGKO6Xpq9p9PK1EnCWO-2Fse-Yud4IG8TcD8JXy4iGlWsWfbnJJSQZCB1J96VrB4QHK39TeoOSr4lrognZvdf4Vxl8ReizuPIMm1-AUw3S2_bKmxTd8xPb35dUiDH3x46MqaJe9l2EgCQFVCXo41zwBPziQXSzpNudXZHgNLFf61Y0_kbPeL88-LdrOT5eBhYZYNNT_1yhihCPWkrlhIi6wTWo1thuj3v1sB0kLXtcDAB_PKT95T-uR93vLR1jAuIVVntI4EiqHWGG1ueFcbY1sRByKBFq59rP5KlM2z0YKnJPAUwjFHtp_bRFFmDTaDKJsUFQjQCVQ9TE1awrixTRn8TTumFWrHQhjUDjvlFRt_RMpPbuSCtQ6dL-7yr3cLGbXSvBDdq2Myx51L4XoJ5kVbSdrwdF4F7hPICmOcKhhnNfbjmy6DpvqumStroqEBkdWjmnNZ78ID8h9xMCuXzwDPozNLgLL5-33oXDcVSucOQF6YftD4xuqjg10boZy98laBbsz0rL1mWfxbuo_cJoO6fucIzCJEcau9pEIQW9NaTEJOCd3YSq6cLWSLTjKOFI8QQiTUadaThBEAhdB4JDe_qrC7YSH48ZgltKT-1ZpRday3Q2AB8rjYbk-crc8G_5YBEPRT300TWj71TPzERfSd-X1r5DN7DukyDnTrlx9T2k72PhQUxaA_1aj8vokeG-pTdH_Pr7mfdbd2gtdysAFHXUQIyi39Jrjf9thGxZFG-ocdzVU1wUmqWRf1LKpJsjAHfaqTFHNGew_DHTAd5Mfba-ebBatJSvPHExszXbtPX7qYQXlt9vGU9XL9qqZhs9EJkc=w1139-h854-no


And even after all that work, I still don't like how the leaves look so transparent. So, we're going to have to find a different solution I think.

I did apply the vinyl to the back for the 1st time to see how that will look, and not gonna lie, I like it a lot. I think it looks really sharp! I'll work on getting the edge to line up better on the next one.

dV5d61qWqj9nn2i7J7rtX6cjhn4Pyne-Vwn_CiEn51tCRA_7liVEBXBT62Eo7x3OXJNbCU39Y7fmRXjuipxshrB7SrbawA5QuCTWImCZQH1wyppZ5gT2aJUuQzDRzFzrJq1bsAdUxLE7rDGRsu5PR0Qs86NOPyUbnF0715unLbGmeJN-Qur5521ksIC2zVI2TP8hy6OcpLTN8yfiieCWsufcjt1ESeiSRmxb0xdPmpSBtsZUIzhNv6_We0uIjM8pwhDR9YNl7EoBoQ-696FxSu1v0DVRrwrO16cxyIgIWyw-KzMPXF8Q6KCF11MmsyD3wXEB6lugOrUsxjCIlYITmqwzDsR61ztk6Zbs5JhUP2BxiMvqIZfwd0-h4XpRqDZW4fZw5-RvLtsejuvQqAm6nOL3993AqamQkO1XFNfJjlEwXkB50YfgwNG0hPwG1clR86cxSqQAahvOrT08SBdA6rJZHuCCDCJ_A-88G6Xtq6-M9j1MNHUKAFF3fiQhXdB79CgQW0zAGWeS9W5AJmCXyd_HbPpCYASRjvxLs67vbZ58MXfqyVyHhoZlKc_6c_pvX2u9CFSfTw3OhtS7an4GcGlUA9PpL4q1uOd6RYiyfowJBj1XOkZZWQG8hMWEo7sFiDkSeBQ1_OK79DGP2aE16IHPTLYSj6kDAUGgn-4oHiFlgGTQ_Y7tjtUf1JWH-AjXzbV5apc0POLXYIAdkDe_8h17Pl4WAA6ro4i_h-tZGVMF-2HQpvrtqlfjnA_rhVnnSLn_bMWnBtAOCwyMYvF52keuUyjhCflMhPjpZlXkJkqg0tAIELsPG5yGTfn2q6C0xjpDOuw1D_Q8Hx3bTTPZJLaJdbYZKuDybSH9cqSchlrGY1tKRJ9YRHMuP5kuHbItil-roqQqqfCAkae3s7iNFfL3YNtsk_8bmG52SP1nIeU0pbHM_jnApYFrh_3HAAYGmluQGdMjEd7vdI61mok=w1139-h854-no


After placing the back vinyl I realized I needed to fix the "bar code" on it. So I went back into GIMP and worked on that. I also fixed where it takes you to, if you have figured that out already. I think it looks better now!

1671516629577.jpeg


Are you pondering what I'm pondering? -

As much as I like the stencil, it didn't give us the results I was hoping for. I think we need to look for a different solution to the design....again. One option is to layer vinyl. Cut out the leaves in white, then lay the clear vinyl over it. Then the clear vinyl is getting the white background (hopefully) exactly where it needs to be. That MIGHT work...maybe. Another option I came across after playing with the laser cutter. I was chatting with my brother about it gave me an idea. He asked if I could laser engrave some gun parts for him with it. I told him it sure could...and then wondered if I could...engrave MY stuff for the Cap Stash. So I dove back into YouTube to see if I could use the Maker's laser to engrave and it looks like I can no problem. In my searching I also came across a guy that was painting his engravings....which got my attention. The way he did it was he put painters tape across the surface of the wood he was using, laser-ed (is that how you verb "laser"??) his design, then added paint into the laser-ed spot. It looked pretty good. Well, I'm using a metal tin, so can't do that exactly like he did, but I might be able to do something similar.

New Plan (Mk 693) -

I'm gonna try to use painters tape and the laser to make a stencil / mask directly on the tin then spray paint the leaves onto it. This will remove the overspray and fuzziness from my hard stencil and should FINALLY get us the right color.

So the plan is to go into GIMP and create an SVG file for the outline of the leaves. Get painters tape and cover the entire surface of my tin. Laser the tape on my tin. Remove or "weed" the tape over the leaves from the tin. Buy spray paint as close to the leave's correct seafoam green as I can find. Spray the surface of the tin green.

But burlap chafes me so... -

That COULD solve the leaves color problem, but that creates another problem. The outline and text on the tin. I have looked into using the laser .... actually the way it is supposed to be used (big change from my normal) and using a coating like Cermark to engrave the black on the tin after the spray paint. But I need to do a LOT more research and see if that will work.

So that's where I'm at now. A couple solutions, lots more problems and changing directions again.
This is that hard part where you just want to be done with the project but gotta push through.

I'll update you as I get more results and data.
 
Thank you! It has become WAY more involved than I anticipated (it seemed like such a simple, straightforward project), but I'm enjoying the challenge.
- Well, it is a simple, straightforward project...but you are really sweating the details and making it great. So suffer for your crimes! LOL
 
Update 8 Jan -

Progress on my newest plan -

When last I updated, the list of things I needed to do was -
- Design a mask in GIMP
- Get masking tape and mask the lids
- Laser the mask
- Weed if needed
- Get spray paint and spray the lids
- Remove the mask
- Fix whatever problems comes up during those above

Designing the Mask -
Designing the mask was pretty straight forward. I just redid the design I used earlier with the acrylic stencil I did before. I dropped it into the LightBurn and it took no problem.

messages_0 (24).jpeg


Masking The Lids -
I found some black 4 inch wide tape on Amazon and bought it. I wanted 4 inches because I wanted to to fit over the lid in 1 pass. It came in quick and I masked the lids up.

1673235895383.jpeg


Right after putting it on the laser I noticed it didn't exactly look the same as the YouTube tutorials showed. It had this weird carbon-y stuff where the laser hit it and I could see ALL the adhesive was still stuck to the tin...not exactly best for trying to spray through it.

messages_0 (20).jpeg


Painting -

I went to the local hardware store and picked up 2 cans of spray paint. I wanted to try and get some of the color differences I saw in the texture.

messages_0 (32).jpeg


I sprayed the tin, let the paint dry and attempted to take off the mask.....and that's when I began to realize I might have made a mistake.

O4KpTHHc9C4dxq6c3NOG1wSxWjIRByjI9W91cBjmMQHSPSqaugVxQWC0KM8qm60MhDScLR-98LtZqRaYmHZbbbqGG8tcmNjwI6xQkztbf9g9ch2QynA4eL3PBiA6Mm497hBBsTN_iPA1I6lh7nzARvoub3NzDOHvQ9E0Evfv7BXYvj5pLgrLwpyxZfem0eu6oX4WrBdgxcSOCr8ht5rG7kUQ_AB7WL3ntpZod_nc-B_i2-sSdl6xMESaim2Ui7bu6mx1khPXLK-SP9HlXljvfKpYmFsOym-_sr6jgCH-EwkSRY6rXYaXI6fcydji1l-3BV7JKEWVDCZN6-cCg1w3bMLmj9U5BswiVXTSf8GeuDoLIWiQkJedEmEILJ3qLa4Mg1f5QAy-_skerXZ_GhMkOC8Zdh1hy-IeLKSer6qYHSbxG9Bdn7SbpyZihFdURTEU1MStbwsfLe2Ox6tO5nsF0n3LIOM6iJBGtrpDU0rJqjPqr1pgTmDLUP_cWhyGeSI3nqRGvcQN1RYO-iTEt7_TG5_VWxjJ7dnXLrumsg_gB7i0ZIo1PhLvqiA9pXNs1Ys5-XjY0_xXFNEUOrWAvf25bGveiKxxI-_fL1lG47w5A3N6LFFrXgWQNDjPawXIzGde6uH916JXy4DsIrD74WJiTl-JOQJNFevcSpe5VEw5ruJiLLoWYgCR9NSXgyfi4h1LjoN1VSMIL842cvClEVat3w0_Kyfi-3T5iAktjaJ2QTdhEUjvknnZ8xjukMhHiOiXw-PP5cmM1QM6WrpXaBK_DeNLtN8W7eriCDmoEPYjMo1pZsnP9PdheZk7NKAB6jLmP5f0dbfE5NInTyR_o9PFPxAH76AfnfdaHcoVCr_cX0y9xvnRhPKFvIDypyP1royjtfVEqFot-0Chz_uP4myVWMnmKNlN32O5XCe7l0-jXAgo-boMOHO9x9MXOvXDuFIE57LcFpsamlCgetbgSv0=w1139-h854-no


messages_0 (22).jpeg


The tape absolutely DID NOT want to come off. I almost bent the tin in half trying to get it off. It was absurdly sticky and left a ton of adhesive and paint goop all over the lid. The whole thing was a giant mess. I chatted up a friend who knew what I was doing and he pointed out that in the pic I sent, the "tape looks a pretty thick to be masking tape." then asked me if I was SURE it was masking tape and not some other kind of tape.....(MRW) I THOUGHT I had verified that it was masking tape. I had not in fact done that and actually bought gaffers tape. Which if you know anything about tape...is NOT even remotely a good choice for masking. SO, back to Amazon I went and found some ACTUAL masking tape. Again black and 4 inches wide.

messages_0 (23).jpeg


The correct stuff.

I repeated the process from before and it worked amazingly well.

vixE1zctPhPdsnIPpD_s5cVhig6GCTvahKmLl3rpz4gSXz54MfY-Y3aJQLAVNvMECqVyNnbH63mCB4Ll_zFC3MGvEX8sbHtZJW6YNeREskfWnzSNqecFNO0YGWo4AIct5OR4akpOwiE9p0BwBxE4yYqiaE2lAyhb10ZvG3sklKp9XerXjLrgnOU3W3WW-Z7BbKr_Dq_Yp2RJa0oFapg911HWlEtrQgrQf1b4cdGC7MYyzv2-Su4s_nA0aY5fqex9e4mjfx6wzpcaroNmPpzy42yHP43NYP_EJfdTH-Bm6sc5qhYNMS2ABf7NOHvNm8BWWynV4dXBeahgGZ3ULl4jCPNWH4udVe0IToxCIS3zEGaxzuPpBojMHSBUKL_AWZXuAYzQ4r4_7hxW5hoDXJ2qB0qD4AHTlNdlpsw51Kwo0ZQNDz7gaJ-fpnH5E49T4LbiUtU29o2iUso_FGeg4tDk0Cl6e3eV290kbYzjVWUOW7I9g-DqgGF3zsp4Z86T2u-17UlUTh54deRkRO1hLldpQSaZdBTCFK0dsd-1MXdhZw3_-rHmobMpHQ8IJ2nl0H_eEDDAG5QXV43ztgyCPEH3JqBfDmqigyVuQnzVGjGMCC9lOl20fGlXH5Zd0X3uQYDIHdu02is38K2Br5d2t0f70uTtv_MItEWn6ShznvTN6DDszqs2RcKPo1J4KMhREReeWtFDX0thjzR8WRColo6wA9C6f-dWnr1m5gfSuk1aFneaflNb-fY53JitilnFAVZYW57X6wU6T2CRZ5N7Sb7PM2Yl05mF_scaeFm5Qwq5X73yQMdhMiP8NVmOOt-THqYEgTgNLoY1SLYA0ifx7-ZTBCSALqbW2E8GGZ4Lieh1dzi6GC2_g-4OY89R2QJtBSO4lYvJtyPbfusMa9_55NIZIuOnI27SVgiYHDtAs9SCznAiuWbAed05_k8-MqcKuonww-cU_3GZmnm1OQeRYcY=w641-h854-no


The only issue I noticed was there was a slight tackiness to where the laser burned out the leaves. I hoped it wasn't enough to matter and the paint would stick.

messages_0 (19).jpeg


I sprayed again, waited for the paint to dry. I peeled off the mask and immediately noticed that this was the correct stuff to use. The mask came off all in one piece and looked really good.

messages_0 (29).jpeg


This process really seems to have fixed the opacity issue from before. The leaves are super bright and match the circle/cross well. The only issue I have is the paint never really dried. Even after 24 hours it's still sticky.

messages_0 (30).jpeg

messages_0 (28).jpeg


I put the CAPS label on just to see how it looks and it looks amazing!!


Unsticky-ifying -

I got the 2nd tin I lasered and pulled out the acetone and some Q-Tips to try and remove the thin tacky layer where the leaves were.

TabhL5CS1p3OPsN3friS9fTLd5sBDObbU78r-PqnK2JSmuQkAgveo5MdAvjpDzCGl-ruk5eLLI1tCTQBS_2a1KQqMO3KKP8bPGi-SBTAYAHOl0L_-WAwwSck7GKWRi9u3fxhZ8cdOWeHBbtFmbdMnbxC1z-l7swRc0Qia6SmUwTRIIlV75tu76saygf5344yLvWvShq0LYbkk7fgA9MP4Vn7Sru2dCbgA5OthiUf8b3dE2cPVEMEc44HU9r9tOGXMVXaSBlX0-LWnanalSJm7VAG-IzBar2vEInNMylJ5vQZYjv70AIPhjdg0w7PE123NvBxAigTX-xIkyBKcblpq9YrdtWLk-GeUSLUzCFX2zJlPkCQbDgCQOr7js4pRQmrZutQ6eKSABOfIRW-XOI-6iyumfdI4olGh1nDrOPDSYtNZing_gWEZfNmDV4foIYX95DDYT_Nbb_zrHthdJ88S5t0js4xeWo1N22KUKu-Clu-3yOT9jVxR4_wLsHQ4G50MTWEhK6xOaNc4ZMCklq1oFai8aw4S_r5NlcLni1lWW2oHbb8_tEt7bfPPSQ9NrlO6YuEOPCV2PUO1kqdUybmlxOqjzEigbtwiPJdgJ2KjYxX7gAMrG9n7Fj2mdcrSzZ19C8aItJPkk315tdvUl6hnOivpeorpJdz254PPy4ZQt3FZgRJcQGISnePWDzZk1IR_I4AIOLQXBK1VhbzXuFW7KjuJcszBsZyqQRHYO6cmIV_iT3CgPvFXMFiXkxGLiniVUeIvjfzXkgPD7KnnA-NFJ-NEfGi37WI6_yzelUoNiigZdo0jY3AopbYJ06IK6lIptcayybWAzV1AvSL2pv3jNXzSrwongHKXygWQmyjEJezLgjnW5mU7xgWluHnKL9K6yV2-LAH94BtV2M1hfoj0rUhaYI1-FaHgdqnDpu6myoTaP2vZ-v2syw3Ck9obir0YI9z2uDcc1rmF78rw-w=w641-h854-no


The adhesive layer came right off. Only a little bit of the small pieces of tape came off. Nothing too serious.

Where I'm at now -

I just sprayed the other tin with 2 spray paints. I'm letting it dry now and am going to see how it looks when the mask comes off. I'm hoping that this paint doesn't have the sticky layer the other one did.
I am trying to decide if doing another layer of masking with black paint on top of the green is what I need to do for the outline and text, or if I should do a layer of vinyl on top of the green paint.

FIND OUT NEXT TIME ON

Overly Obsessive Realistic Fallout Cap Stash Build​

 
Low-tack transfer tape makes a good laser etching mask. (and burn cover for other materials)
Some of your images aren't coming tough (seem to be google user content images), but where is here looks amazing.
 
That looks really good! I like the aging on your tape especially!! What was your process? If you don't mind going into it? I always love hearing other people's process to see how different people execute the same type prop.
Thanks! Typically on my props I use a lot of acrylic washes in various colors, this one was done the same way. For the "leaves" I hand cut my own stencils. I do wish the tin was a different size but it was executed in a couple days as an impromptu gift for my wife who is also a huge Fallout fan.
 
Thanks! Typically on my props I use a lot of acrylic washes in various colors, this one was done the same way. For the "leaves" I hand cut my own stencils. I do wish the tin was a different size but it was executed in a couple days as an impromptu gift for my wife who is also a huge Fallout fan.
I need to get better at washes. Those look good!
If I may possibly be of assistance...
https://www.amazon.com/dp/B0B9JDWC9F?psc=1&ref=ppx_yo2ov_dt_b_product_details
This is the backup tin I am using for the Cap Stash. Its not perfect, but its as close as I've found on the internet for the Cap Stash.
 
- Perhaps consider making a thread with tips from your experience? I use acrylic a lot for various things, and it's easy to get good results but difficult to get great results. Your weathering has excellent subtlety and depth.
I don't see myself as any kind of expert, but I will consider that lol. Thanks.
 
Here are a few of my other Fallout projects/paints and repaints for reference. I adore the Fallout universe, especially the weathered, broken-down appearances of things. These are all done with very basic, cheap acrylics/washes as well.
 

Attachments

  • Pip1X.jpg
    Pip1X.jpg
    149 KB · Views: 51
  • Pip2X.jpg
    Pip2X.jpg
    169.5 KB · Views: 50
  • Pip3X.jpg
    Pip3X.jpg
    148.8 KB · Views: 49
  • Pip4X.jpg
    Pip4X.jpg
    125.6 KB · Views: 51
  • Pip5X.jpg
    Pip5X.jpg
    196.7 KB · Views: 47
Whoooooaaa - i love the Pipboy. Thats not the one from Wand, which one is it? Bethesda?
Thanks! It was a ThinkGeek model Bluetooth version that bricked and they refused to warranty, so I decided to make it look worn out and busted, along with the case. Here's a picture of a stock piece.

Yes, Bethesda essentially.
 

Attachments

  • BTPIP.jpg
    BTPIP.jpg
    53.8 KB · Views: 34

Your message may be considered spam for the following reasons:

If you wish to reply despite these issues, check the box below before replying.
Be aware that malicious compliance may result in more severe penalties.
Back
Top