GF
Sr Member
Re: WIP Randy Cooper Star Destroyer
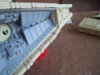
It's right along the edge were the trench meets the hull as seen in this photo were the clamps are.
GFollano
Do you have any pictures that show us what you mean by this?
Ken
It's right along the edge were the trench meets the hull as seen in this photo were the clamps are.
GFollano
 eek Awesome work Gerardo. This baby should be able to float on water. The fun part is coming up now...the painting. Cant wait to see it.