You are using an out of date browser. It may not display this or other websites correctly.
You should upgrade or use an alternative browser.
You should upgrade or use an alternative browser.
Pulse Rifle 3d print Files, SPAS cage/Remington/clam shell shroud, racking etc,,
- Thread starter Seananigans
- Start date
Seananigans
Well-Known Member
Awesome files, thanks so much for sharing. I seem to be missing the Remington internals, trigger assembly really. Any chance you could post. Thanks again.
[/QUOTE I’ll post them later today or tomorrow fella..if I forget will you remind me please..
Seananigans
Well-Known Member
Seananigans
Well-Known Member
PakRatJR
Well-Known Member
Thanks again for the files and all your work on this 
I got everything printed over the weekend and just started with the dry fit of things. Everything seems to be working out no problem except for a bit of a hickup when I started playing with the shroud set.
It seem like it is maybe too small, or maybe too thick on the inside or something. I have a 2.5mm gap between the halves and don't see any easy way to get rid of it. Also the rear strap seems like it might not be quite right as well. I know I will be sanding the shroud parts but I don't think I can sand enough to git it to fit.
Even without the tommy receiver and no gap it seems like it isn't quite long enough. I know my printers are printing the correct sizes, everything else has been fitting perfectly so I am not sure what to try. It would be easy enough to print a spacer for the shroud but I wanted to check just in case I may have missed something.
Seananigans
Well-Known Member
Have you removed the support on the inside Of the shroud?, could you take some pics of the inside please and the bottom section(where the mag fits)..Thanks again for the files and all your work on this
I got everything printed over the weekend and just started with the dry fit of things. Everything seems to be working out no problem except for a bit of a hickup when I started playing with the shroud set.
It seem like it is maybe too small, or maybe too thick on the inside or something. I have a 2.5mm gap between the halves and don't see any easy way to get rid of it. Also the rear strap seems like it might not be quite right as well. I know I will be sanding the shroud parts but I don't think I can sand enough to git it to fit.
Even without the tommy receiver and no gap it seems like it isn't quite long enough. I know my printers are printing the correct sizes, everything else has been fitting perfectly so I am not sure what to try. It would be easy enough to print a spacer for the shroud but I wanted to check just in case I may have missed something.
View attachment 1340805View attachment 1340806View attachment 1340807View attachment 1340808
Seananigans
Well-Known Member
you might need to file the gap out for the safety/full auto levers?..Thanks again for the files and all your work on this
I got everything printed over the weekend and just started with the dry fit of things. Everything seems to be working out no problem except for a bit of a hickup when I started playing with the shroud set.
It seem like it is maybe too small, or maybe too thick on the inside or something. I have a 2.5mm gap between the halves and don't see any easy way to get rid of it. Also the rear strap seems like it might not be quite right as well. I know I will be sanding the shroud parts but I don't think I can sand enough to git it to fit.
Even without the tommy receiver and no gap it seems like it isn't quite long enough. I know my printers are printing the correct sizes, everything else has been fitting perfectly so I am not sure what to try. It would be easy enough to print a spacer for the shroud but I wanted to check just in case I may have missed something.
View attachment 1340805View attachment 1340806View attachment 1340807View attachment 1340808


Seananigans
Well-Known Member
safety and lever (1).stl and 1 more file files here mate.Would you please let me know what the STL file name of the safety lever is Sean, have been through every file and am struggling to see which one it is.
View attachment 1340751
Now looking at Springs!
Seananigans
Well-Known Member
Thanks again for the files and all your work on this
I got everything printed over the weekend and just started with the dry fit of things. Everything seems to be working out no problem except for a bit of a hickup when I started playing with the shroud set.
It seem like it is maybe too small, or maybe too thick on the inside or something. I have a 2.5mm gap between the halves and don't see any easy way to get rid of it. Also the rear strap seems like it might not be quite right as well. I know I will be sanding the shroud parts but I don't think I can sand enough to git it to fit.
Even without the tommy receiver and no gap it seems like it isn't quite long enough. I know my printers are printing the correct sizes, everything else has been fitting perfectly so I am not sure what to try. It would be easy enough to print a spacer for the shroud but I wanted to check just in case I may have missed something.
View attachment 1340805View attachment 1340806View attachment 1340807View attachment 1340808
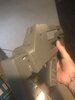
[/QUOTE This is a fresh print straight off the build plate..
Attachments
yatia
New Member
Thanks for those Sean, is there another file with the actual lever as it isn't with those two STL files?safety and lever (1).stl and 1 more file files here mate.
Seananigans
Well-Known Member
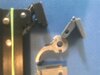
Do you mean the toggle part?.. I use a piece of brass rod thats glued into the holes on the levers, helps with strength .


Seananigans
Well-Known Member
Seananigans
Well-Known Member
Doing it now mate, sorry about that..Sean, friendly reminder if you could load the Remington trigger assembly that would be great.
Seananigans
Well-Known Member
all Remington parts.stl and 7 more files ive thrown quite a few files in..just pick out what you need mate.No need to apologise, cheers for doing this
Seananigans
Well-Known Member
I’ve got a memory like a sieve nowadays fella, old age catching up with me lol..No need to apologise, cheers for doing this
yatia
New Member
Yep, the toggle.Do you mean the toggle part?.. I use a piece of brass rod thats glued into the holes on the levers, helps with strength .View attachment 1340977View attachment 1340977View attachment 1340978
Time to measure and get some ordered. Thanks for confirming Sean!
Similar threads
- Replies
- 20
- Views
- 2,137
- Replies
- 19
- Views
- 7,407
- Replies
- 0
- Views
- 1,463
- Replies
- 8
- Views
- 2,040