Is the Tamiya silver from the spray can? Is it AS-12?On the bright side, I did find some decent options for painting the red button and brass knob.
The resin sabers in these pictures are all Tamiya silver and Tamiya or Duplicolor black.
View attachment 1728237
View attachment 1728238
View attachment 1728239
You are using an out of date browser. It may not display this or other websites correctly.
You should upgrade or use an alternative browser.
You should upgrade or use an alternative browser.
Obi-Wan Kenobi Episode 1 Resin Stunt Lightsaber Research
- Thread starter Dewy
- Start date
That's funny, I use that same exact color and paint for my jedi belt pouches. It was the closest thing I could find to match the tpm ones off shelf. In regular lighting they look way more muted and brown.Images can be deceiving. When I've compared multiple original props together in person right in front of me, the red buttons all seem to match. Obi, Qui, Maul, and others. At maximum, I've seen maybe 20 prequel sabers together at the same moment, and they are all generally the same.
Again, images can be deceiving. Here's a shot of three original props together at the same time and place:
View attachment 1728517
Which of these has a more "candy apple" red button, and which a more muted red? The Qui-Gon certainly appears very bright red. Maybe even that Maul. In truth, NONE OF THEM have bright red buttons, it's just how the image came out after development in Lightroom. ALL THREE have the exact same shade of muted wine red on the button when viewed in person.
Here are some other angles:
View attachment 1728518
View attachment 1728519
You can see the Qui-GOn has a slightly different shade than the Maul and Obi, but is still muted and not "bright red" in appearance. This could be an inconsistent batch of spray, or it may have aged differently than the others, or it may have been a different color of paint originally. But in any case it's still a pretty far distance from the original "shiny red" of the anodized port plug. And I've never seen a prop in person that did appear that way.
Again, in my experience the Rustoleum Claret Wine Satin 334062 is the ideal choice. Your mileage may vary ;-)

TS-83Is the Tamiya silver from the spray can? Is it AS-12?
you mean to say the pouches are a red color? That bizarre if they made it look brown!That's funny, I use that same exact color and paint for my jedi belt pouches. It was the closest thing I could find to match the tpm ones off shelf. In regular lighting they look way more muted and brown.
View attachment 1728532
Yeah they have a redish color to them, you can see in museum pics of qui-gon's pouches for example. The black dray brushing over them and a little bit of distance starts to create the illusion they are brown. Lighting and color calibration on the camera also further changes it.you mean to say the pouches are a red color? That bizarre if they made it look brown!
Seeing how me and Saberz both used the same color for 2 different props from the TPM is kinda interesting though.
Mr Mold Maker
Master Member
In my opinion that looks like moisture contaminated resin. In a very humid environment, it doesn’t take long to happen. Leaving the caps off the bottles or leaving material out in a cup can affect the resin quickly. Stirring can of course introduce bubbles and if you’re pouring it poorly, that can as well, but you usually only see bubble clinging to the walls like in your photos when it’s moisture in the resin turning to steam as the resin heats up. At least in my personal experience anyways. You can try some baby powder in the mold and see if it helps things. I always dust my molds with baby powder before casting. It may not remove the bubbles but it could perhaps prevent them from sticking to the walls so much.
One final note, I see you’re measuring it out by weight and just wanted to point out that this resin is 1:1 by volume, but *100:90 by weight.* It is a very common and easy to make mistake. I know this because I use 320 a good bit and have made the mistake myself.
One final note, I see you’re measuring it out by weight and just wanted to point out that this resin is 1:1 by volume, but *100:90 by weight.* It is a very common and easy to make mistake. I know this because I use 320 a good bit and have made the mistake myself.
I appreciate your input! I have been doing 100:90 by weight, but it would be good to have you confirm my math:In my opinion that looks like moisture contaminated resin. In a very humid environment, it doesn’t take long to happen. Leaving the caps off the bottles or leaving material out in a cup can affect the resin quickly. Stirring can of course introduce bubbles and if you’re pouring it poorly, that can as well, but you usually only see bubble clinging to the walls like in your photos when it’s moisture in the resin turning to steam as the resin heats up. At least in my personal experience anyways. You can try some baby powder in the mold and see if it helps things. I always dust my molds with baby powder before casting. It may not remove the bubbles but it could perhaps prevent them from sticking to the walls so much.
One final note, I see you’re measuring it out by weight and just wanted to point out that this resin is 1:1 by volume, but *100:90 by weight.* It is a very common and easy to make mistake. I know this because I use 320 a good bit and have made the mistake myself.
In my opinion that looks like moisture contaminated resin. In a very humid environment, it doesn’t take long to happen. Leaving the caps off the bottles or leaving material out in a cup can affect the resin quickly. Stirring can of course introduce bubbles and if you’re pouring it poorly, that can as well, but you usually only see bubble clinging to the walls like in your photos when it’s moisture in the resin turning to steam as the resin heats up. At least in my personal experience anyways. You can try some baby powder in the mold and see if it helps things. I always dust my molds with baby powder before casting. It may not remove the bubbles but it could perhaps prevent them from sticking to the walls so much.
One final note, I see you’re measuring it out by weight and just wanted to point out that this resin is 1:1 by volume, but *100:90 by weight.* It is a very common and easy to make mistake. I know this because I use 320 a good bit and have made the mistake myself.
Can’t wait to see you figure it out!
I am leaning towards my molds being contaminated with moisture (or something else possibly). The extra resin that cures in my silicone mixing cups comes out generally bubble free.
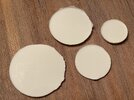
Tops:
Bottoms:
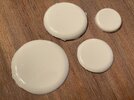
I decided to make a small mold using the new Smooth-On tin cure silicone that was recommended to me by Reynolds Advanced Materials. I specifically told them I wanted to make a tall cylindrical cut mold. I said I would prefer to not use a vacuum degassing chamber, but I plan to cure the mold in my pressure pot. They specifically recommended Mold Max 29NV. To help test paint colors for the red buttons thanks to Saberz I figured I would kill two birds with one stone.
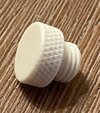
It’s hard to gauge the material performance with such a small sample, but I *think* this came out better.
How do you recommend cleaning molds Mr Mold Maker ? I’ve been told to never use water due to obvious moisture concerns. I was thinking about wiping it with IPA and a lint free cloth then maybe baking the mold in the oven at say 150-200°F to eliminate moisture.
Final note: Apologies for the potato quality pictures. I am still without my home office and photography setup.
I dust all my molds with cornstarch before pouring resin. It seems to pull the resin into small crevices and helps prolong the life of the mold.
I also get random bubbles in my molds and my casts are rarely bubble free with normal pouring. its vastly improved now that I use resin that comes in squeezy ketchup bottles!
I also get random bubbles in my molds and my casts are rarely bubble free with normal pouring. its vastly improved now that I use resin that comes in squeezy ketchup bottles!
Mr Mold Maker
Master Member
I appreciate your input! I have been doing 100:90 by weight, but it would be good to have you confirm my math:
View attachment 1728596
How do you recommend cleaning molds Mr Mold Maker ? I’ve been told to never use water due to obvious moisture concerns. I was thinking about wiping it with IPA and a lint free cloth then maybe baking the mold in the oven at say 150-200°F to eliminate moisture.
Final note: Apologies for the potato quality pictures. I am still without my home office and photography setup.
132:118.8 should be correct but math is absolutely not my strong suit. I’m not sure how much, if at all, that .8 of a gram would throw stuff off. I try to stick with easy numbers. 130:117 for a total of 246g is one way to get that 100:90 ratio. You could also do 140:126 for a total of 266g if you feel 246g is not enough.
As for cleaning, I would recommend 99% IPA. You can also mix 99% IPA with Ivory dish soap to help cut through any oil that may be on the surface and finish with a wash of 99%. It is my understanding that silicone is more or less hydrophobic so I don’t believe moisture would be a concern in the rubber itself but I could be wrong.
Last edited:
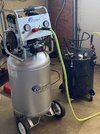
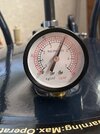
Did you guys really think I was going to be able to wait a few hours!?! As soon as I was happy that it could hold pressure for the required 30-60 minutes, I started mixing resin.
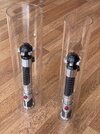
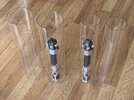
To say it worked well is an understatement. The only bubbles I can find are bubbles in my mold where the pressure forced the resin in leaving all kinds of tiny little resin appendages attached. They’re very easy to break off, however, I already knew I needed to make a new mold. I’ll let the results speak for themselves. Here are some comparison shots without and with a pressure chamber.
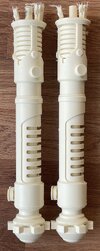
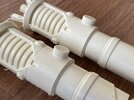
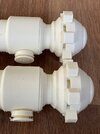
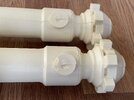
To say it worked well is an understatement. The only bubbles I can find are bubbles in my mold where the pressure forced the resin in leaving all kinds of tiny little resin appendages attached. They’re very easy to break off, however, I already knew I needed to make a new mold. I’ll let the results speak for themselves. Here are some comparison shots without and with a pressure chamber.


Excelsior
Well-Known Member
Did you guys really think I was going to be able to wait a few hours!?! As soon as I was happy that it could hold pressure for the required 30-60 minutes, I started mixing resin.
To say it worked well is an understatement. The only bubbles I can find are bubbles in my mold where the pressure forced the resin in leaving all kinds of tiny little resin appendages attached. They’re very easy to break off, however, I already knew I needed to make a new mold. I’ll let the results speak for themselves. Here are some comparison shots without and with a pressure chamber.
View attachment 1728845
View attachment 1728846
View attachment 1728847
View attachment 1728848
Now we're talking! Looks great! You can really see the details now in that casting. Doesn't seem like humidity will be problem now either.
How's the volume on that CAT compressor, btw?
It is surprisingly quiet. Quieter (and at a less annoying frequency) than the little compressor I keep in my car for my tires.Now we're talking! Looks great! You can really see the details now in that casting. Doesn't seem like humidity will be problem now either.
How's the volume on that CAT compressor, btw?
Opening this thread is like opening Christmas presents
This. Except every day is Christmas.
Not going to lie, this is pretty fun.Dewy is literally accomplishing my childhood propmaking dreams...
Similar threads
- Replies
- 2
- Views
- 1,625
- Replies
- 2
- Views
- 849
- Replies
- 9
- Views
- 1,368
- Replies
- 2
- Views
- 1,596

