STL files for FDM printing available as well.
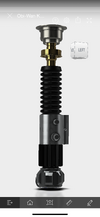
Recently tried my hand at duplicating Kenobi’s lightsaber and eventually landed on the “Chronicles” version simply because I liked the way it looked the most. With the added screws and pins on Graflex it really makes it quite unique in its appearance. All parts are threaded together with a couple press fits. Everything was designed up in Solidworks and then printed on a Bambu lab P1S FDM printer using multiple color PLA filaments as needed (TI Exactra is the only PETG print -transparent). This saber is made up from over 30 individually printed parts and cosmetically I believe it to be very accurate to the actual prop itself. I even got all the groves (booster, grenade, grenade neck.. ) to line up just as they did on the film prop itself. The inside thought has been modified slightly in some areas for assembly as well as some parts modified to reduce the use of supports when printing. Less supports = cleaner print.
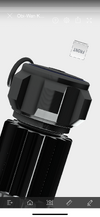
I did add the writing onto the Windvane even though it doesn’t seem to be legible on the prop its self. The reason for that is because when researching this saber I found that pretty much every real part OB1 build has this writing engraved.. some just warn off to the point of vanishing. So I imagine thats the case with Kenobi’s saber as well? I also simply like things to be detailed and this was not only fun to add but also fun to figure out what was actually written there. Plus its easily removable if desired.
This is basically an interest thread to see if anyone would like to have one of these prints for themselves? $65 plus shipping is a fair price to ask I believe. Takes about 2/3 days to print each saber because it’s so detailed as well as using individual colored parts. The files are each printed at .012mm layer height using a variety of Bambu labs different colored PLA filament. Again the transparent Exactra replica part alone is printed in BL’s PETG. But the end result is pretty nice and I’d be honored to share for those that do take an interest.
I know its a 3d printed lightsaber and printed mostly in PLA at that. But for those of us that are on a budget yet still want something really detailed and very accurate to display I don‘t think one can do much better..
Here’s a pic of the actual prop that was the goal when replicating. I edited together a couple of the cleanest photos I found here on TheRPF..

Here is some progress pics from the final CAD rendering to initial prints along the way. Some parts have been modified further since these were taken as everything continued to progressed towards its final form. While I’m not new to 3d printing, I am new to using an in home FDM printing so there was/is a learning curve as well that also progressed to the final version that eventually came to be. Specifically on the Graflex I needed to figure out the best way to print it without leaving support scaring. These pictures below are prior to that discovery but I eventually figured it out. @BeYourOwnScoundrel is simply my Instagram page for those that question why thats there. It’s the only real social media I use daily as I try to limit those endeavors..


Recently tried my hand at duplicating Kenobi’s lightsaber and eventually landed on the “Chronicles” version simply because I liked the way it looked the most. With the added screws and pins on Graflex it really makes it quite unique in its appearance. All parts are threaded together with a couple press fits. Everything was designed up in Solidworks and then printed on a Bambu lab P1S FDM printer using multiple color PLA filaments as needed (TI Exactra is the only PETG print -transparent). This saber is made up from over 30 individually printed parts and cosmetically I believe it to be very accurate to the actual prop itself. I even got all the groves (booster, grenade, grenade neck.. ) to line up just as they did on the film prop itself. The inside thought has been modified slightly in some areas for assembly as well as some parts modified to reduce the use of supports when printing. Less supports = cleaner print.
I did add the writing onto the Windvane even though it doesn’t seem to be legible on the prop its self. The reason for that is because when researching this saber I found that pretty much every real part OB1 build has this writing engraved.. some just warn off to the point of vanishing. So I imagine thats the case with Kenobi’s saber as well? I also simply like things to be detailed and this was not only fun to add but also fun to figure out what was actually written there. Plus its easily removable if desired.
This is basically an interest thread to see if anyone would like to have one of these prints for themselves? $65 plus shipping is a fair price to ask I believe. Takes about 2/3 days to print each saber because it’s so detailed as well as using individual colored parts. The files are each printed at .012mm layer height using a variety of Bambu labs different colored PLA filament. Again the transparent Exactra replica part alone is printed in BL’s PETG. But the end result is pretty nice and I’d be honored to share for those that do take an interest.
I know its a 3d printed lightsaber and printed mostly in PLA at that. But for those of us that are on a budget yet still want something really detailed and very accurate to display I don‘t think one can do much better..
Here’s a pic of the actual prop that was the goal when replicating. I edited together a couple of the cleanest photos I found here on TheRPF..
Here is some progress pics from the final CAD rendering to initial prints along the way. Some parts have been modified further since these were taken as everything continued to progressed towards its final form. While I’m not new to 3d printing, I am new to using an in home FDM printing so there was/is a learning curve as well that also progressed to the final version that eventually came to be. Specifically on the Graflex I needed to figure out the best way to print it without leaving support scaring. These pictures below are prior to that discovery but I eventually figured it out. @BeYourOwnScoundrel is simply my Instagram page for those that question why thats there. It’s the only real social media I use daily as I try to limit those endeavors..
Last edited: