Hdiaz445
New Member
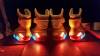
WizardBTTF, I just placed the LED board as is. Like you said, it fit snug. Very happy.
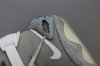
cavx, I applied little heat and separated with a popsicle stick. It's the same process I've read about here. Just had to have patience. I messed up a little because of how soft the material is, so I'll be more careful on the next shoe.
cavx, I applied little heat and separated with a popsicle stick. It's the same process I've read about here. Just had to have patience. I messed up a little because of how soft the material is, so I'll be more careful on the next shoe.
Last edited by a moderator: