Great job Howard! That was a lot of work in the service of the cause! :cheers
Many thanks my friend!
So it genuinely pains me to remain on the opposite side from you on this issue.

confused
lol
My observations:
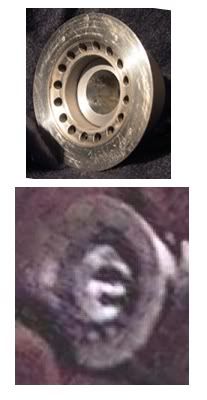
An additional observation regarding point 4 above: if the marks inside the hole are not reflections, then they are no longer relevant to the question of what shape the hole is. :angel
If the marks inside are not reflections - and I don't think they are, having watched the scene frame-by-frame, then they at least adhere to the surface of whatever's inside the emitter. They do appear to taper backward inside, suggesting a cone to my eyes.
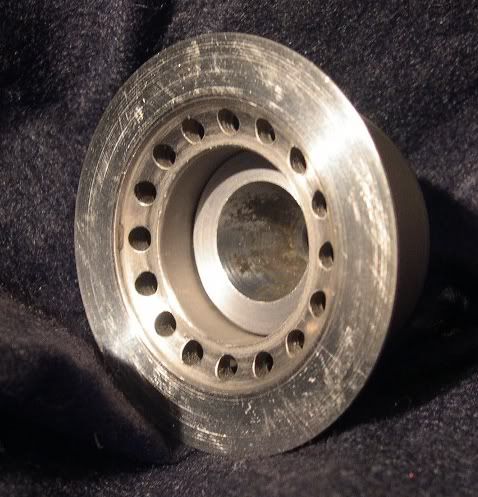
I've spoken with Russ and we're going to go with this design.
However, we'd really like to offer an alternative for those on the other side of the fence that see Chris' and Andres' cylindrical untapered connector as being accurate.
So if Andres wants to draw up a print for this, Russ will offer both designs together.
To answer Chris' questions:
There isn't at this time any master plan to make all of these parts fit together. From the onset, the idea was to just replicate the parts as accurately as possible, leaving the building to the collector.
Saying this, developing a connector between the grenade and emitter was an obvious choice, not wanting to leave guys high and dry regards this problematic area.
I have an idea for a clamp spacer. This design (still on the drawing board) will overcome the problem of securing the grenade to the clamp's front end and the booster to the rear. The design will no affect the integrity of either the booster or the grenade as accurate reproductions, and will also allow the transistors to be fitted before the spacer is applied.
More on this when I've something to show. The design does not use a threaded rod running along the length of the prop, but will be solid enough to support the weight of the grenade.
The 'bolt' or threaded rod portion of the connector will feature a hole running through it.
There's very little material to play with regards fitting the rod portion into the rear of the connector piece and at the same time matching what we can see externally regards the grenade stem sitting inside the emitter's first stage.
Perhaps Andres is correct when suggesting the top of the grenade stem was cut down (perhaps cut down to the first raised ring, giving the prop builder a somewhat larger area to play with) but I think we can match what we're seeing without having to do so.
Regards connectors machined with threading to match member's real grenades.
This will be an option, but you must be absolutely sure what type of threading is inside your neck.
If members feel comfortable with sending Russ their neck portions, he will be happy to work out the appropriate threading and machine the rod to accomodate.
There will be more details regarding this once the interest thread is up for the connector options.
Thanks all!
Howard.