I may indeed do that after the other text came out so nice.What about printing the text area separately, placing it onto the helmet in a recessed area modeled into the main helmet and then just blending in the seams?
You are using an out of date browser. It may not display this or other websites correctly.
You should upgrade or use an alternative browser.
You should upgrade or use an alternative browser.
New Martian helmet model and build
- Thread starter Empiricus
- Start date
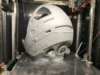
Yeah, It's an interesting subject. It's actually silicone with a plaster core due to negative draft around the ear-area. When the shot is pulled and cooled, the inner core is removed first and the silicone skin after that. Works fine but needs some extra time to cool between shots.Very cool. That is a heavy duty machine. Don't think it thinned out much. Barely made it at the bottom. Do you know what material was used for the buck?

Nice trick! No wonder it took so long. I received my acrylics and will try soon. Actually flying through Copenhagen tomorrow quite close to Gothenburg...
Yeah, some hours away by car. Just passing Scandinavia or visiting?
Mad Max Cars
Active Member
Not pushing the buck in. Positive buck, bake or otherwise heat material, drape over buck, pull if needed, then cool.Right now I favor a negative buck and vacuum to pull heated PETG sheets into it. Not sure what you mean by gravity form? Pushing the buck into the heated sheet?


SemajOvured
Active Member
Any thoughts on the head strap?
SemajOvured
Active Member
Yeah I’d like to know more on that.Well figuring out the head harness inside the helmet will take a moment....
Yeah I’d like to know more on that.
Starting point: Martial arts belt :
SemajOvured
Active Member
interesting.
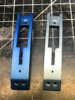
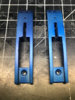
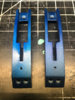
Working out the blue for the bottom part and clamps that I like. The foundation on primer is Turbo Dork blue steel (I hate 0.67oz bottles, now I have to wait for more), Layers of Alclad transparent blue ALC-403, transparent smoke ALC-405 and Aqua gloss clear ( I love the Alclad stuff). Last picture clamp on the left is the final result. Maybe less blue more smoke but this is close to what I want.
Attachments
Last edited:
That looks awesome buddy! Any progress on the dome? I've been trimming the pieces I've received and it's nerve-wrecking, serious measure 5 times, cut once-business.
Similar threads
- Replies
- 2
- Views
- 339
- Replies
- 0
- Views
- 796
- Replies
- 2
- Views
- 1,426