New BMF coming

Thanks Lear60man, I love that the real falcon models have real damage and additions just like the ESB Fett helmet, so your approach will make it... real :)
Got to ask again though, how will you fit the lights once the foam has stuck it all together? I was thinking of foam to strengthen but not till the very end.

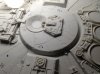
As for me I'm working on the other 4 sidewall details and should have something to post tomorrow.

Also Glunark, I think I am strangely addicted to your posts.
 
Yea but my wife is out of town in Detroit at an Insurance convention.....the horror.

Im done with the painting. Ill order the sidewall parts as they become available on Shapeways and paint accordingly.

First up Natural direct sunlight:


Indoor Florescent Light (fancy wording for 'in the garage')


Really guys, this little toy is a godsend for people like us. Its like an accurate model already put together. So, Im calling Stage 1 finished.
 
It's time to replace the blank spots where Hasbro provides stickers with actual scratch built panels. There are approximately 50 of them.
 

Attachments

  • image.jpg
    image.jpg
    1.1 MB · Views: 191
  • image.jpg
    image.jpg
    1.2 MB · Views: 186
  • image.jpg
    image.jpg
    1.1 MB · Views: 210
  • image.jpg
    image.jpg
    1.1 MB · Views: 191
Wow Mojo..you are really going to town with the replacement pieces. I take it you are using the stickers as a template?

Spacebob...Good question. I think once i work out the internal PVC structure, Ill run wires and hook up the electronics. So Now that I think about it Step 2 and 3 will probably coincide. Ill make usre to run pvc tubes up in the mandibles so that when its on a stand it wont list one way or another. I need to do some more thinking on this one. Another thought I had was to line the inner hulls with saran wrap and then do the expanding foam. That way I can pull it apart, run wires, add a structure etc and then put it back together.
 
I know this probably seems like heresy, but I am not even trying to get the side pieces to look like how they should, I just want them to look complicated and a bit random, which to me is how the original looks anyway.

So bits of car, cotton buds, cocktail sticks, some old action figure accessories, superglue the lot and try not to swear too much as half of it falls on the floor before I can stick it, and the most stuck thing so far is my fingers.

side wells.jpg
 
Lear, the Falcon looks great so far, and crap, I keep forgetting you have a Testarossa, I hate you...
 
Love Chewie :)

Haystack Hair I tried CA it just pulled straight of the Polypropylene with just a little force, maybe after the adhesion promoter and primer it might be ok.

Lear60Man the seran wrap (cling film over here) should work, but I'll wait to see how yours goes before i try anything like that.

Cant believe I didn't notice a frigging Testarossa. o m g. Its got nothing on my Skoda obviously, although it does smell funny.
 
Yea but my wife is out of town in Detroit at an Insurance convention.....the horror.

Im done with the painting. Ill order the sidewall parts as they become available on Shapeways and paint accordingly.

First up Natural direct sunlight:

http://i265.photobucket.com/albums/ii203/lear60man/NaturalLight_zps610c5f18.jpg

Indoor Florescent Light (fancy wording for 'in the garage')

http://i265.photobucket.com/albums/ii203/lear60man/Indoor_zps914ee304.jpg

Really guys, this little toy is a godsend for people like us. Its like an accurate model already put together. So, Im calling Stage 1 finished.


Awesome Job Christian!

Insurance convention? My beter half does insurance for a living as well...

Nice stage for the model in those photos, by the way!
 
Looks good MoJo! What mm styrene and what glue are you using? If it's CA, how does the polypropylene react with it?? Thanks!!

It's standard sheet styrene .015 thickness, same as the molded panels on the toy. I used the stickers to creat a templet.

Glue: It's a type of CA glue called Plastic Sugery. As some in this forum have expressed regular CA will not work as a styrene/polypropylene bond. Some bigger parts (like sidewalls) required a two part epoxy called JB Weld. Be warned, Standard CA glues will hold for a few days but as the plastic swells and shrinks over time those parts will fall off.
 
Last edited:
Thanks! Will keep this in mind. :thumbsup

It's standard sheet styrene .015 thickness, same as the molded panels on the toy. I used the stickers to creat a templet.

Glue: It's a type of CA glue called Plastic Sugery. As some in this forum have expressed regular CA will not work as a styrene/polypropylene bond. Some bigger parts (like sidewalls) required a two part epoxy called JB Weld. Be warned, Standard CA glues will hold for a few days but as the plastic swells and shrinks over time those parts will fall off.

So JB Weld appears to be working? I'd think drilling a few holes in the toy's existing side wall would help as the epoxy would ooze through and expand out on the backside creating a plug of sorts
 
You could always put a couple of screws through the sidewalls to hold the large side panels on with your glue then the heads can be gone over with Greenbles or leave them ascthet are for details

Steve
 
Or use a rivet gun. Hey thats what ILM did:) You can see the rivets on the upper engine deck on this model.

OK guys, instead of clogging up this thread with my antics, I started my own WIP. By the way, I already have a foam gusher from a screw hole. 7 more hours for the foam to cure.
 
Back
Top