Nerf Gun Props? YES!

Figured since I made one for my nephew, I should also make one for my niece. Thought I'd try to get a little more intricate with the weathering on this one and tried my hand at a little chipping.
I still have to clear coat both guns, but they're otherwise finished

IMG_6888.jpg
 
Figured since I made one for my nephew, I should also make one for my niece. Thought I'd try to get a little more intricate with the weathering on this one and tried my hand at a little chipping.
I still have to clear coat both guns, but they're otherwise finished

View attachment 1258855
Nicely done. Other than the pink color, it reminds me of some Blade Runner designs. Those extra hex bolts make it feel so much more real. Great work!
 
Did you use an airbrush Tmax? Love this one!
Actually nah, I’ve got one but I’m a noob with it. This shadowing effect was inspired by dmpsk8 and his mad paint skills! He uses an airbrush but I replicated the effect using a dry-brush technique. Just dabbed more in the corners and feathered it out from there. Used the same technique on my Titanfall CAR build...

PdJsOib.jpg


I just acrylic paints for weathering as they are quick and easy to use. And if you’re not happy with the result you can wipe it off and start again. A good tip also is to not just use black, but rather a really, really dark brown. You wouldn’t think it but the difference is significant. It looks way more like grease and dirt than black paint does. So I do an initial black-wash all over, then the shadowing with dark brown. I then lay down a flat (matte) clear coat, then finish with the silvering. (y)
 
Last edited:
Hi all! It's been a while :)

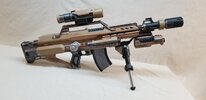
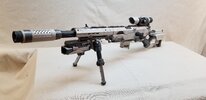
My latest mod-job is actually the first blaster I ever painted. It was looking pretty sad with paint missing from various parts, due to either being overlooked or from wear'n'tear, and a grindy/sticky opening mechanism, so I decided to do a redux version.

The Deploy CS6 Relic.

I love the engineering of this blaster - it's a torch!..

R7KQJdC.jpg


eB3MY0c.jpg


...It's a blaster! The secret to friction-free movement is furniture polish, in case you haven't seen my instagram lately...

n863JB7.jpg


7yoKqCb.jpg


Many, many details... There's a few small modifications that change the blaster subtly - the catch and release buttons had surface details removed, the pump-grip was de-detailed and reshaped slightly, the jam door was de-detailed, and the magazine also.

iFH9yaD.jpg


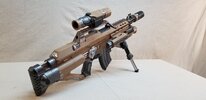
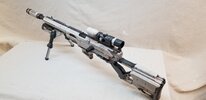
The corrosion and paint-chipping is my usual technique, but skipping the rust step and combining the salt and latex directly on the metal layer.

3xS0Buc.jpg


A second effect employing a water droplet mask was used to obtain the reticulated effect in the colours.

RiY6mKj.jpg


Two grime washes with slightly different tones were used to show the 'open' and 'closed' form in the dirt and grease.

DdMMYNQ.jpg


The scratched metal plate was a mis-step where I forgot to remove a latex mask from the panel before the colour step. It was difficult to remove with 2 layers of paint and latex masks, so I had to grind on it a bit - I decided afterward that I liked the effect and kept it as is... I mean, look at the job that black primer is doing there! Magnificent!

w7i8IP7.jpg


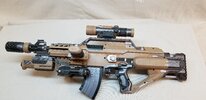
The switches and buttons got extra layers of the metal coat to increase their resilience. As a bonus, you can really see the reticulation effect coming through in these pics too.

wPCPhBJ.jpg


The trigger was tricky. The plastic they use - a soft, flexible substance commonly used in hi-impact areas such as pull-rings, muzzles and lanyard attachment loops - is extremely resistant to paint. Even sanded to a furry surface, the merest scrape will strip the paint off. Luckily there's little-to-no friction in the assembly.

Texycxf.jpg


The contrast between the yellow and orange worked - I over-estimated the difference between bright red and colonial red unfortunately... oh well.

Ps1SQdV.jpg


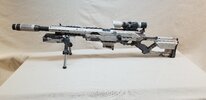
The matt/gloss black on the grips came up sweet - the same water-droplet mask effect as the colours, but resulting in a perished rubber look that I'm more than happy with.

And it moves sweeter than it has for a long time thanks to the aforementioned furniture polish applied while reassembling. The silicon wax is a great zero-residue painted-surface lubricant.

If you made it all the way through, thanks for looking, and keep on Nerfing :)
 
Someone in one of the Fallout FaceBook prop groups I'm in brought it up that the Nerf Demolisher, with it's underbarrel launcher cut off, looks like the 10mm SMG from Fallout, and I can't unsee it.

What tools are recommended for cutting the plastic Nerf guns are made of?


81Sid8HNQrL._AC_SL1500_.jpg
 
Yea, if you have a small hand saw that you can do the majority of the cutting with, I would recommend that, over the dremmel. my experience with using any sort of dremmel attachment on nerf grade plastic, is a pain in the ass because it just melts back together in a ragged wad as you cut. To easy to dork up a part of it you don't want to, and have molten slag you've got to go back and cut through again anyways. My $0.02.
 
What tools are recommended for cutting the plastic Nerf guns are made of?

Hacksaws, fret-saws and razor-saws are the best options. You can cut with a dremel/rotary tool, but use a slow speed setting and work slowly to avoid melting the plastic as mentioned above.

Don't cut right next to your lines - leave a millimetre or so and use files to carefully remove the remaining material for the cleanest finish.
 
Here are my two custom Nerf blasters, a Stampede "assault" style and a Longstrike "sniper" style. The Stampede was completed last year and I just finished the Longstrike today. They both incorporate standard Nerf accessories. The "grenade launcher" on the Stampede is heavily modified however and I also added a barrel lug attachment point for a suppressor. The suppressor on the Longstrike is just a friction fit. I modified the suppressor with a felt lined collar to fit snugly over the barrel. I used Tamiya spray paint. Very expensive but worth it in my opinion. The colors are Tan AS-15 for the Stampede and Insignia White AS-20 for the Longstrike. Both have NATO Black TS-63, Gunmetal TS-38 and Mica Silver TS-76. Weathering was done with Rub n Buff and pastels. I upgraded the Longstike to fire harder even though I couldn't find a stronger main spring. I have no idea if the Stampede even works, I've never put batteries in it. I'm not a Nerfer, but got inspired to do these after watching an Adam Savage One Day Build.
 

Attachments

  • 20210926_171028.jpg
    20210926_171028.jpg
    2.1 MB · Views: 137
  • 20210926_171310.jpg
    20210926_171310.jpg
    2.3 MB · Views: 139
  • 20210926_171127.jpg
    20210926_171127.jpg
    2.4 MB · Views: 157
  • 20210926_171628.jpg
    20210926_171628.jpg
    2 MB · Views: 126
  • 20210926_171646.jpg
    20210926_171646.jpg
    2.1 MB · Views: 169
  • 20210926_171659.jpg
    20210926_171659.jpg
    2 MB · Views: 132
  • 20210926_171719.jpg
    20210926_171719.jpg
    1.9 MB · Views: 138
I see this thread is alive and well since 2011 so I guess I can add my two cents without getting accused of necroposting. ;)

This is from the "Rebelle" series, Nerf guns designed specifically for girls and so there are a lot of playful details that just scream to get repainted. Unfortunately only the right side has those raised ornamental details, the left side is blank and sports the warnings and copyright info instead. I have removed them and simply glued on those 3D stickers that come in silver and gold foil and are supposed to upgrade the pages of poetry albums and diaries. I have painted them over with gold color because the foil looked too artificial and to match the other side.


rechts.jpg

links.jpg

stift.jpg

vorne.jpg

oben.jpg
 
Last edited:

Your message may be considered spam for the following reasons:

If you wish to reply despite these issues, check the box below before replying.
Be aware that malicious compliance may result in more severe penalties.
Back
Top