NGS Fabrication
New Member
I am working on my next competition cosplay and had decided on two items: the Death Stench armor set and the Wild Hatchets dual blades. Both of these items have parts that are supposed to be the bones of monsters used to create the blades and the armor. I always start with the weapons/props for any cosplay since it gets me MUCH more fired up haha. Here's how it went.
I started with creating a 2D pattern from a screenshot off of the wiki, so this wasn't very high quality picture. From importing that picture into SolidWORKS (it is what I have so shush) I could decide scale and refine the profile. I also used this pattern to decide scale for the emblem. I proceeded to 3D print the emblem in multiple pieces so I could sand and fill the layer lines from printing easier.


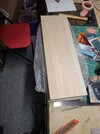
For the bulk of the body I decided to treat myself and use balsa wood. About 90% of my prop and cosplay work is done with EVA foam. So I knew what it would look like and feel like if I wanted to do that again. However I wanted a different feel and look that would be hard to capture properly in foam. Since this is for a competition cosplay, I wanted to highlight a skill which would have me stand out from the rest.
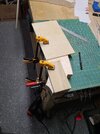
First on the list was to cut out the profile of the body I wanted. This was very easy to do with my small bandsaw. I cut out not just the areas that are going to look like "bone" but also the areas that are "metal". Some initial planning here can save a lot of headaches. Using a jig to position the handles is a smart idea as well. Drilling into end grain, even for balsa wood, can be problematic. Or I was just bad at it lol.


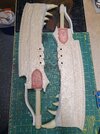
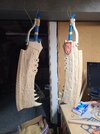
Once they were able to be held and I liked the scale (even if it was a bit late to change easily) began the long process of sanding and carving. This is the part that took the longest time if I am being honest. Not only was it a long process to carve, but figuring out the right techniques. I haven't done much carving before now and only had flat chisels. I ended up sanding down the edge on my belt sander to remove a large amount of material and create a bevel to reference. Drawing some reference lines across all four faces, I was able to remove the rest of the material and add texture with a curved chisel. Deeper holes and the texture on the end are added with rotary tool.
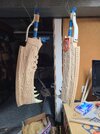
I also added screws into the top area since I didn't have any googly eyes or rivets to add details. Using offcuts to create the "pommel" and a bit of a "handguard" piece. Texture for the metal sections of the hatchets was added with the rounded edge of a ball-peen hammer. Lightly tapping with just enough force to dent the balsa was great for adding the hammered look to wood. Painting later on with really bring out this texture if I do my job correctly.


Next up was molding. Molding and casting are techniques and materials that I haven't done personally before so this was a great learning experience. Sculpting the 4 horns was an experience as well. This was not something I did easily or happily haha, much more comfortable with my hardedge materials. But it was accomplished and texture was added with a variety of sculpting tools. Using solo cups to mold them was a lesson in judging volumes as well. None of this section went easy as I am also an impatient person! Casting the horns themselves, I kept pulling the horns before they were fully cured too. So I messed a bunch of things up but also was able to salvage it!


Once the horns were glued down with epoxy, I used some epoxy sculpt to make sure that no matter what happens it won't go anywhere. The handle and emblem were also epoxied into place to make sure they weren't going anywhere.
Now for the handle. I decided to save some money finally and use more elbow grease then money. Typically you could/should buy plastic sheets at the thickness you want and cut the shape from that. INSTEAD I cut apart an old pvc pipe I had laying around and heated it into sheets. WHEN HEATING OR GLUING PLEASE WEAR PROPER PPE AND VENTILATION. It was a pain to get the correct shape and angles once I had the profile cut. Once done though, I used epoxy to attach it fully and used screws to add a mechanical bond as well.


Finishing time! The balsa wood was now treated with a penetrating epoxy to solidify and firm up the wood. This also created a better surface all around for painting. Now it won't just absorb the paint like a dry sponge. I used a metallic paint to base out the metal sections after masking off the bone sections. After which I am able to dry brush on silver to catch all of the highlights and sharp edges. This really helped capture that texture I did with the hammer and look more believable. Now the Wild Hatchets are done. But are they finished? NO!


To be properly finished they have to be weathered! Also I hate the color of the epoxy sculpt I used. On the bone section I added a series of washes with different levels of water content. This allowed the color to pool in the low spots and highlight the depth I created earlier. After a few rounds and different colors across the faces and horns, I came back with a bone white drybrush. This brought back the very top edges of the bone that I carved earlier, helping to highlight the sharp edges and making it look a bit worn.
On the metal sections I used my favorite series of oil paints. Oils catch the light better then acrylics can to make metal look grimy. Adding some oil lowlights around where the bone meets the wood also makes it look more real in my opinion. Once this was done to my satisfaction I added textured leather to the handle.


The Wild Hatchets are now finished and complete! Let me know what you think! I always appreciate CONSTRUCTIVE criticism. If you are just going to flame my work for whatever reason, just tell yourself how much better at this then I am. Thanks all!


I started with creating a 2D pattern from a screenshot off of the wiki, so this wasn't very high quality picture. From importing that picture into SolidWORKS (it is what I have so shush) I could decide scale and refine the profile. I also used this pattern to decide scale for the emblem. I proceeded to 3D print the emblem in multiple pieces so I could sand and fill the layer lines from printing easier.
For the bulk of the body I decided to treat myself and use balsa wood. About 90% of my prop and cosplay work is done with EVA foam. So I knew what it would look like and feel like if I wanted to do that again. However I wanted a different feel and look that would be hard to capture properly in foam. Since this is for a competition cosplay, I wanted to highlight a skill which would have me stand out from the rest.
First on the list was to cut out the profile of the body I wanted. This was very easy to do with my small bandsaw. I cut out not just the areas that are going to look like "bone" but also the areas that are "metal". Some initial planning here can save a lot of headaches. Using a jig to position the handles is a smart idea as well. Drilling into end grain, even for balsa wood, can be problematic. Or I was just bad at it lol.
Once they were able to be held and I liked the scale (even if it was a bit late to change easily) began the long process of sanding and carving. This is the part that took the longest time if I am being honest. Not only was it a long process to carve, but figuring out the right techniques. I haven't done much carving before now and only had flat chisels. I ended up sanding down the edge on my belt sander to remove a large amount of material and create a bevel to reference. Drawing some reference lines across all four faces, I was able to remove the rest of the material and add texture with a curved chisel. Deeper holes and the texture on the end are added with rotary tool.
I also added screws into the top area since I didn't have any googly eyes or rivets to add details. Using offcuts to create the "pommel" and a bit of a "handguard" piece. Texture for the metal sections of the hatchets was added with the rounded edge of a ball-peen hammer. Lightly tapping with just enough force to dent the balsa was great for adding the hammered look to wood. Painting later on with really bring out this texture if I do my job correctly.
Next up was molding. Molding and casting are techniques and materials that I haven't done personally before so this was a great learning experience. Sculpting the 4 horns was an experience as well. This was not something I did easily or happily haha, much more comfortable with my hardedge materials. But it was accomplished and texture was added with a variety of sculpting tools. Using solo cups to mold them was a lesson in judging volumes as well. None of this section went easy as I am also an impatient person! Casting the horns themselves, I kept pulling the horns before they were fully cured too. So I messed a bunch of things up but also was able to salvage it!
Once the horns were glued down with epoxy, I used some epoxy sculpt to make sure that no matter what happens it won't go anywhere. The handle and emblem were also epoxied into place to make sure they weren't going anywhere.
Now for the handle. I decided to save some money finally and use more elbow grease then money. Typically you could/should buy plastic sheets at the thickness you want and cut the shape from that. INSTEAD I cut apart an old pvc pipe I had laying around and heated it into sheets. WHEN HEATING OR GLUING PLEASE WEAR PROPER PPE AND VENTILATION. It was a pain to get the correct shape and angles once I had the profile cut. Once done though, I used epoxy to attach it fully and used screws to add a mechanical bond as well.
Finishing time! The balsa wood was now treated with a penetrating epoxy to solidify and firm up the wood. This also created a better surface all around for painting. Now it won't just absorb the paint like a dry sponge. I used a metallic paint to base out the metal sections after masking off the bone sections. After which I am able to dry brush on silver to catch all of the highlights and sharp edges. This really helped capture that texture I did with the hammer and look more believable. Now the Wild Hatchets are done. But are they finished? NO!
To be properly finished they have to be weathered! Also I hate the color of the epoxy sculpt I used. On the bone section I added a series of washes with different levels of water content. This allowed the color to pool in the low spots and highlight the depth I created earlier. After a few rounds and different colors across the faces and horns, I came back with a bone white drybrush. This brought back the very top edges of the bone that I carved earlier, helping to highlight the sharp edges and making it look a bit worn.
On the metal sections I used my favorite series of oil paints. Oils catch the light better then acrylics can to make metal look grimy. Adding some oil lowlights around where the bone meets the wood also makes it look more real in my opinion. Once this was done to my satisfaction I added textured leather to the handle.
The Wild Hatchets are now finished and complete! Let me know what you think! I always appreciate CONSTRUCTIVE criticism. If you are just going to flame my work for whatever reason, just tell yourself how much better at this then I am. Thanks all!