Do you mind sharing what brush or alpha you used for the cast iron texture?Gotcha. My bad. I guess they’re both really low res. I actually ended up loading the booster engine into ZBrush, and added a cast metal texture to the main rings and detail inside, and resin printed it.
You are using an out of date browser. It may not display this or other websites correctly.
You should upgrade or use an alternative browser.
You should upgrade or use an alternative browser.
My Rocketeer Build Progress
- Thread starter runJEDIrun
- Start date
BingoMaru
Well-Known Member
Hey I just saw this. I believe these are the alphas I used.Do you mind sharing what brush or alpha you used for the cast iron texture?
runJEDIrun
New Member
Man I’m the worst! I have put this thing off for way too long and yesterday I finally took baby out of the corner and started rough assembly using super/hot glue just to get the pieces together. I plan to do a fiberglass cloth reinforcement on the inside and then a UV resin on the exterior before I start smoothing things out. I still have a couple more parts to print out too.

runJEDIrun
New Member
Does anyone have a lead on these piston shock strut things that are supposed to control the flaps? I tried searching the forum and I wasn’t getting any results.

MunsterMahkus
New Member
Hey man just chiming in, but I was going to use ball joint rod ends, same that the veepy pack is using and they are fairly cheap and can be found at home depot or amazon. There was another thread for veepy pack builders that demonstrated the build of the rod. hope this helps
runJEDIrun
New Member
I applied some resin and fiberglass cloth to the inside of the tanks to reinforce the seams and used Bondo spot glaze putty for the outside seams. I then gave it a sanding. I’m thinking about using E6000 to attach the tanks to this middle piece but I’m not sure if there is a better way to do this. Perhaps E6000 initially follow by more resin and fiberglass cloth to reinforce.


runJEDIrun
New Member
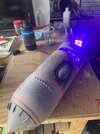
Well… it’s been a while but I’ve decided that I’m just going to attack this thing and get it done. It’s literally been sitting in my garage for over a year and it’s time.
Starting out with some UV resin and UV light which I got here to work out some print lines. After that, wiped them down with 90% isopropyl alcohol to remove tacky uncured resin. More to come.
Starting out with some UV resin and UV light which I got here to work out some print lines. After that, wiped them down with 90% isopropyl alcohol to remove tacky uncured resin. More to come.
Attachments


Last edited:
runJEDIrun
New Member
More UV RESIN work and also a PSA to anyone out there using this stuff that is like me and didn’t know the chemical reaction that happens when you hit the resin with the UV light causes it to get really hot, which makes total sense, but I had no idea and burned my fingers
Word of caution if you are using cheap foam brushes like I did, it leaves behind little pieces as it falls apart. Like Oreo cookie crumbs. Not the end of the world but something to be aware of.
Word of caution if you are using cheap foam brushes like I did, it leaves behind little pieces as it falls apart. Like Oreo cookie crumbs. Not the end of the world but something to be aware of.
Attachments


runJEDIrun
New Member
To anyone that has assembled a rocketeer jetpack. Any advice on how to attach the engine parts inside of the fuselage? I assume painting everything first and then assemble everything? Or assemble first and then paint? 
joberg
Legendary Member
Painting the engines first and with the necessary attachments and hoses. I don't know if your print comes with the attachments inside the pack, but if not, you'll have to devise some kind of blocks or dowels to secure the engines inside. You could look at Valor build of the pack if you do a search.To anyone that has assembled a rocketeer jetpack. Any advice on how to attach the engine parts inside of the fuselage? I assume painting everything first and then assemble everything? Or assemble first and then paint?
runJEDIrun
New Member
Ah bummer that’s what was worried about. I need to figure out a lightweight solution for this.
runJEDIrun
New Member
Attachments

Last edited:
runJEDIrun
New Member
Crowd sourcing - any opinions on using spray foam or foam blocks to fill the cavity at the top part of the fuselage so that I have a surface to mount the engines?
joberg
Legendary Member
I don't remember how the top of the engines is designed. You could use spray foam to secure the engines inside the tubes, but you'll have to make sure your entire prop + engines are in the proper position and secure to allow the foam to harden and keep your engines in place.Crowd sourcing - any opinions on using spray foam or foam blocks to fill the cavity at the top part of the fuselage so that I have a surface to mount the engines?
The problem is to make sure the foam doesn't expand too much and start seeping toward your bottom grill (or on the engines proper).
Also, make sure that the foam can "bite" properly on the portion you want to spray. The more bits protruding from the top, the more bite you'll have for the foam to secure them in place. Since the inside of the tubes is smooth, you'll have to make sure there's also some kind of pieces protruding from those tubes for better grip.
runJEDIrun
New Member
This is definitely what I’m thinking. It’s completely hollow all the way up to the tipsI don't remember how the top of the engines is designed. You could use spray foam to secure the engines inside the tubes, but you'll have to make sure your entire prop + engines are in the proper position and secure to allow the foam to harden and keep your engines in place.
The problem is to make sure the foam doesn't expand too much and start seeping toward your bottom grill (or on the engines proper).
Also, make sure that the foam can "bite" properly on the portion you want to spray. The more bits protruding from the top, the more bite you'll have for the foam to secure them in place. Since the inside of the tubes is smooth, you'll have to make sure there's also some kind of pieces protruding from those tubes for better grip.
Similar threads
- Replies
- 8
- Views
- 294
- Replies
- 26
- Views
- 2,383
- Replies
- 4
- Views
- 908