AJLoCascio
Sr Member
Welcome to the right side of the river!
So I spent a good deal of the quarantine losing my mind / watching the Mummy on repeat. This inevitably lead to me obsessing over Rick O'Connell's costume and gear. There is little to no info on this outfit so I spent a good deal of time compiling and sorting out what I could.
I wanted to breakdown some of the more challenging details I came up against & skip over the more obvious ones like the wrist-cuff and bandanna.
Here are some pics of me in the finished outfit before I go into the process:


Here is a fairly brief overview of what I did:
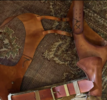
First up:
Pants: Modified Scully Men's Rangewear Canvas Pant
Basically cowboy pants that I cut some of the bottom cuff off of and added belt loops to. You can see in this weird diagram (below) where I placed the belt loops if you are looking at them from the top-down with the fly at the bottom. They should go up and over your belly button so they are a VERY strange fit if you aren't used to that. The location of the loops is very important as it dictates where your holsters sit.

The shirt:
Pouring over reference, I discovered that his shirt is a dead-ringer for a "Pilots shirt" very similar to an Indiana Jones shirt, just has lower pockets and no pleats. The one I got was called the Van Heusen Men's Pilot Dress Shirt Long Sleeve Commander. I got it on amazon, tea stained it and took out the really stiff bit of interfacing inside the collar with a seam ripper.

Now: The big guy!
The Shoulder Holsters:
I'm not going to go over this completely, but there's a few things I want to point out.
First: I've seen the Todd's costumes Holsters and they are AMAZING! But they were missing a few important details + I wanted to make this myself.
So one of the biggest confusions for me is the fact that the gun holsters actually slide through his pants belt. That took me much too long to figure out. For this reason I would highly recommend getting your pants first... which I didn't do.
You can see this best illustrated here:


Now. The thing that drove me MOST insane. These Mystery holes. They seem to move from scene to scene. I suspect these are here to tie the guns in place for stunts because that is roughly where they line up, otherwise I have zero Idea why they are here.
They can be best seen in this pic:

The back also proved to be a bit of a nightmare, especially since I had to sort that out on my own and in a mirror. Really challenging. Plus finding good shots of his back and what kind of rivets they used was really hard. Here are some of the ones that helped me:


Here is the underside and back of mine:


Leather Color
I went with Medium Brown Fiebing's Leather Dye mixed "watered down" with isopropyl alcohol. I used this on all of the leather bits, as they seem to be nearly an identical color.
For the Belt I just went with a 2" leather belt I got at Tandy and found the closest buckle I could. If memory serves I also got the buckles from Tandy and Frankenstein-ed 2 buckles together.
For that Brass belt keeper I couldn't find anything like that online so I made it using one of those K&S Precision Metals brass bars. You can typically find them at craft hobby / stores
The Chamelot-Delvigne Revolvers!
(I got mine from HanzoSword.com - their customer service was... unusual - not my favorite)
I originally 3-D printed some just to get started on the holsters, but eventually found these. I had to add my own brass ring at the bottom since the casting didn't come with any.
 .
.

The Boots
Just re-used the ones for my Rocketeer costume. They are English officer's boots or something... I don't remember.
Hope this helps anyone looking to make this! It was a lot of fun to put together.
Oh. And for anyone interested in making the holster from scratch here is the pattern I drew up.
Happy Mummy Hunting!
-AJ

So I spent a good deal of the quarantine losing my mind / watching the Mummy on repeat. This inevitably lead to me obsessing over Rick O'Connell's costume and gear. There is little to no info on this outfit so I spent a good deal of time compiling and sorting out what I could.
I wanted to breakdown some of the more challenging details I came up against & skip over the more obvious ones like the wrist-cuff and bandanna.
Here are some pics of me in the finished outfit before I go into the process:
Here is a fairly brief overview of what I did:
First up:
Pants: Modified Scully Men's Rangewear Canvas Pant
Basically cowboy pants that I cut some of the bottom cuff off of and added belt loops to. You can see in this weird diagram (below) where I placed the belt loops if you are looking at them from the top-down with the fly at the bottom. They should go up and over your belly button so they are a VERY strange fit if you aren't used to that. The location of the loops is very important as it dictates where your holsters sit.
The shirt:
Pouring over reference, I discovered that his shirt is a dead-ringer for a "Pilots shirt" very similar to an Indiana Jones shirt, just has lower pockets and no pleats. The one I got was called the Van Heusen Men's Pilot Dress Shirt Long Sleeve Commander. I got it on amazon, tea stained it and took out the really stiff bit of interfacing inside the collar with a seam ripper.
Now: The big guy!
The Shoulder Holsters:
I'm not going to go over this completely, but there's a few things I want to point out.
First: I've seen the Todd's costumes Holsters and they are AMAZING! But they were missing a few important details + I wanted to make this myself.
So one of the biggest confusions for me is the fact that the gun holsters actually slide through his pants belt. That took me much too long to figure out. For this reason I would highly recommend getting your pants first... which I didn't do.
You can see this best illustrated here:
Now. The thing that drove me MOST insane. These Mystery holes. They seem to move from scene to scene. I suspect these are here to tie the guns in place for stunts because that is roughly where they line up, otherwise I have zero Idea why they are here.
They can be best seen in this pic:
The back also proved to be a bit of a nightmare, especially since I had to sort that out on my own and in a mirror. Really challenging. Plus finding good shots of his back and what kind of rivets they used was really hard. Here are some of the ones that helped me:
Here is the underside and back of mine:
Leather Color
I went with Medium Brown Fiebing's Leather Dye mixed "watered down" with isopropyl alcohol. I used this on all of the leather bits, as they seem to be nearly an identical color.
For the Belt I just went with a 2" leather belt I got at Tandy and found the closest buckle I could. If memory serves I also got the buckles from Tandy and Frankenstein-ed 2 buckles together.
For that Brass belt keeper I couldn't find anything like that online so I made it using one of those K&S Precision Metals brass bars. You can typically find them at craft hobby / stores
The Chamelot-Delvigne Revolvers!
(I got mine from HanzoSword.com - their customer service was... unusual - not my favorite)
I originally 3-D printed some just to get started on the holsters, but eventually found these. I had to add my own brass ring at the bottom since the casting didn't come with any.
The Boots
Just re-used the ones for my Rocketeer costume. They are English officer's boots or something... I don't remember.
Hope this helps anyone looking to make this! It was a lot of fun to put together.
Oh. And for anyone interested in making the holster from scratch here is the pattern I drew up.
Happy Mummy Hunting!
-AJ
Attachments
Last edited:
")