My HAL 9000 builds (plural)

The original lens contained colored filters in it. They rotated the dial to the red filter (R60 filter) and shined the light bulb through it.
I looked into an R60 filter and then bought a lighting gel sheet from a camera store that was as close as possible. Cut a small circle of it and stuck it inside my lens.

The warm white light passing through red filter material is what makes it look different than just a red LED.
There's also the diffraction of light in the original lens elements that has to be taken into account. Different lenses produce a different colour temperature image. Even if you're using the same filter, the resulting red won't be the same if it's just passing through regular glass
 
If you look at the Tested video with Peter Jackson, it does indeed stick way out the back. That's the problem we'll always have; in order to get that 'far away' look of the red light, it needs the reverse lensing effect of the entire array of elements in the original lens (essentially the reverse of what the fisheye is intended to do). In the same way we can't look through a the back of a single piece of glass and expect to see a fisheye effect. It's just a physics issue that won't be able to be solved if the unit is meant to hang flush on a wall.

That's what I thought for a while. But actually it's not quite true. The outer lens elements, especially of course the enormous primary, gather light from a large area for the fisheye/wide angle effect. But many of the smaller elements are converging elements that bring the image down to the small 35mm film sized imaging area.

When you shine a red light through a real fisheye you'll see a rather tiny red spot of light when viewed from the front. It also sort of vanishes when viewed off-axis. You occasionally see this effect in the film.

However we're used to seeing quite a lot of red in the eye. So when I got my hands on a real Nikkor 8mm f/8 lens I was pretty disappointed as to how little light came through, and how narrow the beam was. I eventually dismantled the lens and removed the bulk of the internal components. And that worked. It looks much closer to how it looked in much of the film!

So. By removing all but the primary and secondary lens elements, and by putting in a small LED, it actually is possible to get a great looking HAL while keeping it fairly thin. If you're willing to spend the cash on an actual lens...
 
There's also the diffraction of light in the original lens elements that has to be taken into account. Different lenses produce a different colour temperature image. Even if you're using the same filter, the resulting red won't be the same if it's just passing through regular glass

I'm afraid I don't agree with this. Virtually all lenses are carefully designed to be quite neutral in colour when it comes to white light passing through. Even lenses held as being unusually warm are barely so - only someone really familiar with lenses would notice the difference. They all use optical glass, which is glass designed for purity and transparency.

Now, there are occasional examples, such as really old lenses with discolored balsam cement, or in extreme cases the yellowed lenses that you get from trace radioactive elements used in some types of optical glass in the past. But those are rare.

There's also the matter of slight colour fringing on the edges caused by some wide angle lenses, but that doesn't affect the overall colour of the picture per se.

Compare optical glass to regular "window" glass, which tends to have iron oxide content in it that gives it a green tint. You can really see how green the glass is when seen on edge.
 
Last edited:
I'm afraid I don't agree with this. Virtually all lenses are carefully designed to be quite neutral in colour when it comes to white light passing through. Even lenses held as being unusually warm are barely so - only someone really familiar with lenses would notice the difference. They all use optical glass, which is glass designed for purity and transparency.

Now, there are occasional examples, such as really old lenses with discolored balsam cement, or in extreme cases the yellowed lenses that you get from trace radioactive elements used in some types of optical glass in the past. But those are rare.

There's also the matter of slight colour fringing on the edges caused by some wide angle lenses, but that doesn't affect the overall colour of the picture per se.

Compare optical glass to regular "window" glass, which tends to have iron oxide content in it that gives it a green tint. You can really see how green the glass is when seen on edge.
Gotta disagree with you here. Different lenses do indeed differ in the way they resolve colour. It's just a part of the character of different lenses. Compared next to one another, there are noticeable differences in colour temperature. I've worked in the photo industry for close to 20 years and see it all the time. For example I know if we white balance for our strobes when shooting on a Canon L series, then swap to a Zeiss Otus, there will be a noticeable shift toward blue.
 
Gotta disagree with you here. Different lenses do indeed differ in the way they resolve colour. It's just a part of the character of different lenses. Compared next to one another, there are noticeable differences in colour temperature. I've worked in the photo industry for close to 20 years and see it all the time. For example I know if we white balance for our strobes when shooting on a Canon L series, then swap to a Zeiss Otus, there will be a noticeable shift toward blue.

Yes, but you're talking about really subtle colour shifts, noticeable on film or digital to a trained observer. The sort of thing that most people would never see unless you put two slides or prints side by side and asked people to compare them directly. We were talking about shining a red-filtered light through a lens for a movie prop!

I don't think the minor differences in white balance that can occur with some photographic lenses would make any noticeable difference whatsoever in the case of the HAL lens.
 
I was starting to feel guilty about all my chatter about my own build in other people's threads so I figured I should start my own thread.

This all snowballed for me after I accidentally stumbled upon some replica HAL lenses for sale on eBay and then got curious about building a HAL 9000 replica.

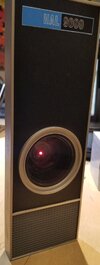
As I weighed the thought of buying the lenses I started to research the Moebius models HAL 9000 kit that I'd never heard of before and were referenced in the lenses product description. Building a super realistic HAL 9000 suddenly seemed in reach.

Then I remembered that my best friend is a huge 2001 fan and thought "Hmm this might make a good gift idea for him." which then turned into "I should buy two of each so I can build one for him, and one for myself!"

So I bit the bullet and bought two of the replica lenses off eBay (Now sold out) and two of the Moebius kits off of Amazon.

Then I discovered other people's HAL 900 builds here on RPF.

I looked at what other people had done and then decided that maybe the plastic kit wasn't good enough and maybe I should replace much of the kit with upgraded parts (including metal)

Related threads I've participated in so far:
I'm still early in my build and moving slowly but my plan is for one of the following options:
  1. Build the kit as-is (painted plastic) with the replacement lens. (Not likely at this point.)
  2. Upgrade the kit with a new faceplate that is either:
    1. Vinyl wrapped polystyrene in a brushed anodized black aluminum finish (I've ordered and receieved the vinyl and it's "ok".)
    2. Actual metal brushed anodized black aluminum finish. (I've order a plate and it's enroute to me now.)
  3. Upgrade the kit with a new faceplate AND an aluminum frame, AND custom machined aluminum lens enclosure rings. (I have requests for quotes in progress.)
Regardless of what option I go with, the build will also have sound effects built in. I'm currently getting a quote from an Arduino expert on Fiverr who may be building it for me. Unlike most HAL 9000 builds though, mine would be triggered with a small remote to play the sounds as opposed to a physical button on HAL. The question is where to place the remote sensor? (In the speaker grill?, hidden inside the lens? We'll see.)

This evening I meticulously cut apart the Moebius plastic lens ring to accomodate the glass replacement lens and it went extremely well but it still needs more sanding. The glass lens fits into the original part extremely snugly and definitely won't be falling loose as I had initially feared.

More to come soon. This thread will be peppered with pics.
I just finished a Moebius HAL 9000 kit but modded with a Panasonic projector lens and brushed aluminum finished paper. The lens adds real depth to the red LED as opposed to the plastic piece provided in the kit. Plus the mat finish of the paper really looks like a nice 60’s finish. I tried to capture the illusion of depth to the red eye in the pics. I also mounted the name plate decal on a separate piece of plastic to make it stand out.
 

Attachments

  • hal.JPG
    hal.JPG
    98.3 KB · Views: 127
I just finished a Moebius HAL 9000 kit but modded with a Panasonic projector lens and brushed aluminum finished paper.

Looks cool. :) What specific projector lens did you use? Is it something available separately, or is it a component of some other product?
 
Sorry about the delay folks. Lot of photos to sort. Several photos still to take. Much to write. Been super busy even over the holidays. New post as soon as possible.
 
when I got my hands on a real Nikkor 8mm f/8 lens I was pretty disappointed as to how little light came through, and how narrow the beam was. I eventually dismantled the lens and removed the bulk of the internal components. And that worked. It looks much closer to how it looked in much of the film!
I ended up going a much different route than what I discussed earlier in this thread.
A 5mm LED just wasn’t cutting it. In any color, even with the gel filter.
I came up with a creative solution that involved a lot of… well… you’ll all see soon.
I think I *nailed* the look both for the naked eye and for a camera.
 
Eager to see the result. As for the famous "Red Light"; I'm wondering what kind of bulb these guys used to have that look:unsure:
As we know, to have that light shine on film is not the same power if it was shot in a video format...right? And, it has to compete with other studio lights to boot!
 
Pretty sure it was a tungsten spot or photoflood. There weren’t a lot of options for lighting types in those days. If you look at photos of the back of sets you mainly see those with of course heavy duty overhead lighting in the studio rafters, such as carbon arc brutes.
 
Pretty sure it was a tungsten spot or photoflood. There weren’t a lot of options for lighting types in those days. If you look at photos of the back of sets you mainly see those with of course heavy duty overhead lighting in the studio rafters, such as carbon arc brutes.
Yes, and when looking at the thin housing of the Work Bench, in the EVA Pod Bay, where HAL is incased, it's a wonder how they were able to pull that red light!
 
Yes, and when looking at the thin housing of the Work Bench, in the EVA Pod Bay, where HAL is incased, it's a wonder how they were able to pull that red light!

I suspect they had a removable back panel. When they were shooting from the front they pulled that off and installed a big lamp sticking out the back. When shooting from the back or side, when the front isn’t visible, they took the lamp out and put the rear panel back on.

Again, conjecture, but it seems reasonable to me.
 
Are you guys thinking that they'd need bulbs/lamps any bigger than was being used to backlight the pushbuttons?

Yes. The pushbuttons had tiny low voltage tungsten bulbs. Photos in the Archives showing the pod set under construction shows a whole spaghetti junction of wires to drive those. The HAL light was probably bigger as it had to be brighter. A small bulb behind the Nikkor lens doesn’t let a whole lot of light through.
 
Yes. The pushbuttons had tiny low voltage tungsten bulbs. Photos in the Archives showing the pod set under construction shows a whole spaghetti junction of wires to drive those. The HAL light was probably bigger as it had to be brighter. A small bulb behind the Nikkor lens doesn’t let a whole lot of light through.
Wouldn't that be the same system they used for HAL on the work bench? I'm sure that bench was wired the same as the inside of the Pod.;)
 
At least once a week I think of how I need to come back and post the finished build pics. I’m embarrassed that I haven’t yet. Truth is I haven’t had a chance to do a good proper photo shoot of it yet. It is definitely a long standing to-do item. <cringe>
 
At least once a week I think of how I need to come back and post the finished build pics. I’m embarrassed that I haven’t yet. Truth is I haven’t had a chance to do a good proper photo shoot of it yet. It is definitely a long standing to-do item. <cringe>
Welcome to our world of projects:p No need to apologize; we're in the same boat. My AR-35 radar unit from the same movie is "in progress":rolleyes:
I'm sure that your pics will rock!!
 

Your message may be considered spam for the following reasons:

If you wish to reply despite these issues, check the box below before replying.
Be aware that malicious compliance may result in more severe penalties.
Back
Top