Ok, it's been almost two months since I last updated. Dunno if anyone's noticed, but life has been a little unusual during that time. Theoretically, having more time at home (laid off until next week) meant more time for helmets, but it turned out Mrs Dim had a Pandemic plan that basically included repainting or rebuilding most of the house. Oh, and she had a bad back, so I had to do the actual work bit.
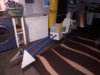
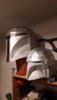
Anyway, whinging aside, I DID finish up the Mando helmet, but have a couple of things to admit:
One, as usual, my measuring was wrong, wrong, wrong, so the crest does not run evenly front to back.
Two, as usual, my surfacing was terrible, something that shows up even more than usual with the silver paint.
Three, I should have noticed from the instructional video that this helmet is too short for the width. The actual Mando helmet is longer, so this one looks....wrong.


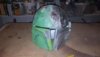
Never one to let abject failure slow me down, I watched the final season of "Clone Wars" on our pandemic-purchased Disney +, and got a hankering for a clone helmet again. This time it was Hunter, from the Bad Batch.

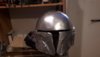
I think it's a basic series 2 clone trooper helmet with a nifty paint job, but I could be wrong. I wanted to do this build differently, since every attempt I have made up to this point has come out badly (or at least, not as well as I'd hoped.) With most helmets it's the surfacing on the dome that's the issue, so I figured I'd make that and keep it separate for as long as possible. That way I could sand and smooth and put in the details without worrying about the rest of the helmet.

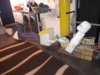
I started with an oval of foam with the right length and width measurements, and used cardboard to make the vertical pieces. I built a lattice from cardboard strips, then coated the whole thing in tissue-paper mache. I was going to bondo next, but only got half coated before my bondo ran out.
I thought I might build the lower part of the helmet Atlanthia-style, with cardboard delinating the shape and then mache over the top, like I did for the Stormtrooper build all those years ago. Instead, though, I made another oval the same dimensions and curved the back of the helmet around that to the point where the "ears" stop.
.jpg")
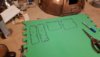
Oh, and by the way, I'm working from some very nice reference pictures which I had found and printed off. It just worked out that the main ref pic was 1cm to 1inch in real life, which means I can actually measure some parts for real! Lucky break! Although, obviously, sometimes I look at the measurement, convert and say "Huh, that's gotta be wrong" and guesstimate instead. Bodging is a hard habit to break.
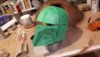
Here comes the bit I'm proudest of: I measured and drew out half the faceplate. Then I drew it onto foam, flipped it and drew the other half. A symmetrical faceplate that ACTUALLY FITTED FIRST GO! No filling in!

My other great find was that I could glue the edges of the foam and then hold them in place by pushing finishing nails into the foam like pins. They hold really well, but are easy to remove. Next I cut the cheeks, shaved the edge and glued them in on the right(ish) angle.

What's nice about this version of the helmet, is that the ridge around the neck is flat, not semi-circular. I could just make a band of foam that ran around the back and came to the ends of the ears. The next section is also a box rather than a tube, so it was fairly easy construction.

By this point, I had accumulated a bunch of small gaps and rough edges (not changing scalpel blades often enough. Budget.) I grabbed the tissue paper again and mache'd the whole assembly. This helped with the cheek joins, as well as looking strangely reminiscent of the animated helmet - there'd been some black paint in the glue I was using, which tinted the white tissue paper.

I have to say, even if I went no further, I was pretty blown away. Usually by this point I am already disappointed. Here, there's only the dome that's not great, and I'm planning to take more time with that. I need more bondo, realistically, and even if I decide to shortcut and use filler, I'm gonna surface with resin (of which I have quite a bit stockpiled.)
I can't make the bottom half of the faceplate until I have the two tubes either side of the vocoder in place. My measurements indicated about 3.5 to 4 inches, which looked silly, so I went with 3 inches.

That was this morning. Like I said, I got reactivated to come back into work next week, so I suspect I'll give a little more time to this helmet in the next couple of days than I should, but I don't want to rush it. When I get the next bit of faceplate put in, I'll mache again, then coat the dry mache with resin for strength. If I do get around to bondoing over the top of this, I'll want to keep it as thin a layer as possible. Am I learning? Is this what learning feels like?