My Builds: The growing of an eclectic collection

Re: My Builds: Hoth Blaster, Ahsoka Hilts, Rey Staff, Hilts, Medal, Necklace, Dice, e

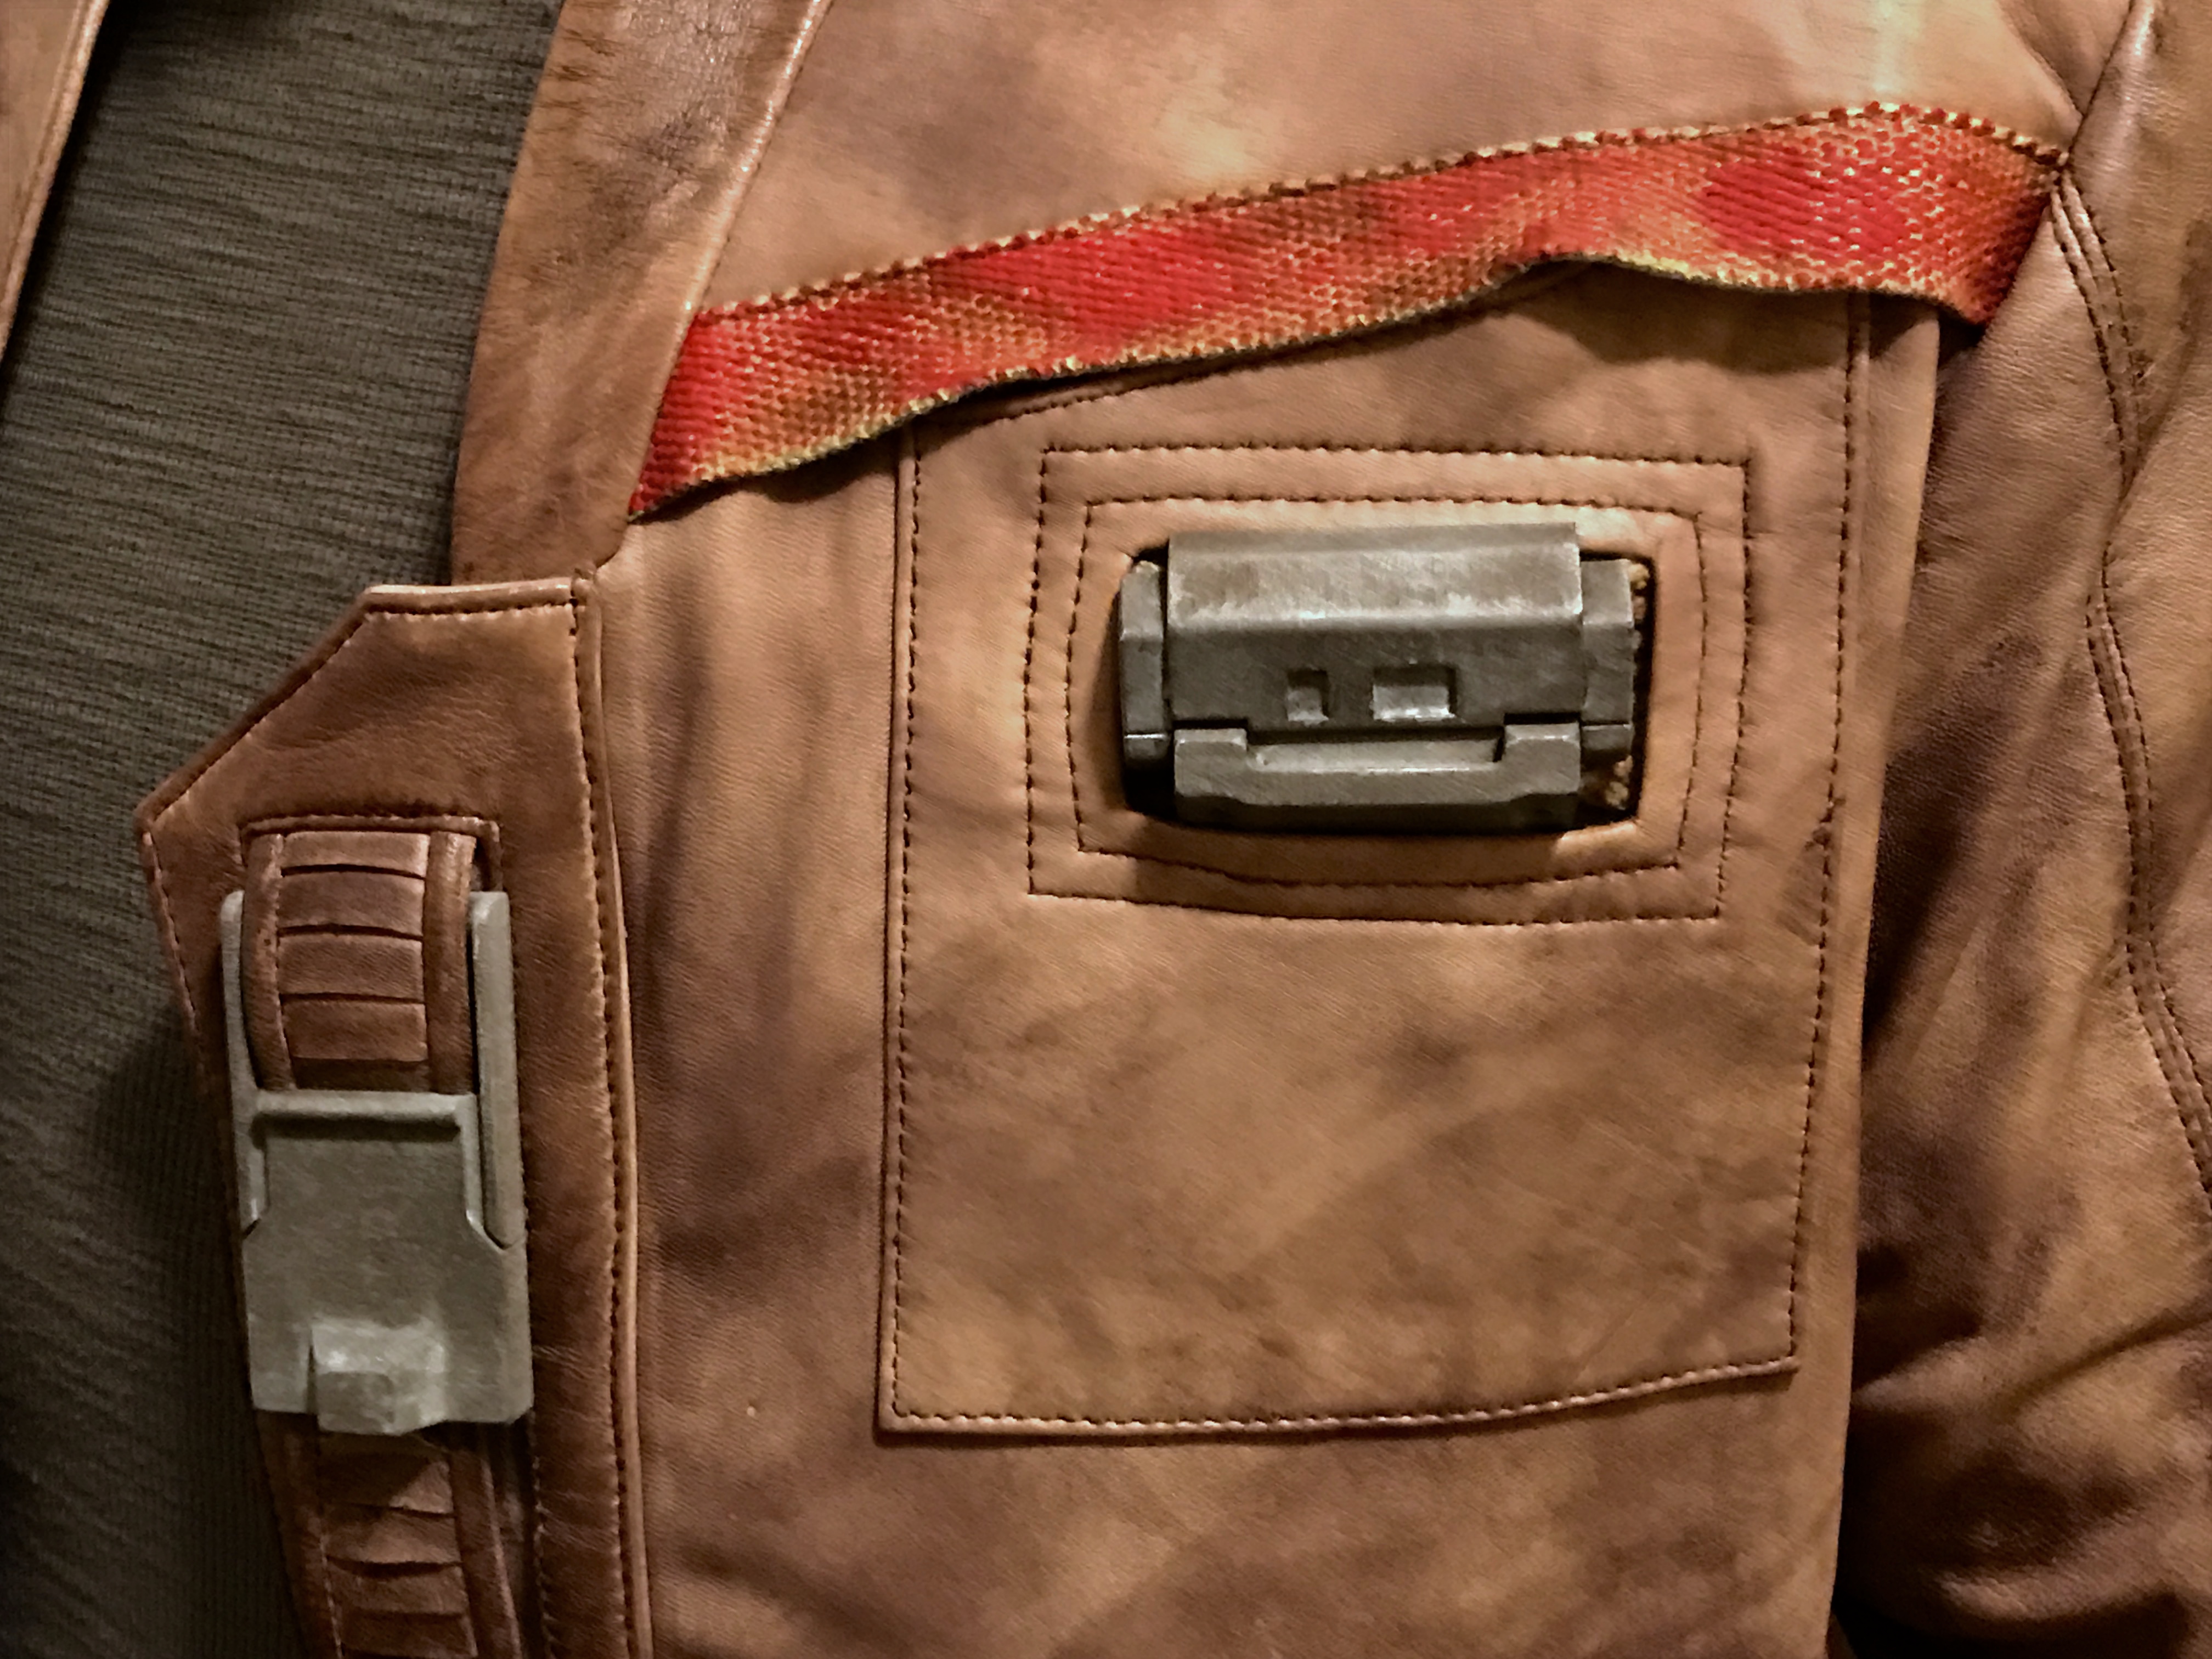
Got my Zlurpo jacket. I LOVE IT!

I'm glad I opted for the weathering service... nicely done.

I'm about to leave with the family to see Rogue One and I am wearing it.


Here is a shot with the Risu greebles.

attachment.php


attachment.php
 
Last edited:
Re: My Builds: Hoth Blaster, Ahsoka Hilts, Rey Staff, Hilts, Medal, Necklace, Dice, e

You surely have a preference for the unusual props ;) well done, Frank

Thank you. I like a variation in my collection. I like this prop for various reason.


  1. Although it has little screen time, I think it is memorable and easily recognizable to the casual viewer.
  2. Having a daughter, it strikes an emotional cord.
  3. It is very different from other props in my collection.
  4. The kit is very affordable, well done, and fun to build.
 
Re: My Builds: Jyn's Doll, Ahsoka Hilts, Rey Staff, Hilts, Medal, Necklace, Dice, etc

I have been working on the Rogue One Rebel Helmet. I have the Vietnam Era M1 helmet and the Mr Mold Maker kit.


I am not happy with the way the shield sits on the helmet. I have adjusted the bands to run over the top and push in the sides in the hope that it will form the shield against the helmet. I am also considering using velcro to attach it at points to keep it secure and straight.

I need to figure out what color paint it.


Here is the cloth cover out of the box...

attachment.php


Here it is after it soaked in hot water and hit with the hair drier to form a custom fit...

attachment.php


Here is the shield anded and cleared up and in place for a test fit..

attachment.php
 

Attachments

  • IMG_0380.JPG
    IMG_0380.JPG
    2.2 MB · Views: 976
  • IMG_0377.JPG
    IMG_0377.JPG
    2.5 MB · Views: 993
  • IMG_0383.JPG
    IMG_0383.JPG
    2.2 MB · Views: 962
Last edited:
Re: My Builds: Jyn's Doll, Ahsoka Hilts, Rey Staff, Hilts, Medal, Necklace, Dice, etc

nice MJF, i like those rubber bands! :thumbsup
 
Looking good MJF,

I have not figured out what goes in the lower front hole looks like some kind of samll lense and its certainly darker behind them, cant tell if they weathered the fabric or put some kind on dark stocking material behind it.

Bands looking good. The box could be rotated 90deg I dont think I have noticed one thats horizontal.

I remember MMMaker saying gently heating the resin will make is a little softer so you can slightly adjust the form. I'm pretty sure that's still the case. maybe some hot water? I will try find the post. there are gaps between the fabric and armor on the reference material.
 
Last edited:
This is the closet I have got to the correct colour, its similar to Swamp.
262f2f.png

Its a photoshop colour that I pulled from some of the reference material and have adjusted to make it closer to what I was told about the ture colour ( check out MMMakers test colour thats pretty close too. Of course every one describes colour different so there maybe some small discrepancy. Im going to search for paint match or I can go down to the local body shop and have it made up.
 
Looking good MJF,

I have not figured out what goes in the lower front hole looks like some kind of samll lense and its certainly darker behind them, cant tell if they weathered the fabric or put some kind on dark stocking material behind it.

Bands looking good. The box could be rotated 90deg I dont think I have noticed one thats horizontal.

I remember MMMaker saying gently heating the resin will make is a little softer so you can slightly adjust the form. I'm pretty sure that's still the case. maybe some hot water? I will try find the post. there are gaps between the fabric and armor on the reference material.

The box was just thrown on to see how it held in place with the band.

I think I'm okay with the fit now that I have a plan. I notice that when the back of the shield is held in place to the rear of the helmet, the shield is positioned perfectly. Therefore I plan to use velcro in the rear to hold the shield in position. I may also try to add some foam to the front (and maybe the sides) to help the fit.

The color looks great.

I have some clear rounded rubber bumpkins that look like small camera lenses. If I can find at the right size ring to go around it, will mount it on some flat black scrap plastic and put in the hole.
 
Oww thats a good idea about the rubber bumpkins. I think that's a good idea I made it with 6mm thickness so thickening up the cast should work like you say.
 
Put a base layer of silver on the shield. Next is the green coat.

I also hot glued the ends of the ribbed section down to the cover so it would not flip upend to help stabilize the shield.

I also drilled a hole through the side cylinder. Still needs to be wider if I hope to get a small pen light in there.
 

Attachments

  • IMG_0398.JPG
    IMG_0398.JPG
    2.7 MB · Views: 184
Here is where I am at the end of the day...

IMG_0399.JPG

Tomorrow I will do some weathering. I want to dirty uo the cover as well.

I might work on a the yellow symbol tonight. If i can come up with some sort of stencil, I may add it first thing tomorrow.
 
Here is what I did today.

attachment.php


attachment.php


I weathered the shield. I did some sanding to dull down the finish expose the silver base coat. i then did a few various acrylic color washes to the shield and box.

I addd black foam backing to the holes of the shield.

The lens in the helmet hole is simply a 12mm jump ring with black acrylic paint in the center. It is a placeholder until I find something better.

I applied a muddy brown acrylic wash to the fabric cover but it didn't show up much.

I still need:

  • To work on the side cylinder. I have no idea what the prop is supposed to be, I'm thinking a light so I have a small penlight on the way that I am hoping to add.
  • Waiting on a couple of metal toothpick holders to stick in the band.
  • Waiting on a 3D printed clip on camera-looking-device that goes on the strap,
 

Attachments

  • IMG_0404.JPG
    IMG_0404.JPG
    3.4 MB · Views: 827
  • IMG_0406.JPG
    IMG_0406.JPG
    3.6 MB · Views: 830
Thank you. The toothpick holders are probably a bit too long but pretty nice for a found item.


I'm still wait on a flashlight i want to try to install and a strap camera I am having 3D printed.
 
Last edited:
Not much of an update. But I think I am finally happy with the coloring of the shield. The Petrol color is a very nice base but I was not happy with the sheen. I did a lot of sanding and many various color coats of acrylic wash but I think i am satisfied.

Even though I am not done with the side cylinder, I wanted to see what it looked like with the helmet.

I also decided to move the rubber bands mid way, up the helmet. I wanted them in a position so it would not cover the lens i the lower hole of the shield. For some reason, if the bands are to low, it makes the proportions of the shell look off. At least IMHO.

IMG_0418.JPGIMG_0419.JPG
 

Your message may be considered spam for the following reasons:

If you wish to reply despite these issues, check the box below before replying.
Be aware that malicious compliance may result in more severe penalties.
Back
Top