You are using an out of date browser. It may not display this or other websites correctly.
You should upgrade or use an alternative browser.
You should upgrade or use an alternative browser.
My 11th Doctor's Sonic Screwdriver remote (Sort of) rebuild... FINISHED......
- Thread starter NakedMoleRat
- Start date
-
- Tags
- doctor who
NakedMoleRat
Master Member
Re: My 11th Doctor's Sonic Screwdriver remote (Sort of) rebuild (More like prop repli
Thanks, since we know that the 11th Doctor has been in his incarnation for about 300 years, I want this sonic to look like it has spent that time with him. I am going for a slightly worn, slightly tarnished look.
Thanks, since we know that the 11th Doctor has been in his incarnation for about 300 years, I want this sonic to look like it has spent that time with him. I am going for a slightly worn, slightly tarnished look.
Re: My 11th Doctor's Sonic Screwdriver remote (Sort of) rebuild (More like prop repli
WOW! That looks fantastic! If someone steals that from you...it was me. Just letting you know. It's really shaping up nicely...and making me want to put more money into my "sonic fund."
I'm curious though, what did you do to strip The Wand Company Copper end cap? Because the color match between the parts looks really good. Also, have you done anything to secure the rear button in place yet?
Keep up the awesome work. I've finally remembered I can subscribe to threads and have added this to my list of subscriptions because I need to see how this turns out.
-Nick
NakedMoleRat
Master Member
Re: My 11th Doctor's Sonic Screwdriver remote (Sort of) rebuild (More like prop repli
Very kind Nick.
I used a 50/50 mix of water and degreaser that I picked up at Home Depot for about $2.00. I had to soak it for two days, but hey, regular paint stripper was $15.00 a quart and all I needed was two ounces, so the wait was worth it. I then scrubbed it away with a green scrubber, which scuffed the paint up enough for plating. Then I soaked it in a 50/50 mix of water and muriatic acid for a minute, rinse and plate. The slider took about 3 hours to get a nice even, thick coat on it.
The 'button' on the end piece is simply held in with hot glue.
I have the 3D printed lens emitter that is on Dan's Shapeways site in rubber. I'll pull it tomorrow and see if I can cast it. I have an idea about how to make the swirl effect....we'll see.
Then I have to make, mold and cast the center shaft.....which is telescopic.......
Oh well, if it didn't have challenges, the end result would not be so sweet!
WOW! That looks fantastic! If someone steals that from you...it was me. Just letting you know. It's really shaping up nicely...and making me want to put more money into my "sonic fund."
I'm curious though, what did you do to strip The Wand Company Copper end cap? Because the color match between the parts looks really good. Also, have you done anything to secure the rear button in place yet?
Keep up the awesome work. I've finally remembered I can subscribe to threads and have added this to my list of subscriptions because I need to see how this turns out.
-Nick
Very kind Nick.
I used a 50/50 mix of water and degreaser that I picked up at Home Depot for about $2.00. I had to soak it for two days, but hey, regular paint stripper was $15.00 a quart and all I needed was two ounces, so the wait was worth it. I then scrubbed it away with a green scrubber, which scuffed the paint up enough for plating. Then I soaked it in a 50/50 mix of water and muriatic acid for a minute, rinse and plate. The slider took about 3 hours to get a nice even, thick coat on it.
The 'button' on the end piece is simply held in with hot glue.
I have the 3D printed lens emitter that is on Dan's Shapeways site in rubber. I'll pull it tomorrow and see if I can cast it. I have an idea about how to make the swirl effect....we'll see.
Then I have to make, mold and cast the center shaft.....which is telescopic.......
Oh well, if it didn't have challenges, the end result would not be so sweet!
Propsjonnyb
Well-Known Member
Re: My 11th Doctor's Sonic Screwdriver remote (Sort of) rebuild (More like prop repli
NMR , if you've seen Nick build photos , you'll know the centre shaft is a brass tube over which the inner resin core fits , as I was making a working glowing core, I couldn't go that way, so I lined my cage with an acrylic tube which centred and 'held' my inner core and head steady , the core telescoping up and down, inside. The claw holder fits atop holding the ( spring loaded) claws and emitter cap. A safety stop inside the handle stops the free-moving core, shooting out when its 'flicked' , the Wand's own locking pins (on the legs - slightly cut and filed down) allow the core to 'jump' the first and stop at the second position ( locked open) , building it this way allows the Wand sonic to lock the claws closed with gentle pressure and 'flick' open with a deft flick of the wrist .
NMR , if you've seen Nick build photos , you'll know the centre shaft is a brass tube over which the inner resin core fits , as I was making a working glowing core, I couldn't go that way, so I lined my cage with an acrylic tube which centred and 'held' my inner core and head steady , the core telescoping up and down, inside. The claw holder fits atop holding the ( spring loaded) claws and emitter cap. A safety stop inside the handle stops the free-moving core, shooting out when its 'flicked' , the Wand's own locking pins (on the legs - slightly cut and filed down) allow the core to 'jump' the first and stop at the second position ( locked open) , building it this way allows the Wand sonic to lock the claws closed with gentle pressure and 'flick' open with a deft flick of the wrist .
NakedMoleRat
Master Member
Re: My 11th Doctor's Sonic Screwdriver remote (Sort of) rebuild (More like prop repli
Thanks Johhny.
I can't find a tube anywhere from any plastic company in Phoenix that even comes close. Hence trying to cast my own.
On that note, I HATE two part rubber! I have NEVER gotten it to cure properly. So I follow the directions EXACTLY! For my emitter bulb, 2 oz of rubber and one full measured scoop of hardener, mix well and in 2 to 4 hours it's a mold! Except, I pour it before bed last night, get up today and it is still tacky! I will see what it looks like after work. Is there any way to make it harden? Microwave it, boil it? Anything?
It was $20.00 for a tiny kit and I really hate the thought of wasting any of it. Then again, if I measure it and it STILL doesn't work anyway.....
Re: My 11th Doctor's Sonic Screwdriver remote (Sort of) rebuild (More like prop repli
Plating looks good. The weathered look really works for an old timer's sonic. Great job
Plating looks good. The weathered look really works for an old timer's sonic. Great job
NakedMoleRat
Master Member
Re: My 11th Doctor's Sonic Screwdriver remote (Sort of) rebuild (More like prop repli
Thank's, Dan, I very much appreciate your on-going support in this project. I would not be doing this without you!
The copper plating looks a little darker in the pictures than it actually is. It was taken with overhead lighting and no flash. I may try to flash it and see how it looks.
I still hate rubber molding compound!
NakedMoleRat
Master Member
Re: My 11th Doctor's Sonic Screwdriver remote (Sort of) rebuild (More like prop repli
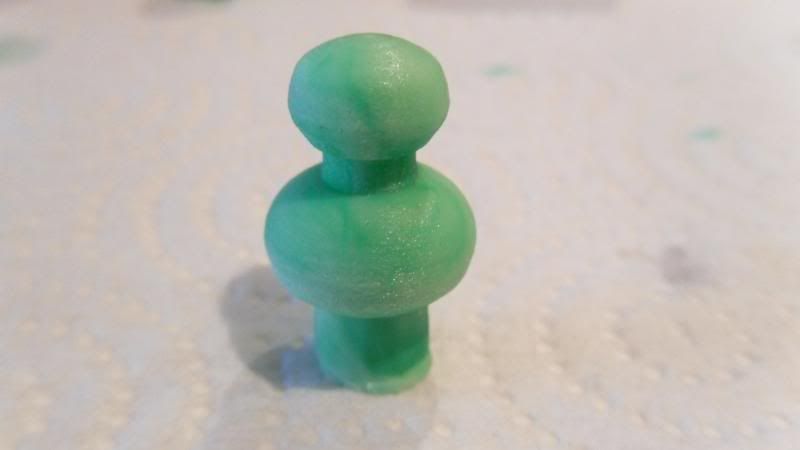
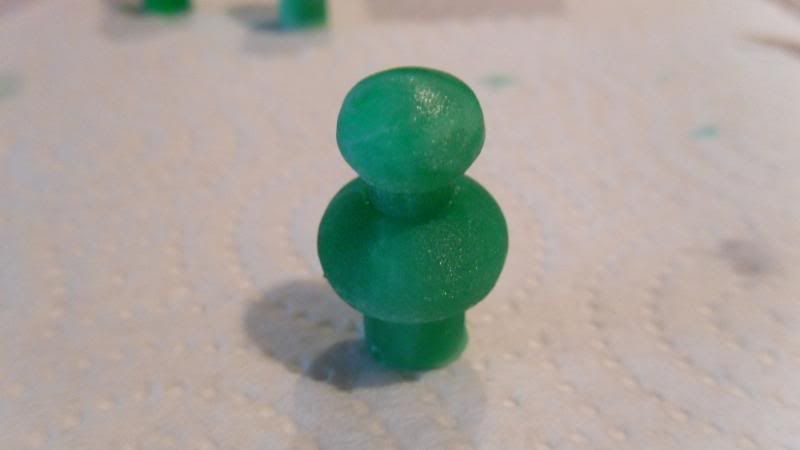
Well, the mold was still tacky, but it had hardened enough to release the emitter bulb and allow me to cast another. The resin takes 24 hours to set (Hadn't checked that before I bought it) so I won't know until tonight if the cast worked.
Two questions I am dying to have answered. 1. Did the resin make it past the thin 'neck' and make it fully into the end part? 2. Did my 'swril' effect work?
What I did was use transparent dye to color the resin green. After thouroughly mixing it, I dropped in one more drop of green and gave it a quick swirl, without mixing it, then poured it into the mold. It may have a swril, I won't know until later tonight. I will likely stop off and get some transparent white tint to make a light green base first, then swirl the dark green in and see how that works.
NakedMoleRat
Master Member
Re: My 11th Doctor's Sonic Screwdriver remote (Sort of) rebuild (More like prop repli
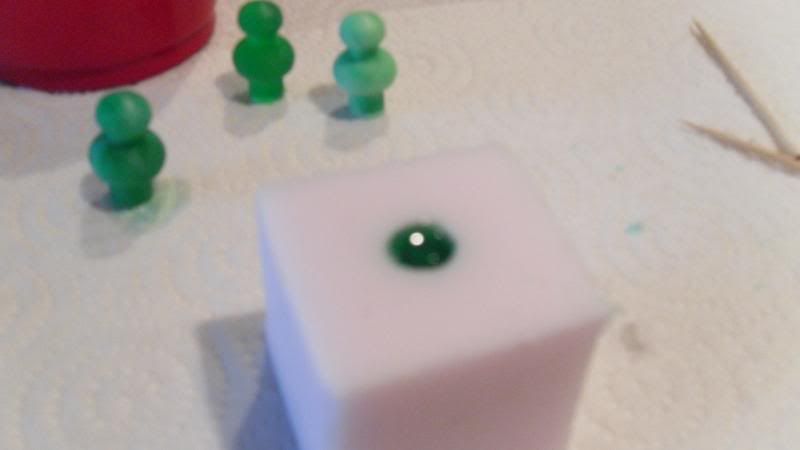
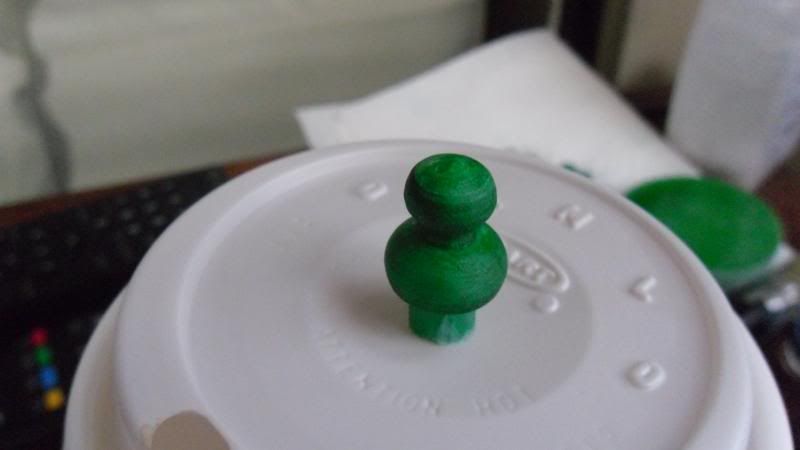
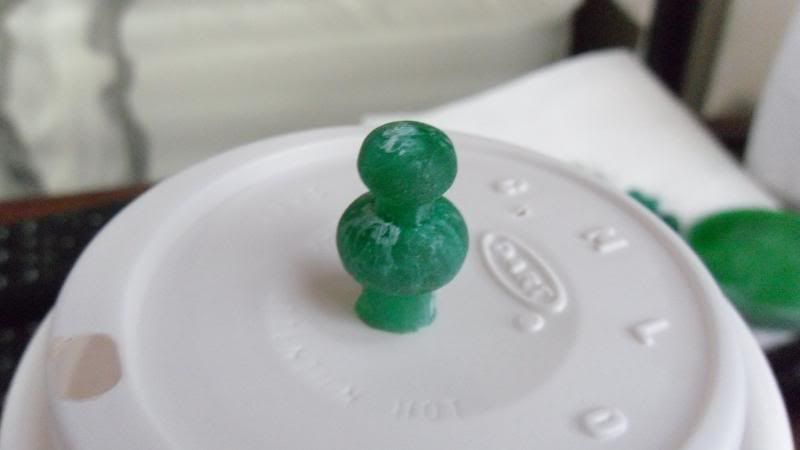
And for tonight.....
The emitter cast came out pretty dang nice!.....except not swirly marbled......So I got another one going. Used a drop of white opaque and a drop of green transparent and mixed, then after it was all pretty....another drop of green, quick swirl and pour. We'll see in hours how that one looks. They didn't have any white transparent, but the instructions said to make it so, use less dye. Then again, only mixing 2 teaspoons of resin, one drop might be too much. Oh well, tomorrow will tell if it worked, and if light will shine through.
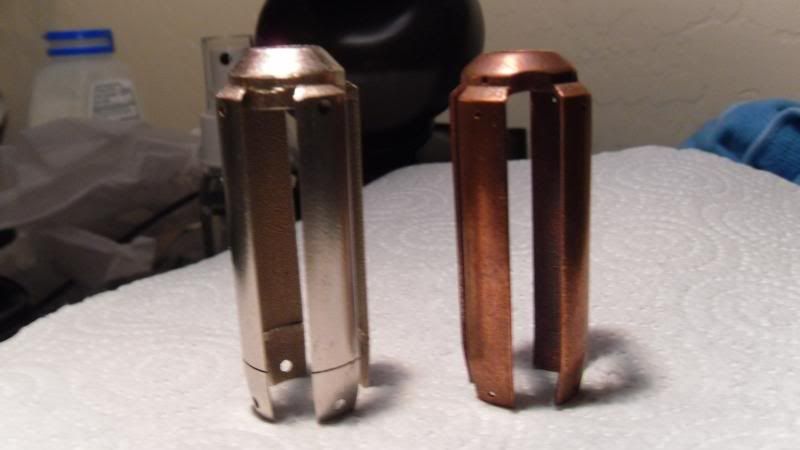
On to other news. My replacement copper slider from Shapeways came in today. I complained that the scribe lines in the ribs did not print and the holes were too small. Well, when the new one showed up.....I saw a LOT more flaws that I did not realize.....Sheesh! It looks like a completely different model!

And after two hours of filing and sanding......and numb fingers and forearms! (Thank you Black $ Decker, without you I would be insane)
I've got some more fine-tune sanding to do, but the worst of it is over.....
We'll see how the emitter looks tomorrow....
Thanks for looking.
And for tonight.....
The emitter cast came out pretty dang nice!.....except not swirly marbled......So I got another one going. Used a drop of white opaque and a drop of green transparent and mixed, then after it was all pretty....another drop of green, quick swirl and pour. We'll see in hours how that one looks. They didn't have any white transparent, but the instructions said to make it so, use less dye. Then again, only mixing 2 teaspoons of resin, one drop might be too much. Oh well, tomorrow will tell if it worked, and if light will shine through.
On to other news. My replacement copper slider from Shapeways came in today. I complained that the scribe lines in the ribs did not print and the holes were too small. Well, when the new one showed up.....I saw a LOT more flaws that I did not realize.....Sheesh! It looks like a completely different model!
And after two hours of filing and sanding......and numb fingers and forearms! (Thank you Black $ Decker, without you I would be insane)
I've got some more fine-tune sanding to do, but the worst of it is over.....
We'll see how the emitter looks tomorrow....
Thanks for looking.
Re: My 11th Doctor's Sonic Screwdriver remote (Sort of) rebuild (More like prop repli
Wow. That looks completely different. What did they do to my poor model on that first go round?
Wow. That looks completely different. What did they do to my poor model on that first go round?
NakedMoleRat
Master Member
Re: My 11th Doctor's Sonic Screwdriver remote (Sort of) rebuild (More like prop repli
Completely buggered it up!
Wow. That looks completely different. What did they do to my poor model on that first go round?
Completely buggered it up!
Re: My 11th Doctor's Sonic Screwdriver remote (Sort of) rebuild (More like prop repli
That looks like two different models...And for tonight.....
The emitter cast came out pretty dang nice!.....except not swirly marbled......So I got another one going. Used a drop of white opaque and a drop of green transparent and mixed, then after it was all pretty....another drop of green, quick swirl and pour. We'll see in hours how that one looks. They didn't have any white transparent, but the instructions said to make it so, use less dye. Then again, only mixing 2 teaspoons of resin, one drop might be too much. Oh well, tomorrow will tell if it worked, and if light will shine through.
http://i26.photobucket.com/albums/c143/LastWho/SAM_1296_zps970acd6f.jpg
http://i26.photobucket.com/albums/c143/LastWho/SAM_1297_zps67d09c09.jpg
On to other news. My replacement copper slider from Shapeways came in today. I complained that the scribe lines in the ribs did not print and the holes were too small. Well, when the new one showed up.....I saw a LOT more flaws that I did not realize.....Sheesh! It looks like a completely different model!
http://i26.photobucket.com/albums/c143/LastWho/SAM_1298_zpsdd469d78.jpg
http://i26.photobucket.com/albums/c143/LastWho/SAM_1299_zps36381de8.jpg
And after two hours of filing and sanding......and numb fingers and forearms! (Thank you Black $ Decker, without you I would be insane)
http://i26.photobucket.com/albums/c143/LastWho/SAM_1301_zps9fb2b016.jpg
http://i26.photobucket.com/albums/c143/LastWho/SAM_1300_zps6eb4bea1.jpg
I've got some more fine-tune sanding to do, but the worst of it is over.....
We'll see how the emitter looks tomorrow....
Thanks for looking.
Re: My 11th Doctor's Sonic Screwdriver remote (Sort of) rebuild (More like prop repli
Seriously, if I didn't know any better I would have guessed that those were two completely separate models and you just upgraded to a higher-res one.
Seeing it as it's supposed to look is really night and day.
As for the emitter, how long are you waiting before you add your dye, because if you're having trouble getting it to swirl, you might want to let it kick then wait longer before adding your swirl. Just a thought, but it'll still probably take some experimentation to get right.
Keep going! This is awesome.
-Nick
That looks like two different models...
Seriously, if I didn't know any better I would have guessed that those were two completely separate models and you just upgraded to a higher-res one.
Seeing it as it's supposed to look is really night and day.
As for the emitter, how long are you waiting before you add your dye, because if you're having trouble getting it to swirl, you might want to let it kick then wait longer before adding your swirl. Just a thought, but it'll still probably take some experimentation to get right.
Keep going! This is awesome.
-Nick
NakedMoleRat
Master Member
Re: My 11th Doctor's Sonic Screwdriver remote (Sort of) rebuild (More like prop repli
I had not thought of that! It takes 24 hours to cure, so I would not have to be in a hurry to add the dye. Great suddestion. Thanks.
I had not thought of that! It takes 24 hours to cure, so I would not have to be in a hurry to add the dye. Great suddestion. Thanks.
NakedMoleRat
Master Member
Re: My 11th Doctor's Sonic Screwdriver remote (Sort of) rebuild (More like prop repli
Well, the bulb was sligthly swirly, but too opaque. It would only show light in the direct area where the LED is. So a third one is in curing.
On ANOTHER note.....
So I had to come in to work tonight on 3rd shift and have a meeting with my staff. I still need to do some adjustment filing to my new copper slider part and so I figure I'll bring it in to work on it tonight. I decide that I need to bring the collar too to make sure it all lines up right. So I have the collar in one of the Shapeways ziplock bags and the new slider in another sitting on my dash board. As I turn a corner the collar slides off and hits the floor. No big....except I can't find the stinking thing ANYWHERE in the car! It HAS to be there, but I tore the entire car apart and cannot find it!
So I just ordered another one! Estimated delivery date is now the 29th. Sad thing is, I NEED that collar to make the center shaft! I need it for the diameter of the center piece, without it, I can't get the right fit. So, I am on hold now for a few weeks. I may be able to figure out the claws in the mean time.
I MAY get this thing done before the year is up! :facepalm
Propsjonnyb
Well-Known Member
Re: My 11th Doctor's Sonic Screwdriver remote (Sort of) rebuild (More like prop repli
Hi NMR, a method I've used before to colour resin is to cast it clear and dip it afterwards in glass acryllic paint , to get a marbled effect take a jar big enough to dip your piece in fill it with water and then drop a few drops of acryllic glass colour paint eg green & white on the surface , swirl it with a cocktail stick and the quickly dip and remove your piece , a marbled swirly look should now coat your piece. Sorry to hear you lost a piece in your car , I did the same with a full sonic , I found mine lodged in the runner channels the car seats are mounted on , just the right size fit!!
Hope you find it soon
Sent from my iPad using Tapatalk HD
NakedMoleRat
Master Member
Re: My 11th Doctor's Sonic Screwdriver remote (Sort of) rebuild (More like prop repli
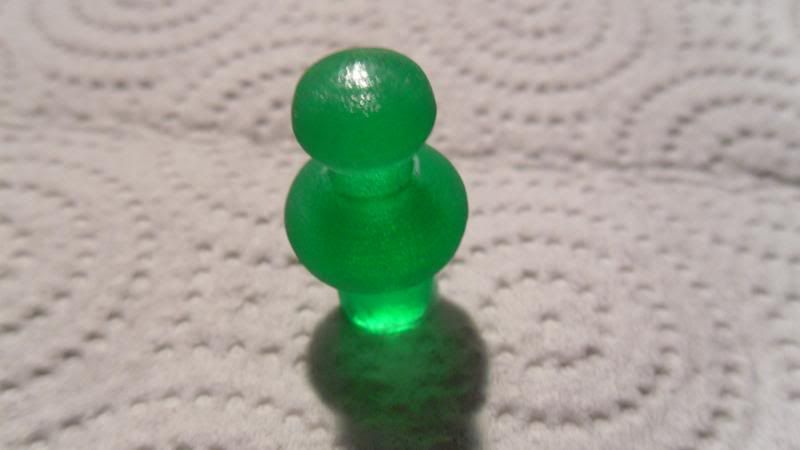
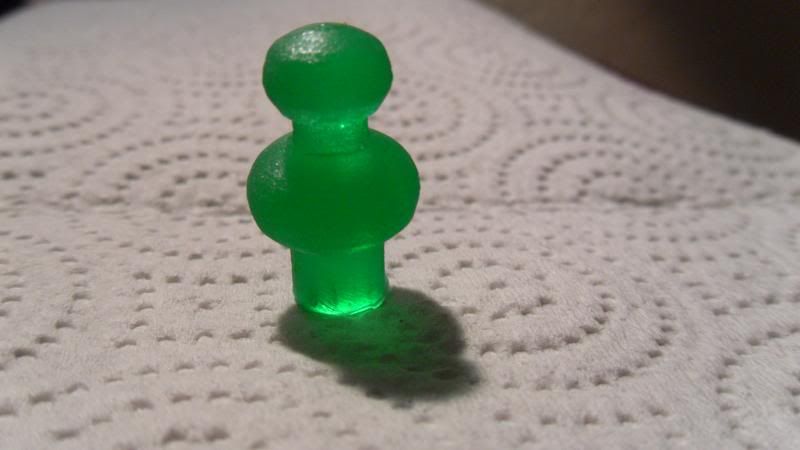
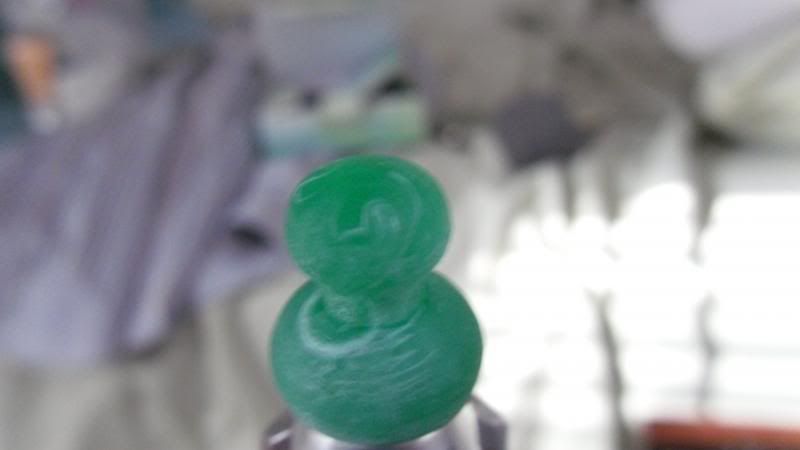
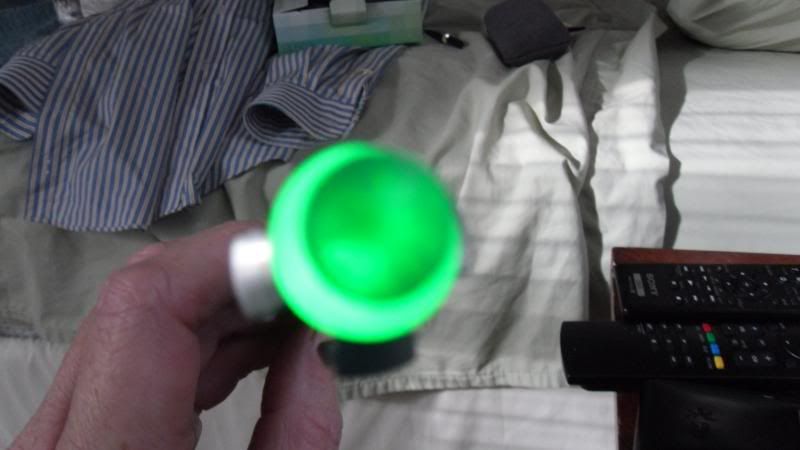
Update time;
Went through several castings for the emitter.
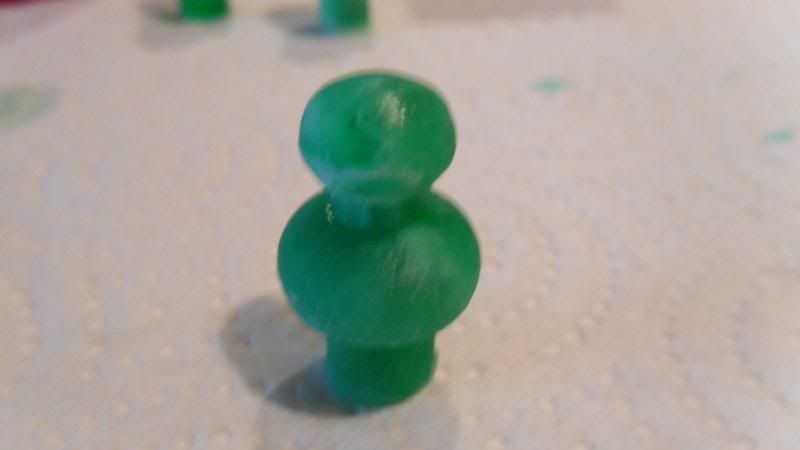

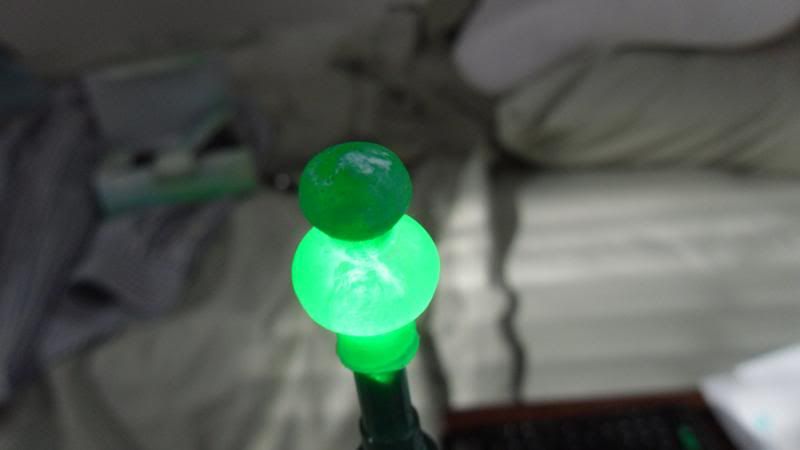
I wound up making 11 versions altogether, but finally settled on this one (#5), just the right amount of swirls, but lets all the light shine through. The second one is lit up, but the flash drowns out the light at the end a bit, as well as made the white look a bit brighter.
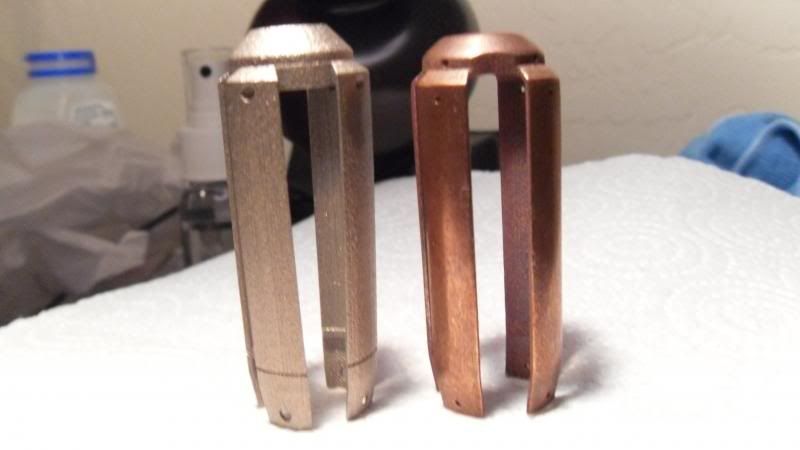
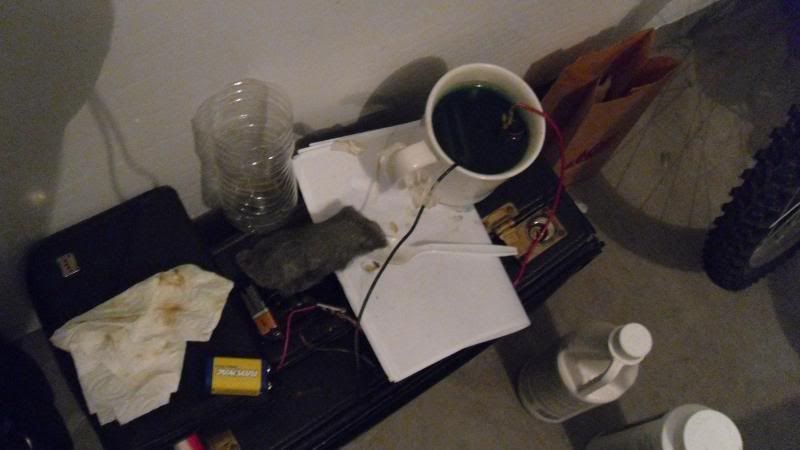
And I finally got the replacement collar in, sanded, plated and clear coated.

And if you are curious to see my high tech copper plating system......
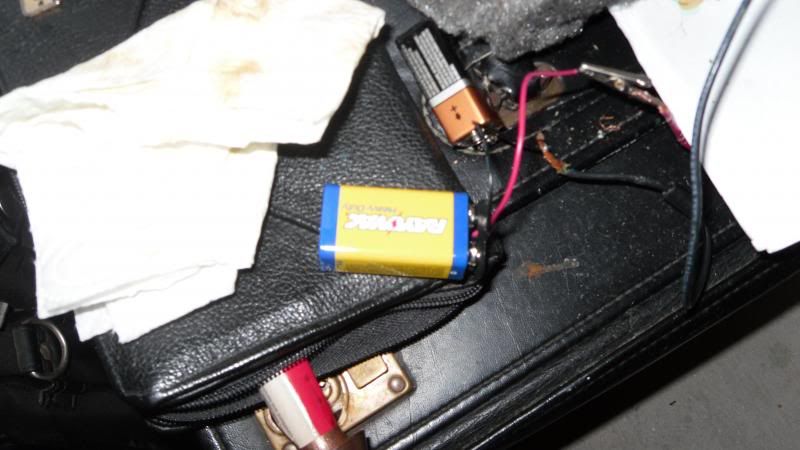
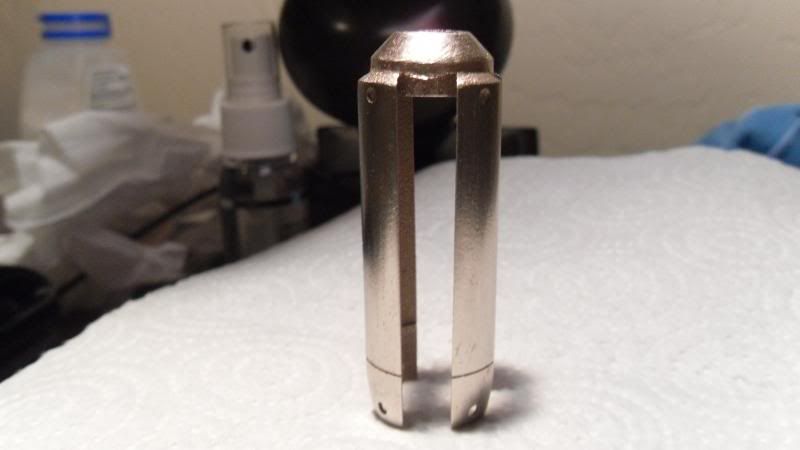
And the copper cage....almost ready. This is a second plating. After burnishing out, some steel showed through, had to re-do it.

That's it for now.....
Thanks for looking.
Update time;
Went through several castings for the emitter.
I wound up making 11 versions altogether, but finally settled on this one (#5), just the right amount of swirls, but lets all the light shine through. The second one is lit up, but the flash drowns out the light at the end a bit, as well as made the white look a bit brighter.
And I finally got the replacement collar in, sanded, plated and clear coated.
And if you are curious to see my high tech copper plating system......
And the copper cage....almost ready. This is a second plating. After burnishing out, some steel showed through, had to re-do it.
That's it for now.....
Thanks for looking.
Last edited:
NakedMoleRat
Master Member
Re: My 11th Doctor's Sonic Screwdriver remote (Sort of) rebuild (More like prop repli
One more quick, end of the day update.
I decided that I wanted shiny new copper, so back to polishing like mad.....these have not been clear coated yet.
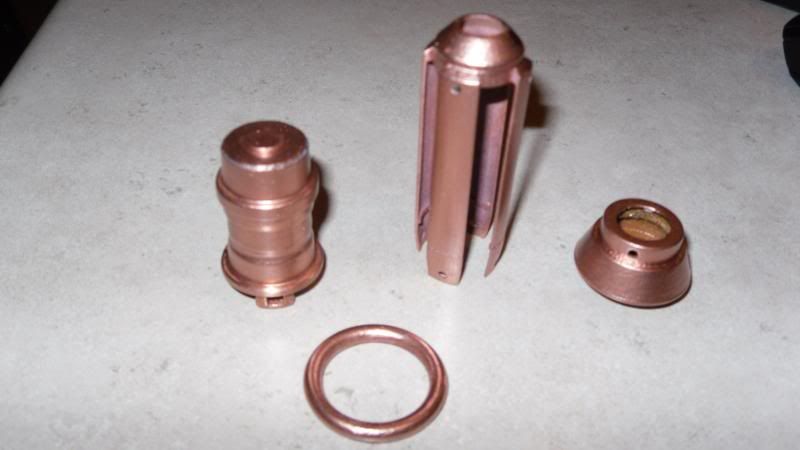
And a quick, held together, test fit.
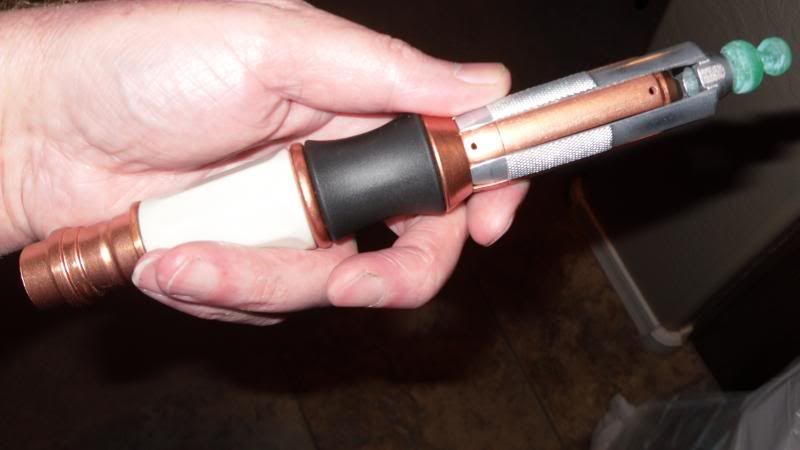
Thanks for looking.
One more quick, end of the day update.
I decided that I wanted shiny new copper, so back to polishing like mad.....these have not been clear coated yet.
And a quick, held together, test fit.
Thanks for looking.
Last edited:
Re: My 11th Doctor's Sonic Screwdriver remote (Sort of) rebuild (More like prop repli
Man! I always love seeing a new update in this thread! It just gets better and better.
That thing is looking gorgeous. What technique did you end up using to get your swirl on the emitter?
And the most important question: How's it feel in your hand?
-Nick
Man! I always love seeing a new update in this thread! It just gets better and better.
That thing is looking gorgeous. What technique did you end up using to get your swirl on the emitter?
And the most important question: How's it feel in your hand?
-Nick
Similar threads
- Replies
- 22
- Views
- 3,914
- Replies
- 4
- Views
- 1,158
- Replies
- 2
- Views
- 748